Monday, February 15, 2010

Best Laptop Review: - Acer Timeline Aspire 4810TZ

Acer Timeline Aspire 4810TZ [Review]
A well priced notebook that performs well too
Good looks, slim, lightweight, comfortable keypad, HDMI, battery life, Windows 7 Home Premium, optical drive, price
Slightly underpowered
Check specifications


Write Review: -

1. Intro Bundle: -
We've already seen the 13-inch Acer Timeline and today we'll look at the 14-inch version. Apart from the larger screen the notebook features the same design with only a couple of changes to the layout and an addition of an optical drive. The Timeline Aspire 4810TZ that we are reviewing today continues to boast of an eight hour battery life. The Timeline also continues to stay with the motto of providing a portable computing solution. Acer has therefore not beefed up the processing power in this model. Let's see if the Timeline continues to stay as an ideal portable computing solution for the business user.


Bundle: -
--> Acer Timeline 4810TZ
--> Charging Cable & Adapter
--> Driver CD
--> Warranty Card
--> Bag

The notebook comes with Windows 7 Home Premium installed.

2. Build & Design: -

The Acer Timeline cannot make a style statement but nonetheless has an executive look to it. The Timeline utilizes aluminium for its lid and there is a brushed metal Acer logo placed in the center. The use of aluminium reduces the overall weight and adds to the overall looks by subtracting the possibility of fingerprints.


Even though this is a 14-inch version of the Timeline, it is still under an inch thick.Coming to the layout of the laptop, on the left is a USB port placed close to the hinge. There are the air vents for the processor followed closely by the VGA and the HDMI port. The second USB port is placed alongside the audio ports for easy access. One jack is a Line-In/MIC port, while the other is a Line-out/SPDIF/headphone jack.


To the right of the laptop there is the Kensington Lock at the far end followed by the LAN/RJ45 port, and a USB port. The welcome addition is the DVD-RW optical drive on this side.


The memory card slot, which is placed on the side in the 13-incher, is now found right in the front. There is a long LED that is placed right in the center falling just below where the touchpad button is. The LED denotes battery status (amber for charging, blue for fully charged).


The lid of the Acer Timeline Aspire 4810TZ can be opened up to 120 degree. The screen is 14.1-inch with over 720P resolution (1366 x 768 pixels). Above the screen in the center is a web camera for video conferencing. There's also a MIC placed to the left. The screen is well protected with rubber padding all around it.


Coming down to the keypad area we have the same good-looking keypad design. Above the keypad to the left is a power button that has a sleek and neat metal finish with an LED. The LED states if the laptop is powered ON or is in standby with a white and amber glow respectively.


Besides the Power button in the same line are speakers and a set of touch sensitive buttons. The touch sensitive buttons above the keypad are for Wi-Fi, Smart Backup, and PowerSmart. There is also an HDD utilisation LED.Acer has found it ideal to place the optical drive eject button at an accessible location and hence it's found at the front alongside the HDD LED.


Coming back to the keypad, it features a nice glossy finish with similar design as seen on the Acer Aspire 4736Z and the 5738Z. This provides for a smooth flow of your fingers over the keys and a very comfortable typing experience. The keys have a nice feedback to every punch, much softer to the iteration seen on the Aspire models. This makes for longer hours of comfortable computing.
Below the keypad is the touchpad placed in the center and with sufficient wrist space on either side. The touchpad is provided with a lock button for comfortable typing. So you can turn off the touchpad if it is a hindrance. The touchpad features a step design for the buttons. They are placed a step lower than the touchpad surface for easy perception and tapping left or right without looking.
Overall, I liked the design of the Timeline; there is nothing exquisite about it, but it's still good-looking and practical

3. Performance: -
SiSoftware Sandra 2009


4. 3DMark 06: -
5. PCMark Vantage: -
6. Performance Analysis: -
The Acer Timeline 4810TZ is powered by an Intel Pentium Processor (U4100 - 1.3GHz 800MHz). This processor is a low power consuming processor but doesn't really sacrifice on the performance. It has 3MB of L2 cache and runs at 800MHz; good enough to keep things smooth on the spec sheet. The processing is supported by 2GB of DDR3 RAM running at 1066MHz.
So now going through the benchmark results and given the build and design of the Acer Timeline, I'd like to pit it against the Samsung X360 and the previous Timeline - the 3810T.
If you take a look at the SiSoftware Benchmarks, you'll notice that there is a multi-core benchmark result that was not there in the 3810T review. So this Timeline - the 4810TZ - is therefore a much better performer. Its performance is more or less similar to the Samsung X360, just that there is a slight increase in overall performance of the Samsung X360, but that's because of the SSD drive instead of HDD.
This Timeline is overall a good performer and will crunch all office document work with ease and also playback HD content without much trouble. Given the work quotient this isn't the ideal solution for Creative or Animation, so all other basic work can be easily handled. This Acer Timeline is much more powerful when compared to its sibling.
7. Battery: -
LifeThe Acer Timeline is equipped with a 6-cell Li-ion battery and has a specified battery life of eight hours. The claim of eight hours is similar to that of the Samsung X360. We put the Acer Timeline's battery through its paces and got a really good result of over four hours in our BurnIn Test. However, this is a half an hour lesser than the Samsung X360. This means the Timeline can last much longer, as the Battery Profile was set to Power Saver but had Wi-Fi turned ON. With the PowerSmart mode of the Acer Timeline turned ON it could easily provide 5-6 hours of usage. Once again Acer has showcased how power efficient laptops can be.

*******


Entry-level PC for about 20K

We help you choose components to put together a basic PC 1. CPU: - If you are one of those who have been saving to buy a PC this festive season, here is a guide that would help you put together an entry-level PC.In today's times this is basic computer that will allow you to easily perform all your daily tasks without any problem, which may include some Office applications, internet, multimedia (music & movies) and some casual gaming.
We set off with a budget of Rs.20,000 in mind, which is a fairly acceptable price for your first PC or someone looking for a basic setup, but not bare bone either like a netbook. These are all Mumbai prices, so if you're in Delhi or Chennai then you may get these components for a little less since these things are always a little pricier in Mumbai. So without wasting any more time let's get on with it and build our entry-level PC.

CPU and Motherboard Combo (Rs. 5,500)


2. Motherboard: Whenever you buy a CPU and motherboard, it's better if you buy them as a set as many vendors offer you a small discount when you do so. The two choices were Intel E5200/G31 and Athlon IIX2/740G. We chose AMD for our entry-level system because you get a higher clock speed for the same price as an Intel E5xxx series chip. Yes, you can overclock the E5200 more easily but we are not targeting that audience here and more importantly we are looking for a solid performing combo, and even a blonde would agree that the 740G kicks the G31's butt.

This is micro-ATX board with plenty of features like 3+1 phase power design, solid state capacitors, 6 SATA II ports, Gigabit LAN, DVI and VGA, and the list goes on. It also has a PCI-E x16 slot in case you want more graphics power later.


3. Memory (2GB RAM): -

Next step is buying the memory, prices of which have shot up lately for some reason. After a little digging around we found that the difference between a regular Kingston 1GB RAM and G.Skill was only 100 bucks, which is why we chose the G.Skill for its better performance. Note that this matters much for an entry-level PC, so it's up to you really if you want to save the 100 bucks. It's better to go for two 1GB sticks instead of a single 2G stick, as you get an added advantage of Dual Channel.

G.Skill F2-6400CL5S-1GB NY (2 sticks) - (Rs.2200)


4. Hard Drive: -


Hitachi 500GB - (Rs. 2,450)


For the HDD we wanted to go for the Seagate 500GB, which sells for 2.4K. However, the new version (7200.12) has some problems like developing bad sectors or simply dying. The price of WD is still a bit high at 2.7K (for our build at least), so we went with Hitachi, which isn't talked about much, but performs well and doesn't have any major issue that Seagate is currently facing with their 500GB.

4. Cabinet with SMPS: -


Circle 512 with 400W Power Supply - (Rs. 1,300)


Circle is a tried and tested brand that provides good quality cabinets for a very reasonable pricing. Another main point is that the cabinets are pleasing to the eye with a modern design and plenty of ventilation holes, as well as provision for a fan in the front and back. The one we've chosen is one from their lower end models that fits our budget.


5. Optical Drive: -


LG, Sony DVD Writer (Rs. 1,125)


Here you can go for any brand that is easily available to you. All of them are around the same price of 1.2K.


6. Monitor: -


AOC 831S+ : 18.5" LCD Monitor (Rs.6200)


The monitor of choice here would be the AOC 831S+, which has some good specifications like 1366x768 resolution screen, 300 cd/m2 of brightness, 10000:1 Dynamic contrast ratio, 5ms response time, VGA and a piano black finish.
If you want something cheaper, then there's the Acer AL1716W, which is a 17 incher that retails for 5.9K. I would still suggest you go for the bigger screen though.


7. Keyboard & Mouse: -


Logitech Desktop/ Microsoft Desktop 500 (Rs. 650)


This is the most basic keyboard and mouse combo that is comfortable to use and relatively cheap


8. Speakers: -


Altec Lancing BXR1221 (2.1 System) - Rs. 1,050


We've reviewed a 2.0 speaker system known as the BXR1220. (Read the review here) This is desktop variant that comes with a 4-inch subwoofer that should provide some decent bass in music and movies. Another alternative to this is the Logitech R20 (also a 2.1 system) that retails for just Rs. 850.

9. Final Build


What this will let you do?

--> Watch Full HD movies
--> Play music
--> Office and other productive work
--> Surf the Internet
--> Light/Casual gaming


Thanks to the strong onboard GPU that's derived from the 780G, you can easily play games like The Sims 3, StreetFighter IV, or anything on the Unreal 3 engine albeit at low settings. In fact, even full HD movies are not a problem when you use Media Player Classic: Home Cinema, which uses the GPU to decode the movie. Below is our entire PC at a glance.


So there you have it, our entry-level PC is ready. You can mix and match some of the components if you wish, but this guide should give you a good idea where to start. Next up is our "Jack of all trades" PC that will do pretty much anything but without breaking the bank, so stay tuned.

How to disable gmail chat without disable gmail for a network

It is really nice to use chat and mail in the same browser window. But many times we need to disable the chat feature of gmail for their employees and many guys don't know how to perform it on a network. The following are the simple steps to disable gmail chat on a network.

1. Disable gmail chat from the complete network using DNS lookup table.
If our router or firewall has the feature of DNS lookuptable controlling we can disable the gamil chat feature by assigning the gmail chat DNS to loop back address.

That is assign chatenabled.mail.google.com to 127.0.0.1 and the gmail chat function will be disabled for the complete network.

Gmail chat DNS = chatenabled.mail.google.com

Loop back address = 127.0.0.1

2.Block gtalk in a Local Network with the use of third party tools: In market there are a lot of tools available to block chat features on the complete network. Here I am not going to promote any of that product but you can easily find it out by simply google it.

How to Split Large Files into Smaller Files ?

If you want to share a video or other file, that seems to be too large to upload, you can use a couple of programs to split the file into smaller parts that can be joined later.

Split Files Using Winzip :

One way is using a Zip utility program, such as WinZip. The following information applies to WinZip. If you are using a different program, refer to its help files if you are unsure how to proceed. To split a Zip file into smaller pieces:

1. Open or create the Zip file.

2. Choose Split from the Actions menu.

3. Specify the name to be used for the split Zip file. The name must be different from the name of the open Zip file.

4. Specify the size to be used for the individual parts. You can choose from common sizes using the Part size drop-down list or you can specify your own size. To specify your own size, choose "Other size" in the drop-down list and type the desired size in the Other size field. You can specify the size in bytes, kilobytes (KB), or megabytes (MB); indicate which you're using by clicking the appropriate radio button. For uploading to sendspace, make sure you make the split files less than 300MB each.
5. Click OK to create the split Zip file.

Split & Join Larger Files With 001 File Manager

File Splitting Made Easy

001 File Manager is a free splitter utility which is very good alternative to Hjsplit.With this file splitter,a large file can be divided into multiple parts so that it becomes easy to distribute.


We often need a file splitter to split a file into multiple parts, so that they can be copied on to multiple CDs or DVDs or USB sticks.This utility is more useful when it comes to uploading a file to Rapidshare,Megashare,Easy-Share...etc.


001 File Manager is a portable software which does not require any installation. So it can be used anywhere without installation.It can be run from a pendrive.


Learn Something New Today,


Step-by -Step Tutorial to make any Application Portable with Winrar & Universal Extractor. Surpise your friends by learning this


Key Features Of "001 File Manager"
1. Can merge/divide a single file into N number of parts
2. Takes very small memory to work
3. In-built check for update
4. Can do multiple task on single click
5. Supports both divide and merge simultaneously


Download

http://www.softpedia.com/progDownload/001-File-Manager-Download-149247.html

Thursday, February 11, 2010

Automatic Window Refresh

Whenever you make a change to your windows you have to press F5 or do a manual refresh.
With this tweak you can tell windows to increase the rate at which it does the refreshing.

Navigate to the key:

HKEY_LOCAL_MACHINE\SYSTEM\CurrentControlSet\Control\Update. Create a new
DWORD value, or modify the existing value, named UpdateMode and set it to equal "0" for
faster updates. Restart Windows for the change to take effect.

Clear Recent Commands From the Run Dialog in Windows XP

Clear Recent Commands From the Run Dialog in Windows XP
Run Box helps you to Open any application fastly instead using your mouse and browsing the application to open it.But after running many commands in Run dialog Box you will find a list of used commands.This may irritate us sometimes.

There are many cleaner applications(Ccleaner) that will do this for you, but I will now explain how to do it manually.

First let's start with easier then we can try using regisrty hack.

1.Clear Recent Run Dialog Entries The Easier Way:
  • Right-click on the taskbar and choose Properties, then choose Start Menu.
  • Select the "Classic Start menu" option.
  • Click Customize button.
  • Now just click the Clear button to remove all of the recent documents andapplications from the start menu.
  • Once you've done that, hit Cancel and then Cancel again to make sure you don't switch to the Classic Start menu.

Note:This method will clear out everything... so if you just want to remove a single entry you need to use the registry hack method.


2.Clear Recent Run Dialog Entries Through Regedit:

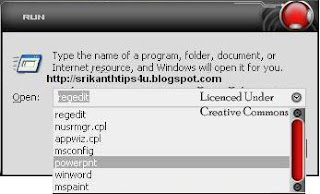
  • Click Start-->Run--> Type regedit -->Press Enter.
Note:If you have trouble in Opening Click here for Solution

HKEY_CURRENT_USER\Software\Microsoft\Windows\CurrentVersion\Explorer\RunMRU

  • You'll see all your recent commands on the right, and you can delete any of the keys that contain your commands.
  • Restart your Pc(You will find the Run commands will be Cleared).

Hide 'User Accounts' from users

Hide 'User Accounts' from users

1.Go to Start/Run, and type: GPEDIT.MSC
2.Open the path
User Config > Admin Templates > Control Panel
3.doubleclick "Hide specified Control Panel applets"
4.put a dot in 'enabled', then click 'Show"
5.click Add button,type "nusrmgt.cpl" into the add box

Easy Ways To Change Start Button Text In Windows XP


Easy Ways To Change Start Button Text In Windows XP
How to Change Start Button in Windows Xp?
One of the most annoying thing in windows XP is the start button text, which almost every user want to change as per my experience. I myself changed my start button text to different funny start button texts.

In order to change the start button text you will need to tweak your windows explorer which is responsible for displaying the text on your start button.

The most traditional way or commonly used way to change the start button text is by using the popular program called Resource Hacker but it is some what more complex and meant for advanced users.

In this post i am going to discuss 2 simple ways to Change the Start Button Text.Let’s see allthree ways through which you can change the start button text in Windows XP

The Complex Method ( For Advanced Users)

CHANGE START BUTTON TEXT WITH RESOURCE HACKER

We would suggest please make a system restore so that you can restore back to the previous windows state

1. Firstly download resource hacker from here
2. Run Resource Hacker, by double clicking ResHacker.exe and click File--> Open, Locate windows explorer in C:\WINDOWS ( explorer.exe )

3. Now navigate to String Table --> 37 --> 1033 and then change text written in between double quotes in front of 578 from Start to something like GPK and click the button Compile Script

Note: If you are using windows XP classic start menu then you should open String Table --> 38 to edit.
4. Click File --> Save as and set the file name as HackedExplorer.exe in the same directory C:\WINDOWS
5. Now, you need edit the registry. Open Start Menu --> Run, type regedit and press Enter
6. Navigate to the following path

HKEY_Local_Machine -> Software -> Microsoft -> Windows NT -> CurrentVersion –> Winlogon

In the right pane double click key named explorer.exe to HackedExplorer.exe

7. Exit Registry and restart your computer to see the new name in the start button of windows XP.

Above method is not simple as it involves tweaking your windows explorer and then editing the system registry which is can create some serious problems if the procedure is not followed properly.


Simple Method 1 ( For Normal User )

CHANGE START BUTTON TEXT WITH START BUTTON CAPTION RENAME


1. Download the utility from here, and double click StartB.exe to run it
2. Enter the name which you want to set in start button and click the button Change Start Button Name

You can revert the default text in start button by clicking the button Change Start Button to Default

Simple Method 2 ( For Normal User )

CHANGE START BUTTON TEXT WITH START BUTTON RENAME


1. Download Start Button Renamer from here, and install it
2. Run Start Button Renamer and Enter the name you want to set in Start button and click the button Click Here To Rename Start Button to change the name in start button instantly.

Note: Only the first five letter will be seen in the start button and it will be reset when you log off or restart.

Both of these above mentioned simple methods are much safer and easier way to change start button text in windows more faster.

Know Your Gmail Account Creation Date


Here is a simple trick to find out your Gmail account creation date.If you have deleted the first email sent by the Gmail team then there is another yet neglected method to find it If you have not changed your POP settings

Go to Settings --> Forwarding and POP/IMAP from your gmail account.
Now search for the line:
1. Status: POP is enabled for all mail that has arrived since YOUR DATE

You have your account creation date

Note:
This date is very important is security aspects! So don't share it with anyone

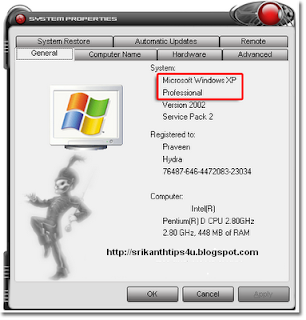
For a 32-bit version operating system:
Microsoft Windows XP Professional Version appears under System
For a 64-bit version operating system:
Microsoft Windows XP Professional x64 Edition Version appears under System.

Method 2
  • Click Start-->Run.
  • Type msinfo32.exe and hit press Enter.
Under "System Information", review the value for the System Type item:

For 32-bit editions of Windows XP, the value of the System Type item is x86-based PC.
For 64-bit editions of Windows XP, the value of the System Type item is x64-based PC.

How to Fix Limited or No Connectivity Error Message In Xp Sp2

How to Fix Limited or No Connectivity Error Message In Xp Sp2

After installing Windows XP Service Pack 2, you may receive the following error message in the System Tray.
"This connection has limited or no connectivity. You might not be able to access the Internet or some network resources. "

Solutions to the problem are varied, however most of the solutions found on the web just mask the problem by simply guiding the user through turning off this notification. Now this solution may work great for systems that are showing a false positive error, but what if the system genuinely has lost its local area connection or the connection is unstable, what then?

One possible answer involves a bug in Service Pack 2 of Windows XP dealing with a loss of network connectivity for workstations that use Microsoft’s L2TP-based virtual private networking (VPN) client to connect to servers that are connected to NAT-based networks. However, this bug seems to appear in situations that are not associated with VPNs either.

If patching Windows XP for this bug does not fix the problem, read through the list below of other causes and fixes. You may have to reinstall your firewall, rebuild the configuration in your router, drop your connection speed from 100Mbps to 10Mbps, or assign static IP addresses to your computers in the network to resolve this issue.

How do I know if my system is affected by this bug?

If you have installed Windows XP Service Pack 2 and are experiencing any of the following symptoms, this bug is affecting your system.

· After installing Windows XP SP2, your network connection reports a problem with "Limited or No Connectivity"

· You have trouble connecting to the Internet or your local area network after installing Windows XP Service Pack 2.

· Your network connection gets stuck "Acquiring IP Address"

What Steps Can I Take to Fix This Problem?

If you are receiving this error, you should run the Microsoft patch (KB884020) for it. Follow the instructions below to do this.

1) Download the patch from Microsoft's site
2) Run the update to install it
3) Run this short Registry fix to complete the update. Type the following lines in Notepad and save the file as "FixReg.reg" on your desktop, then double click on it to install into your registry.

Windows Registry Editor Version 5.00

[HKEY_LOCAL_MACHINE\SYSTEM\CurrentControlSet\Services\IPSec]
"AssumeUDPEncapsulationContextOnSendRule"=dword:00000002

4) Reboot your computer

If you experience the error message again, reboot your computer first. In most cases this will solve many connectivity issues that are not associated with this SP2 bug.

My Connection Works, Can I just disable the warning message?

If your local area connection is working properly and you simply want to disable the warning message follow these steps.

1.Open Control Panel
2. Open Network Connections and Right Click on the Local Area Connection and click on Properties
3.Uncheck the following option on the General Tab

"Notify me when this connection has limited or no connectivity"
4.
Click OK and close the Network Connections window.

What If Installing this Patch Doesn't Help?
Other Causes For This Problem

If you are still experiencing this error message even after running the patch shown above, you may be experiencing one of several problems shown below:

1.Your Network or DSL router may have bad or missing information. Powercycle your router and/or rebuild the configuration in your router.

2.Double-check your cabling to the computer. Make sure you have the correct type of cabling, straight-through CAT 5 or possibly a crossover cable and try another cable or test the cable to make sure its working properly.

3.Check your network card to make sure its configured correctly and working properly. Many times setting the network card to 10Mbps/Full Duplex will solve this issue. To do this, open Control Panel-->System-->Device Manager. Go to the properties of the Network card, click on the Advanced tab and find the Link Speed andDuplex section. Change it from Auto Detect to 10Mbps/Full Duplex.

4. Check and test your firewall. Your firewall, especially if its a software firewall like ZoneAlarm, Black Ice, Norton Firewall or something else could be blocking the connection. Disable your firewall and test the connection. You may have to resolve the problem by even uninstalling and reinstalling the firewall.

5.Check your IP address assignments and workgroup settings in the computer for accuracy. Statically assign IPs to the computers in your network.


I hope this will slove your Problem.

Generic Host Process for Win32 Services Error

Problem:
When is start Windows Xp Sp2 I get Generic Host Process for Win32 Services Error. How can I get rid off this win32 Sevices error?

Why This Error Occurs?
According to microsoft, this error occurs in windows XP sp2, if security update 873333 (MS05-012) had been installed. Microsoft also claims, that this problem only occurs in Microsoft Windows XP Service Pack 2 (SP2), but it does provide fixes for windows server 2003 andwindows 2000. Microsoft had earlier issued security update 873333 (MS05-012), to fix a Vulnerability in OLE and COM, that could allow remote code execution.

Some Symptoms Of Generic Host Process Win32 Services Error:
  • E-mail messages that include file attachments would not display file names, when the file name contains double-byte character set (DBCS) characters and the file name is longer than 42 characters.However, this problem can only be noticed when the e-mail message format is Rich Text.
  • All applications that implements the IMallocSpy debugging interface may experience heap corruption. For example, you may be browsing the internet and would suddenly experience a halt in all your Network activity.Though you might see the Internet connected icon in the tray, you may not able to browse
  • You encounter error messages about faulting netapi32.dll and svchost.exe .
  • You also receive error messages that state “Your PC has recovered from a serious problem” .
Ok Lets Now See How To Fix This Error:
I have collected 3 Solutions from various sites.Try any one the following solutions to fix this error.

Solution 1:
Download the patch KB894391, to fix Generic Host Process for Win32 Services Error.

Solution 2:
  • Go to Run and type regedit .
  • Navigate to HKEY_LOCAL_MACHINE--> SYSTEM --> CurrentControlSet --> Services --> Browser --> Parameters .
  • Find the key IsDomainMaster .
  • Set its value to Falsem.

Restart your computer

Solution 3:

  • Go to Run and type cmd.
  • Type ‘netsh’ in command console then press Enter.
  • Type ‘winsock’ and Press Enter and then type reset.
  • Restart the computer.

I hope these solutions will help you to Fix the Problem.

How To Format The Unformatable Pendrives ?


Problem:
I am unable to format my pendrive or delete some files in my pendrive.So how can i format my pendrive?

Why This Problem Occurs?
When your pendrive contains virus files it will constantly processing with your Pc.And eachvirus
are coded differently
and its difficult to delete some infected files or format your pendrive.

Solution:
  • Goto Start --> Run.
  • Type Cmd & press Enter.
  • Type the following
Format/x J:
  • Here J: refers to your removable dsik drive letter.
  • Press Enter.

Task Manager disabled problem in windows xp

It is due to some kind of virus/ trojan activity which normally disables the task manager.Now due to this problem when ever the user press alt+ctrl+del to launch windows task manager it gives an error saying “Task Manager is being disabled by your administrator”.


Solution:

To Enable the Disabled Task Manager on your system

1. Press window key+r to show run prompt
2. Follow the following steps
  • Enter gpedit.msc in the run prompt and click OK
  • In the Group Policy settings window
  • Select User Configuration
  • Select Administrative Templates
  • Select System
  • Select Ctrl+Alt+Delete options
  • Select Remove Task Manager
  • Double-click the Remove Task Manager option’.
  • Set the property of this item as disabled.

For Those who use Windows XP Home Edition can use the registry to enable Task Manager

1.
open start --> run and type regedit

2. Navigate to the following path:

Hive: HKEY_CURRENT_USER\Software\Microsoft\Windows\CurrentVersion\Policies\System
3. You will find a registry key with name DisableTaskMgr of type: REG_DWORD
4. Double click the key with and set the Value to 0
5. Exit the registry and restart to see the effect.

Folder options disabled by Virus / Trojan


Are you not able to access or see your folder options under File Menu>>Tools in Windows Explorer on your Windows XP ? This problem of hidden or disabled folder options occur normally due to malicious virus(w32.rontokbro@mm) activity.

The virus creates an entry in registry to disable “Folder Options” in Windows explorer.

Solution to recover Disabled Folder Option:

In most of the cases, even if the virus is been already removed by your anti-virus program, it doesn’t restore the registry back to the original state. Also anti-virus usually does not delete the registry entry created by the virus.

For restoring the registry settings,follow the steps given below

*Enable your folder options in explorer.

1. Go to Start --> RUN
2. Type regedit and press enter.
3. Go to HKEY_CURRENT_USER --> Software --> Microsoft --> Windows --> CurrentVersion --> Policies-- > Explorer
4. On the right side of the screen, you can see some registry entry names, out of them, right-click on NoFolderOptions and click Modify option.
.A new small screen pops up, on this screen, sen the value data field as 0 (zero).PressOK.

That’s it but it requires reboot. Trouble Fixed.

How to remove write protected error for the flash drive

How to remove write protected error for the Pen drive or Other USB devices:

Some USB Errors Shown:

  • Cannot copy files and folders, drive is write protected
  • Cannot format the drive, drive is write protected
  • The disk is write protected
  • Remove write protection or use another disk
  • Media is write protected

Some times USB drive becomes write protected and deleting/Copying files or Folders on the USB drive is not Possible.

Let’s now see how to remove write protection on your portable devices like pen drives, memory cards, iPod and other USB mass storage devices.


What Actually causes This Problem?

Write Protection on any portable USB Device can be applied by the physical lock provided on the card adjuster or some times provided on the pen drives, so make sure to make your drive not write protected by moving the lock in right direction.

But even after moving the physical lock for write protection the problem can happen due to some virus action. This happens when some virus or script which applies the registry hackto make any drive write protect when connected to the computer, In that case follow the procedure below to remove write protection from your pen drive.

1. Open Start Menu --> Run, type regedit and press Enter, this will open the registryeditor.

2. Navigate to the following path:

HKEY_LOCAL_MACHINE\SYSTEM\CurrentControlSet\Control\StorageDevicePolicies

Note: If the registry key StorageDevicePolicies key does not exist, you will need to create it

3. Double click the key WriteProtect in the right pane and set the value to 0 in the Value Data Box and press OK button

4. Exit Registry, restart your computer and then again re-connect your USB pen drive on your computer. That is it, done.

How to Convert/Burn a Chrsitmas PowerPoint Presentation/Slideshow to CD/DVD?

Many a time, there are people on Yahoo Answers asking this question:how to burn/convert a Christmas PowerPoint presentation to CD/DVD? They want the Christmas PPTpresentation,often containing vibrant elements like animation, transition, Chrsitmasmusic or movie clips, to keep complete when burning to a CDor DVD as it was.

The answer to the question depends on where the PowerPoint presentation is going to playback.

1. Suppose the terminal remains a computer.

You would not email a Christmas PowerPoint file because there is noInternet connection on the computer where you are going to deliver it,or because you are afraid of data loss during emailing. Instead, youwould consider a safer way – save all the data in the PowerPoint fileto a CD and move it to another computer where you will deliver it. Inthat case, you can try one of these methods:

a) Take MS PowerPoint “Package for CD” (in Office 2007) or “Pack and Go” (in Office 2003)


The “Package for CD” or “Pack and Go” feature allows you to copyyour presentation, whether including audio or video or hyperlink filesor not, together with a Microsoft Office PPT PowerPoint Viewer to anoptical disk like CD and DVD, a USB flash drive or a network location.The presentation copied to CD or DVD is good for distributing to acomputer that running Microsoft Windows 2000 or later even withoutPowerPoint. However, if you use the Package feature to transfer apresentation to a computer with OS other than that, e.g. an earlierWindows 98 OS, or a different Mac OS, then a compatibility problem mayoccur. To avoid that problem, try to

b) Convert the PowerPoint file to video and connect it to CD

Video is a universal format that accommodates to any computer,whatever an earlier Windows or a Mac. For an extensive access of yourpresentation, you may turn it to CD-video using the professionalconversion program Moyea PPT to Video Converter.

The total conversion is a three-step process: Launch the PowerPointto video program and input the presentation(s) to convert, select theoutput format to “Video-CD Format (*.dat)“, and start the conversion.


A minute or two, you can get a CD-ready video retaining all theoriginal PowerPoint elements, completed with animations, sounds andmovie clips. Then connect the video to a CD so that you can take it toany computer with ease.

2. Suppose the end-device of your presentation is a CD player or a DVD player attached to TV.

A CD/DVD player cannot play a PowerPoint file. If you would like toreuse a favorite music file from a Christmas PowerPoint presentationfor playback on a CD player, you need to extract the audio and recordto a CD. If you want to share an amazing presentation with family orfriends on a big screen TV, you have to convert it to an appreciateformat – DVD. Because even if you copy the presentation to a DVD usingthe mentioned Pack and Go feature, the DVD presentation won’t play on aDVD player, for it is only a data DVD that only applies to a computer.To play the Christmas presentation on a DVD player attached to TV, youshould turn it to a real video DVD that supportable.

To make such a video DVD, you can rely on a screen recorder like Camtasia Studio. Alternatively, take Moyea PPT to DVD Burner,a dedicated PowerPoint to DVD converter with more competitive price andeffective performance. It is a mix of dual use – aids to burn PowerPoint to DVD and to convertPowerPoint to video (including audioextracting). The PowerPoint to DVD and video converter features a 100% preserve of original animations, transitions,sounds and movie clips, a variety of DVD menus for remote control onscreen, a free insertion of watermarks, sound tracks and voicenarrations, and a built-in burning engine to burn a presentation onto aDVD.

Below is a brief how-to of the PPT to DVD burner.

I. Download and install Moyea PPT to DVD Burner on your computer. After installation, run it and import the PowerPoint file to convert.

II. Go to Options, and do one of the following:
  • To extract the audio from your presentation or create a video copy of the presentation for playback on a CD player, select the Convert to Video fileoption. Go to Burn, click Start to begin extracting the audio from the presentation.

  • To burn the presentation to DVD for playback on a DVD playerattached to TV, set the output to Create Standard DVD or Create HighDefinition DVD as required. In the Menu tab, select a proper DVD menu for later screen display. Go to Music, if you would like to add a sound track for the presentation on DVD. Proceed to Logo to add your own logo for the DVD presentation. Jump to Burn, click Start to burn the presentation to DVD.


III. For the generated audio file, record it to a CD with athird-party CD recorder. For the DVD output, you can get the final workon a disc if you have a DVD writer installed on your PC. Otherwise, usea third-party burning program to burn the DVD image files created to adisc.

Now it is easier for you to share and distribute a PowerPoint presentation via CD/DVD.