There is NOTHING more annoying than spending 30 minutes debugging a network problem to find it was the cable. Badly made or non-standard cabling is a foolish thing to spend time on - do it once and do it right. This guide may help you to forget cabling problems and spend time time doing really useful things - like pondering the meaning of life.
Contents
Crossed and Straight cables - when to use them.
Standards Summary
Category 5 (UTP) colour coding table
10base Straight Cable (PC to HUB/SWITCH)
10baseT Crossed cable (PC to PC or HUB to HUB)
100baseT Straight Cable (PC to HUB/SWITCH)
100baseT Crossed cable (PC to PC or HUB to HUB)
1000base-T Gigabit Ethernet
RJ45 Connector Pin Numbering
RJ45 Connections - some hints
Shielded Twisted Pair (STP)
Notes:
LAN cables are generically called UTP (Unshielded Twisted Pair) and are identified with a category rating. When installing new cable, unless there is a very good reason not to, you should be using category 5, 5e or 6 UTP which is rated for both 10 and 100mb LAN operation.Info on Shielded Twisted Pair (STP) cabling.
UTP comes in two forms SOLID or STRANDED. SOLID refers to the fact that each internal conductor is made up of a single (solid!) wire, STRANDED means that each conductor is made up of multiple smaller wires. Stranded cable (which is typically more expensive) has a smaller 'bend- radius' (you can squeeze the cable round tighter corners with lower loss) and due to its flexibility should be used where you plug and unplug the cable frequently. All other things being equal the performance of both types of cable is the same. In general, solid cable is used for backbone wiring and stranded for PC to wall plug (patch) cables. Beware: Each type of wire, solid or stranded, needs its own connector type.
There is NO excuse with all the choice of color cable and other techniques available to-day for not being able to visually spot the difference between at least a straight and a crossed cable before you spend 1 hour fitting the wrong cable into your network. For cheap-skates (which includes us) you can get heat-shrink colour tubing in a slew of colours which you fit on each end of the cable beside the connector to indicate the wiring type and standard instead of using different coloured cables. The advantage of this scheme is that when you change your wiring standard you can just change the sleeve colour - you don't have to rip out the cable. Disadvantage: You have to remember to put the tubing on BEFORE the connector! You CAN use 100base-TX wiring with a 10base-T network (but not always the other way round). In general ALWAYS use 100baseTX/T4 wiring standards.
If you are using category 5, 5e or 6 wiring EVERYWHERE you can use the 100base-TX standard (this only uses 2 pairs , 4 conductors). Most of the information below assumes you are using category 5, 5e or 6 cables.
If you are using category 3 or 4 cables with 100M LANs ANYWHERE you MUST use the 100Base-T4 standard and this has ADDITIONAL RESTRICTIONS documented throughout (it uses all 4 pairs, 8 conductors). LAN connections/pinouts are defined by IEEE 802.3u.
Maximum LAN cable runs are 100 meters (~300ft).
We provide a Cabling FAQ which provides additional information or background.
We have added an article on mixing 100 MB LAN and Telephony on a single category 5(e) or 6 cable. It can be done, but you must be very, very cautious.
We have updated some of the material for 1000base-T (Gigabit Ethernet 802.3ab) which uses all 4 pairs (8 conductors) and added notes where relevant about Power-over-Ethernet (PoE 802.3af). A copper standard for 10GB Ethernet is being worked on (802.3an) but as of February 2005 the IEEE was still standardizing away.
Step 1: Before we start building our patch cable, you will need to cut a length of Cat6 cable. When cutting your cable be certain to make the correct measurements as there is nothing worse than building a patch cord that will not reach.
Now we begin, by stripping the jacket back approximately 1 inch from the end. To do this, we like to use Ideal's 45-163 Coaxial Stripper.
Exercise caution when striping back the jacket, making certain that the blade depth of your strippers will not damage the conductors but will still cut through the jacketing. If you nick the conductors, it may work fine at first, however, after time the conductors will break or begin to short out.

Step 2: Now that we have the jacket stripped back with the conductor pairs exposed, we will need to separate and straighten them. You can start by pulling the first pair and the last pair to their respective sides (Orange to the left and Brown to the right). Untwist them, but not any further than you have stripped back the jacket. Next we split the green pair. Pull the white/green conductor to the left and the green to the right. This leaves you with the blue pair in the middle. Untwist the blue leaving the white/blue conductor on the left and the blue on the right.
Note: Normally, we wouldn't untwist Cat 6 pairs except when building patch cords. It would be next to impossible to insert the conductors into the proper locations in the connector without untwisting them. (Keep in mind you want to keep as much of the twist of each pair intact in order to meet performance standards).


Step 3: Now that we have separated and straightened all of the pairs, we need to arrange the conductors into the proper order according to which of the wiring standards you would like to use. For this example we will be wiring via the 568-B standard (most common in patch cords). Please consult the pin-out to find the proper color codes that reflect your desired wiring standard. After you have all the wires arranged in the proper order, place them tightly together as show in the picture to the left. Once you have done this, verify that the wires are still in the proper order before continuing to step 4.

Step 4: Now we'll trim the conductors down to fit into the RJ45 connector. When trimming, make sure to make a nice clean cut at a 90 degree angle about 1/2 of an inch from the end of the jacket. If you fail to make a straight cut or cut too short, some of the conductors may not reach the contacts in the connector. If you leave the conductors too long, when crimping the connector, the jacketing will not be gripped leaving all the strain on the conductors. This is not a good situation! For proper trimming, hold the wires securely in their proper order just at the end of the jacket.


Step 5: Now that we have our Cat 6 patch cable prepped for termination, we are almost finished. While still holding the cable firmly, we now need to place the conductors into their proper location in the RJ45 Modular Connector. Hold the RJ45 modular plug with the pins facing up (towards you) and carefully insert the conductors holding firmly to be certain they retain their order. You will need to use a moderate amount of force to properly seat the wires against the contacts in the connector. When this is done, look at the tip of the connector. As illustrated in the picture to the left you should be able to see the end of each conductor indicating that they were fully inserted. Also take note of the colors. All whites on the top and all the colored conductors on the bottom.
Update 10/03/2007: Many customers have reported Cat6 Connectors with load bars much easier to use during the termination process. The load bar is used to align the conductors into the proper order and hold them in place during insertion.

Step 6: Carefully insert the assembly which you have just completed into a modular crimping tool. When crimping the connector you want to make sure you use the full stroke of the crimp tool so that the contacts properly "bite" into the conductors. After you have completed the crimp take time to look at the connector and make sure all the pins were crimped and that they made good contact with the conductors.

Step 7: If you are building a straight through (standard) patch cord, terminate the other end by repeating this process from step one using the same wiring scheme as the first. If this is a Crossover cable, return to step one and continue, however, be sure to terminate this end using the wiring scheme that you did not use for the first end. Terminating one end with 568-B and the other with 568-A creates a crossover.

Step 8: That's it! Use a tester to test for continuity and you are done.
Note: If the cord does not test positive for continuity, cut the connector off and start over, or buy one of our pre-made or custom length patch cables.
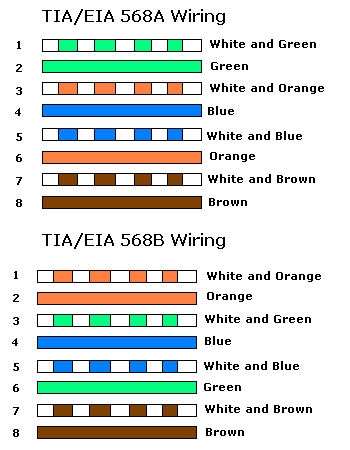
Pin # Wire Color 1 White/Green 2 Green 3 White/Orange 4 Blue 5 White/Blue 6 Orange 7 White/Brown 8 Brown 568-A Color Code
Pin # Wire Color 1 White/Orange 2 Orange 3 White/Green 4 Blue 5 White/Blue 6 Green 7 White/Brown 8 Brown 568-B Color Code
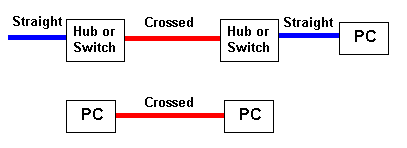
Crossed and Straight cables - when to use them
The following diagram shows the Normal use of Crossed and Straight cables (see also the notes below).
Notes:
We show Straight cables as BLUE and Crossed as RED. That is our convention. The cable color can be anything you choose or, more likely, the vendor decides.
To avoid the need for Crossed cables many vendors provide UPLINK ports on Hubs or Switches - these are specially designed to allow the use of a STRAIGHT cable when connecting back-to-back Hubs or Switches. Read the manufacturers documentation carefully.
Increasingly vendor hubs (can you still buy them) and switches will auto-detect the connection type and internally switch the connectors so that STRAIGHT cables can be used everywhere.

Standards Summary
The various standards can get a tad complicated and messy. We get occasional email requesting a summary of the standards - this is our attempt to provide a quick overview.
| Standard | Required Pairs | 10M | 100M | 1000M | Notes |
| 10base-T | 2 (1/2 and 3/6) | yes | yes | no | 100m support only if no cat 3/4 in run |
| 100base-TX | 2 (1/2 and 3/6) | yes | yes | no | 100m support only if no cat 3/4 in run |
| 100base-T4 | 4 (1/2, 3/6, 4/5 and 7/8) | yes | yes | yes | |
| 1000base-T | 4 (1/2, 3/6, 4/5 and 7/8) | yes | yes | yes | Functionally identical to 100base-T4 |
Category 5(e) (UTP) colour coding table
The following table shows the normal colour coding for category 5 cables (4 pair) based on the two standards supported by TIA/EIA (see also our primer on this topic)
We get occasional email about the difference between 568A and 568B wiring. Which one you use is a matter of local decision. These standards apply to the color code used within any SINGLE cable run - BOTH ENDS MUST USE THE SAME STANDARD. However, since they both use the same pinout at the connectors you can mix 568A and 568B cables in any installation.
10baseT Straight Cable (PC to HUB/SWITCH)
Straight cables are used to connect PCs or other equipment to a HUB or Switch. If your connection is PC to PC or HUB to HUB you MUST use a Crossed cable.
The following cable description is for the wiring of both ends (RJ45 Male connectors) with the 568B category 5(e) wiring colors you could, of course, use the 568A colour scheme.
| Pin No. | strand color | Name |
| 1 | white and orange | TX+ |
| 2 | orange | TX- |
| 3 | white and green | RX+ |
| 4 | NC | * |
| 5 | NC | * |
| 6 | green | RX- |
| 7 | NC | * |
| 8 | NC | * |
NOTE: Items marked * are not necessary for 10M LANs (10base-T) but since you will be moving shortly to 100MB LANs (won't you) you will save yourself a LOT OF TIME finding crappy cable (that you made) that does not work. Instead we suggest you wire to 100Base-T4 standards. After all you gotta stick the ends somewhere man.
We use BLUE for 10base-T straight cables. NOTE: All our wiring is now done to the 100base-T4 spec which you can use with 10base-T networks - but NOT necessarily the other way around.
10baseT Crossed cable (PC to PC or HUB to HUB)
Crossed cables are used to connect PCs to one other PC or to connect a HUB to a HUB. Crossed cables are sometimes called Crossover, Patch or Jumper cables. If your connection is PC to HUB you MUST use a Straight cable.
The following description shows the wiring at both ends (male RJ45 connectors) of the crossed cable.
| One end RJ45 Male | Other end RJ45 Male |
| 1 | 3 |
| 2 | 6 |
| 3 | 1 |
| 4 * | 5 * |
| 5 * | 4 * |
| 6 | 2 |
| 7 * | 8 * |
| 8 * | 7 * |
NOTES:
- Items marked * are not necessary for 10M LANs but since you will be moving shortly to 100MB LANs (won't you) you will save yourself a LOT OF TIMEfinding crappy cable (that you made) that does not work. Instead we suggest you wire to 100BaseT standards.
- We use RED for crossed cables (or more commonly now a red heat-shrink collar at each end).
- All our crossed wiring is done to the 100base-T4 spec which you can use with 10baseT networks - but NOT always the other way around.
100base-T Straight Cable (PC to HUB/SWITCH)
Straight cables are used to connect PCs or other equipment to a HUB or Switch. If your connection is PC to PC or HUB to HUB you MUST use a Crossed cable.
The following cable description is for the wiring of BOTH ends (RJ45 Male connectors) with your category 5 wiring colors (TIA/EIA 568A or 568B though the example uses 568B colors).
| Pin No. | conductor color | Name |
| 1 | white and orange | TX_D1+ |
| 2 | orange | TX_D1- |
| 3 | white and green | RX_D2+ |
| 4 | blue | BI_D3+ ** |
| 5 | white and blue | BI_D3- ** |
| 6 | green | RX_D2- |
| 7 | white and brown | BI_D4+ ** |
| 8 | brown | BI_D4- ** |
We use BLUE for 100baseT straight cables.
NOTES:
Wires marked ** are ABSOLUTELY NECESSARY for 100Base-T4 networks - used when any combination of category 3/4/5 cables are present, when using 1000base-T (GigE) and MAY be required for Power-over-Ethernet (PoE) - see below.
Wires marked ** are not essential for 100Base-TX (using cat 5/5e ONLY cables) and CAN be used for other purposes, for example, telephony but, .. beware.. read this FAQ and our LAN plus Telephony article before you wire your entire neighbourhood for surround sound.
The Power-over-Ethernet spec (802.3af) allows three schemes where power may be supplied. Two of these schemes use pairs 4,5 and 7,8 (marked ** in above table) for power (called Midspan PSE and Alternative B or Mode B), one scheme uses ONLY pairs 1,2 and 3,6 (Endpoint PSE, Alternative A or Mode A) for both signals and power. Depending on which scheme you use pairs 4,5 and 7,8 may be required.
Gigabit Ethernet requires all 4 pairs (8 conductors).
All our wiring is now done to the 100base-T4 spec which you can use with 10baseT networks - but NOT the other way around.
100base-T Crossed cable (PC to PC or HUB to HUB)
Crossed cables are used to connect PCs to one other PC or to connect a HUB to a HUB. Crossed cable are sometimes called Crossover, Patch or Jumper cables. If your connection is PC to HUB you MUST use a Straight cable.
The following description shows the wiring at both ends (male RJ45 connectors) of the crossed cable. Note: The diagrams below shows crossing of all 4 pairs and allows for the use of cat3/4 cables with 100m LANs (100base-T4). Pairs 4,5 and 7,8 do not NEED to be crossed in 100base-TX wiring. See notes below.

We use RED for crossed cables (or more commonly now a red heat-shrink collar at each end).
NOTES:
- All our crossed wiring is now done to the 100base-T4 spec (uses all 4 pairs, 8 conductors) which you can use with 10base-T networks - but NOT necessarily the other way around.
- Many commercial 100m LAN cables seem not to cross pairs 4,5 and 7,8. If there is no cat3/4 wiring in the network this perfectly acceptable.
- Gigabit Ethernet uses all 4 pairs so requires the full 4 pair (8 conductor) cross configuration (shown above).
- If you are using Power-over-Ethernet (802.3af) then Mode A or Alternative A uses pairs 1,2 and 3,6 for both signals and power. Mode B or alternative B uses 4,5 and 7,8 to carry power. In all cases the spec calls for polarity insensitive implementation (using a diode bridge) and therefore crossing or not crossing pairs 4,5 and 7,8 will have no effect.
1000base-T Gigabit Ethernet
1000base-T is the copper based version of the gigabit Ethernet standard defined by 802.3ab which, since it is over 6 months old, is available free of charge from the enlightened IEEE. Great work. In passing, if you want to see sophistry raised to an art form read the EIA's justification for charging for their specifications. (Note: The original EIA statement is unfortunately no longer available on-line. This is a great loss to the development of the English language in general, and comedy writing in particular.) The following notes apply to the 1000base-T spec:
The standard defines auto-negotiation of speed between 10, 100 and 1000 Mbit/s so the speed will fall to the maximum supported by both ends - ensuring inter-working with existing installations.
The cable specification base-line is ANSI/TIA/EIA-568-A-1995 (which you have to pay for). This means that if you know your cat5 cable was manufactured to this standard (there was a lower rated 1991 version of this specification) then it will support Gigabit Ethernet. Cat5 cable manufactured to the old specification may work or it may not - you need to run some tests. Cat5e and cat6 being higher spec cables will support Gigabit Ethernet.
Maximum runs are the standard 100m (~300ft).
Gigabit Ethernet uses all 4 pairs (8 conductors). The transmission scheme is radically different from 10 and 100 Mbit/s standards (PAM-5: a 5 level amplitude modulation scheme) and each conductor is used for send and receive.
Crossed Gigabit Ethernet cables must cross all 4 pairs however it should be noted that since all 1000base-T equipment includes automatic crossover detection, crossed 1000base-T cables are extremely rare.
Because of the higher speeds everything about a Gigabit cable must be correct. Specifically the connectors must be rated for Gigabit operation with minimal untwisting of the cable when adding the connector.
When Cat6 cables are used these will also support 10 Gbit/s operation up to 55m. When Cat6a cables are used these will support 10 Gbit/s operation up to 90m.
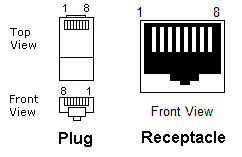
RJ45 Connector Pin Numbering
RJ45 Male Connector
RJ45 Connections - some hints
We get mail saying 'Help. I've wired it correctly but it does not work'. Here are some simple notes that may help. Remember: it's more difficult that you think.
- The RJ45 connector is the critical connection - always use the highest quality connectors you can afford. The most common cause of connection faults are bad connectors.
There are different connectors for stranded and solid cable and manufacturers do not always do a good job at differentiating them. Spend the time to make sure you have the right connector type. If you use the wrong type of connector the cable may work initially but it will almost certainly fail very quickly.
- Make and test practice cables until you get it right every time - especially before you destroy a cable you just spent 2 hours fitting.
- When installing cable runs ensure the bend radius is within the cable specification and avoid kinks and excessive cable twisting. While the bend radius for Cat5/e/6/6a is defined to be approximately 1 inch, in general this should be avoided and a more generous 3 - 6 inches should be allowed unless absolutely necessary.
- When cutting the exterior cover of the cable be very careful not to cut the insulation cover of the conductors since this can cause shorts. Bottom line: the cable won't work.
- Expose a maximum of 1 inch of individual conductors when preparing the cable for connection.
- Untwist the pairs and line up all the conductors according to the wiring standard you are using. Only untwist the exposed connector pairs that lie outside of the exterior cover. Do not allow the untwisting operation to propagate under the exterior cover.
- Measure the cable end by placing it beside the RJ45 and trim the conductor ends so they are are all the same length and no individual conductor wire is visible outside the plastic cover of the RJ45 connector. This procedure also ensures the absolute minimum of untwisted cable is used. Untwisting of too much cable can easily cause reduced speed when running Gigabit connections.
- Carefully slide the prepared cable into the RJ45 connector making sure the end of the conductors reaches the end of the RJ45 connector.
- Using the crimp tool make the connection with a single firm squeeze operation.
- Test the cable before fitting if possible.
Shielded Twisted Pair
Shielded Twisted Pair (STP) comes in a variety of formats. It is typically used in three applications:
Where there is significant EMI (Electro-Magnetic Induction) in the environment such as caused by high-powered electric motors (such as in elevator shafts), flourescent lighting etc. Additionally where there is significant Alien Crosstalk (ANEXT) such as in very high speed (gigabit and 10gb) LANs. In this case the ethernet signals in the cable require protection against external interference from either adjacent pairs or the environment.
Where there is extremely sensitive electrical/electronic equipment in the surrounding environment or where security requirements demand elimination of eavesdropping possibilities from radiated LAN signals (TEMPEST). In this case the ethernet signals in the shielded cable are contained and prevented from polluting, or escaping into, the external environment.
Where maximum performance - either speed or distance - is required. As Ethernet speeds continue to increase either fiber or Shielded Twisted Pair is becoming increasingly common, for instance, to reach 100m distances at 10Gb speeds on copper will require shielded cable (limited to 55m for UTP).
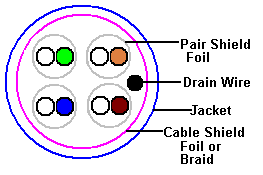
Shielded cable comes in three broad types with a confusing range of terminology:
Where there is a single foil (FTP - Foil Twisted Pair) or braided (ScTP - Screened Twisted Pair) shield inside the jacket covering all four pairs. Suitable for applications 1 and 2 above.
Where there is a foil shield covering each pair. This is frequently refered to as PiMF (Pairs in Metal Foil) and is designed primarily to eliminate Alien Cross-talk (ANEXT) from adjacent pairs. Suitable for application 3 above.
Where there is a foil shield covering each pair and a (Foil or Braided) shield covering the whole cable. This is frequently refered to as SSTP (Double Shield Twisted Pair) or even PiMF - since many manufacturers also add a jacket shield to foil covered pair cables. Suitable for applications 1, 2 and 3 above.
In almost all cases there is a single ground wire (called a drain) which allows for connection to secondary grounding sources.
The diagram below illustrates the differences:
Notes:
Shielded cable of any variety has a greater diameter than UTP and will therefore occupy more space in cable ducting and raceways.
Connecting shielded cable is more complex and time consuming - but not execessively so - than conventional UTP. Manufacturers specifications vary enormously, expecially with respect to grounding, and should be followed closely.
In shielded cable installations the jacks and receptacles are typically made of metal and the cable shield (foil or braid) is connected electrically to the connector and thence through the metal receptable to a suitable ground provided by the end equipment.
Foil covered pairs are typically not connected to ground and thus provide only alien crosstalk immunity from adjacent pairs (ANEXT).
Manufacturers specifications and measurements suggest that shielded cables do NOT create antenna effects - indeed experiments show that UTP creates a substantially greater antenna effect (~40db) over correctly grounded shielded cables.
Even ungrounded shielded cables provide better performance (by ~20db) than conventional unshielded twisted pair (UTP).
The drain wire provides a secondary or auxiliary ground method in cases where metallic path grounding is provided by the connectors and, as such, is optional. In cases where metal connectors are not being used (there is no grounding via the connectors) the drain wire may be used as the primary grounding method and needs to be routed independantly to a suitable ground. The drain wire (cable ground) needs to be exposed before connector. This process could require a considerable length of exposed drain wire depending on the location of the ground source. A plastic insulating sheath should be placed over the drain wire to minimize electrical hazards.
In all cases where both ends of a shielded cable are gounded this should be done using a common (building) ground to avoid ground potential loops which if they exceed 1V will have serious effects on cable performance. It is also important to note that 'grounding both ends' means final equipment terminations. Intermediate jacks or faceplates must maintain electrical continuity throughout the cable run but are not themselves grounded. This app note from AMPprovides a detailed explanation.
HDMI v1.4 Cable : Substantial Velocity with Ethernet
ReplyDeleteIt might discover puzzling with all the numerous cables in the market in conjunction with the many mis-information regarding variation 1. 3 & 1. 4, ethernet in conjunction with period limits. The key reason why definitely not preserve the many stress and anxiety & simply get a cable tv which capabilities?
Zero advertising. Zero And. Azines. No worries! - These types of cables are created to the highest anticipation in conjunction with constructed with complicated PVC coat in conjunction with deterioration. resistant Yellow metal Accessories to provide the item the most notable success. Prospective evidence in conjunction with entirely in the opposite direction works with almost all HDMI anticipation. This means; Somebody need not acquire additionally cables if you never have however upgraded your entire program - These types of cables OPERATES!
All ethernet cable uses copper to conduct the information, but it is how the information is conducted that determines the category of the cable.
ReplyDelete