Saturday, January 1, 2011

How to remove data in Active Directory after an unsuccessful domain controller demotion

Re-installing a Domain Controller

This article is written to give readers a heads up about some issues involved when re-installing a Domain controller. This article is particulary about re-installing a Windows 2000 domain controller and issues that may occur if the re-installation is not done properly.

This article is to be used at the readers own risk and the author nor this project can be held liable for any damage related to this article or your use of information contained here. You could seriously damage Active Directory if you perform tasks related to this subject improperly. This article will outline the issue and point to resources for further information.

If a Windows 2000 domain controller crashes and cannot be gracefully removed from the domain, there are some Active Directory maintenance tasks which should be performed prior to the re-installation of that domain controller or the installation of a new domain controller.

Background

Active Directory is the control mechanism for your Windows domain which allows users to be created or removed and controls access to various objects in the network including servers, workstations, and files. You should be aware that Active Directory treats everything as an object and assigns a unique identifing number to each object including your domain controller servers. When your domain controller is re-created, it will not have the same identifying number. Therefore it is important to use the correct process when dealing with these important objects. There are two cases which may occur when a domain controller must be re-installed:


Crashed Domain Controller which must be replaced or re-installed

If your domain controller crashes and must be re-installed you should clean up Active Directory before installing a new domain controller or re-installing your domain controller. See Microsoft's Knowledge Base Article Q216498 at http://support.microsoft.com/default.aspx?scid=kb;en-us;216498

This procedure describes how to use the NTDS Utility program to clean up active directory. This procedure must be done precisely to avoid damaging Active Directory. If you have not followed the procedures properly, or have installed a new domain controller before cleaning up Active Directory and/or have noticed some unusual effects which may be caused by Active Directory corruption, you should call Microsoft technical support IMMEDIATELY. I recommend that you DO NOT attempt to clean up the corruption yourself.

Windows Server 2003 Service Pack 1 (SP1) or later service packs – Enhanced version of Ntdsutil.exe

The version of Ntdsutil.exe that is included with Service Pack 1 or later service packs for Windows Server 2003 has been enhanced to make the metadata cleanup process complete. The Ntdsutil.exe version that is included with SP1 or later service packs does the following when metadata cleanup is run:
  • Removes the NTDSA or NTDS Setting subject.
  • Removes inbound AD connection objects that existing destination DCs use to replicate from the source DC being deleted .
  • Removes the computer account .
  • Removes FRS member object.
  • Removes FRS subscriber objects.
  • Tries to seize flexible single operations master roles (also known as flexible single master operations or FSMO) held by the DC that are being removed .
Caution The administrator must also make sure that replication has occurred since the demotion before manually removing the NTDS Settings object for any server. Using the Ntdsutil utility incorrectly may result in partial or complete loss of Active Directory functionality.

Procedure 1: Windows Server 2003 SP1 or later service packs only

  1. Click Start, point to Programs, point to Accessories, and then click Command Prompt.
  2. At the command prompt, type ntdsutil, and then press ENTER.
  3. Type metadata cleanup, and then press ENTER. Based on the options given, the administrator can perform the removal, but additional configuration parameters must be specified before the removal can occur.
  4. Type connections and press ENTER. This menu is used to connect to the specific server where the changes occur. If the currently logged on user does not have administrative permissions, different credentials can be supplied by specifying the credentials to use before making the connection. To do this, type set credsDomainNameUserNamePassword, and then press ENTER. For a null password, typenull for the password parameter.
  5. Type connect to server servername, and then press ENTER. You should receive confirmation that the connection is successfully established. If an error occurs, verify that the domain controller being used in the connection is available and the credentials you supplied have administrative permissions on the server.

    Note If you try to connect to the same server that you want to delete, when you try to delete the server that step 15 refers to, you may receive the following error message:
    Error 2094. The DSA Object cannot be deleted0x2094
  6. Type quit, and then press ENTER. The Metadata Cleanup menu appears.
  7. Type select operation target and press ENTER.
  8. Type list domains and press ENTER. A list of domains in the forest is displayed, each with an associated number.
  9. Type select domain number and press ENTER, where number is the number associated with the domain the server you are removing is a member of. The domain you select is used to determine whether the server being removed is the last domain controller of that domain.
  10. Type list sites and press ENTER. A list of sites, each with an associated number, appears.
  11. Type select site number and press ENTER, where number is the number associated with the site the server you are removing is a member of. You should receive a confirmation listing the site and domain you chose.
  12. Type list servers in site and press ENTER. A list of servers in the site, each with an associated number, is displayed.
  13. Type select server number, where number is the number associated with the server you want to remove. You receive a confirmation listing the selected server, its Domain Name System (DNS) host name, and the location of the server's computer account you want to remove.
  14. Type quit and press ENTER. The Metadata Cleanup menu appears.
  15. Type remove selected server and press ENTER. You should receive confirmation that the removal completed successfully. If you receive the following error message, the NTDS Settings object may already be removed from Active Directory as the result of another administrator removing the NTDS Settings object or replication of the successful removal of the object after running the DCPROMO utility.
    Error 8419 (0x20E3)
    The DSA object could not be found


    Note You may also see this error when you try to bind to the domain controller that will be removed. Ntdsutil has to bind to a domain controller other than the one that will be removed with metadata cleanup.
  16. Type quit, and then press ENTER at each menu quit the Ntdsutil utility. You should receive confirmation that the connection disconnected successfully.
  17. Remove the cname record in the _msdcs.root domain of forest zone in DNS. Assuming that DC will be reinstalled and re-promoted, a new NTDS Settings object is created with a new GUID and a matching cname record in DNS. You do not want the DCs that exist to use the old cname record.

    As best practice, you should delete the host name and other DNS records. If the lease time that remains on Dynamic Host Configuration Protocol (DHCP) address assigned to offline server is exceeded then another client can obtain the IP address of the problem DC.
  18. In the DNS console, use the DNS MMC to delete the A record in DNS. The A record is also known as the Host record. To delete the A record, right-click the A record, and then click Delete. Also, delete the cname record in the _msdcs container. To do this, expand the _msdcs container, right-click cname, and then click Delete.

    Important If this is a DNS server, remove the reference to this DC under the Name Servers tab. To do this, in the DNS console, click the domain name under Forward Lookup Zones, and then remove this server from the Name Servers tab.

    Note If you have reverse lookup zones, also remove the server from these zones.
  19. If the deleted computer is the last domain controller in a child domain, and the child domain was also deleted, use ADSIEdit to delete the trustDomain object for the child. To do this, follow these steps:
    1. Click Start, click Run, type adsiedit.msc, and then click OK
    2. Expand the Domain NC container.
    3. Expand DC=Your Domain, DC=COM, PRI, LOCAL, NET.
    4. Expand CN=System.
    5. Right-click the Trust Domain object, and then click Delete.
  20. Use Active Directory Sites and Services to remove the domain controller. To do this, follow these steps:
    1. Start Active Directory Sites and Services.
    2. Expand Sites.
    3. Expand the server's site. The default site is Default-First-Site-Name.
    4. Expand Server.
    5. Right-click the domain controller, and then click Delete.
  21. When you use DFS Replication in Windows Server 2008 and in later versions, the current version of Ntdsutil.exe does not clean up the DFS Replication object. In this case, you can use Adsiedit.msc to correct the DFS Replication objects for Active Directory Domain Services (AD DS) manually. To do this, follow these steps:
    1. Logon a domain controller as a domain administrator in the affected domain.
    2. Start Adsiedit.msc.
    3. Connect to the default naming context.
    4. Locate the following DFS Replication topology container:
      CN=Topology,CN=Domain System Volume,CN=DFSR-Globalsettings,CN=System,DC=Your Domain,DC=Domain Suffix
    5. Delete the msDFSR-Member CN object that has the old computer name.

Procedure 2: Windows 2000 (All versions) Windows Server 2003 RTM

  1. Click Start, point to Programs, point to Accessories, and then click Command Prompt.
  2. At the command prompt, type ntdsutil, and then press ENTER.
  3. Type metadata cleanup, and then press ENTER. Based on the options given, the administrator can perform the removal, but additional configuration parameters must be specified before the removal can occur.
  4. Type connections and press ENTER. This menu is used to connect to the specific server where the changes occur. If the currently logged on user does not have administrative permissions, different credentials can be supplied by specifying the credentials to use before you make the connection. To do this, type set credsDomainNameUserNamePassword, and then press ENTER. For a null password, typenull for the password parameter.
  5. Type connect to server servername, and then press ENTER. You should receive confirmation that the connection is successfully established. If an error occurs, verify that the domain controller being used in the connection is available and the credentials you supplied have administrative permissions on the server.

    Note If you try to connect to the same server that you want to delete, when you try to delete the server that step 15 refers to, you may receive the following error message:
    Error 2094. The DSA Object cannot be deleted0x2094
  6. Type quit, and then press ENTER. The Metadata Cleanup menu appears.
  7. Type select operation target and press ENTER.
  8. Type list domains and press ENTER. A list of domains in the forest is displayed, each with an associated number.
  9. Type select domain number and press ENTER, where number is the number associated with the domain the server you are removing is a member of. The domain you select is used to determine whether the server being removed is the last domain controller of that domain.
  10. Type list sites and press ENTER. A list of sites, each with an associated number, is displayed.
  11. Type select site number and press ENTER, where number is the number associated with the site the server you are removing is a member of. You should receive a confirmation listing the site and domain you chose.
  12. Type list servers in site and press ENTER. A list of servers in the site, each with an associated number, is displayed.
  13. Type select server number, where number is the number associated with the server you want to remove. You receive a confirmation listing the selected server, its Domain Name System (DNS) host name, and the location of the server's computer account you want to remove.
  14. Type quit and press ENTER. The Metadata Cleanup menu appears.
  15. Type remove selected server and press ENTER. You should receive confirmation that the removal completed successfully. If you receive the following error message:
    Error 8419 (0x20E3)
    The DSA object could not be found
    the NTDS Settings object may already be removed from Active Directory as the result of another administrator removing the NTDS Settings object, or replication of the successful removal of the object after you run the Dcpromo utility.

    Note You may also see this error when you try to bind to the domain controller that will be removed. Ntdsutil has to bind to a domain controller other than the one that will be removed with metadata cleanup.
  16. Type quit at each menu to quit the Ntdsutil utility. You should receive confirmation that the connection disconnected successfully.
  17. Remove the cname record in the _msdcs.root domain of forest zone in DNS. Assuming that DC will be reinstalled and re-promoted, a new NTDS Settings object is created by using a new GUID and a matching cname record in DNS. You do not want the DC's that exist to use the old cname record.

    As best practice you should delete the hostname and other DNS records. If the lease time that remains on Dynamic Host Configuration Protocol (DHCP) address assigned to offline server is exceeded then another client can obtain the IP address of the problem DC.
Now that the NTDS Settings object has been deleted, you can delete the computer account, the FRS member object, the cname (or Alias) record in the _msdcs container, the A (or Host) record in DNS, the trustDomain object for a deleted child domain, and the domain controller.

Note You do not need to manually remove the FRS member object in Windows Server 2003 RTM because the Ntdsutil.exe utility has already removed the FRS member object when you run the utility. Additionaly, the metadata of the computer account cannot be removed if the computer account of the DC contains another leaf object. For example, Remote Installation Services (RIS) might be installed on the DC.

The Adsiedit utility is included with the Windows Support Tools feature in both Windows 2000 Server and Windows Server 2003. To install the Windows Support Tools, following these steps:
  • Windows 2000 Server: On the Windows 2000 Server CD, open the Support\Tools folder, double-click Setup.exe, and then follow the instructions that appear on the screen.
  • Windows Server 2003: On the Windows Server 2003 CD, open the Support\Tools folder, double-click Suptools.msi, click Install, and then follow the steps in the Windows Support Tools Setup Wizard to complete the installation.
  1. Use ADSIEdit to delete the computer account. To do this, follow these steps:
    1. Click Start, click Run, type adsiedit.msc in the Open box, and then click OK.
    2. Expand the Domain NC container.
    3. Expand DC=Your Domain Name, DC=COM, PRI, LOCAL, NET.
    4. Expand OU=Domain Controllers.
    5. Right-click CN=domain controller name, and then click Delete.
    If you receive the "DSA object cannot be deleted" error message when you try to delete the object, change the UserAccountControl value. To change the UserAccountControl value, right-click the domain controller in ADSIEdit, and then click Properties. UnderSelect a property to view, click UserAccountControl. Click Clear, change the value to 4096, and then click Set. You can now delete the object.

    Note The FRS subscriber object is deleted when the computer object is deleted because it is a child of the computer account.
  2. Use ADSIEdit to delete the FRS member object. To do this, follow these steps:
    1. Click Start, click Run, type adsiedit.msc in the Open box, and then click OK
    2. Expand the Domain NC container.
    3. Expand DC=Your Domain, DC=COM, PRI, LOCAL, NET.
    4. Expand CN=System.
    5. Expand CN=File Replication Service.
    6. Expand CN=Domain System Volume (SYSVOL share).
    7. Right-click the domain controller you are removing, and then click Delete.
  3. In the DNS console, use the DNS MMC to delete the A record in DNS. The A record is also known as the Host record. To delete the A record, right-click the A record, and then click Delete. Also delete the cname (also known as the Alias) record in the _msdcscontainer. To do so, expand the _msdcs container, right-click the cname, and then clickDelete.

    Important If this was a DNS server, remove the reference to this DC under the Name Servers tab. To do this, in the DNS console, right-click the domain name underForward Lookup Zones, click Properties, and then remove this server from theName Servers tab.

    Note If you have reverse lookup zones, also remove the server from these zones.
  4. If the deleted computer was the last domain controller in a child domain and the child domain was also deleted, use ADSIEdit to delete the trustDomain object for the child. To do this, follow these steps:
    1. Click Start, click Run, type adsiedit.msc in the Open box, and then click OK
    2. Expand the Domain NC container.
    3. Expand DC=Your Domain, DC=COM, PRI, LOCAL, NET.
    4. Expand CN=System.
    5. Right-click the Trust Domain object, and then click Delete.
  5. Use Active Directory Sites and Services to remove the domain controller. To do this, follow these steps:
    1. Start Active Directory Sites and Services.
    2. Expand Sites.
    3. Expand the server's site. The default site is Default-First-Site-Name.
    4. Expand Server.
    5. Right-click the domain controller, and then click Delete.

Advanced optional syntax with the SP1 or later versions of Ntdsutil.exe

Windows Server 2003 SP1 introduced a new syntax that can be used. By using the new syntax, it is no longer required to bind to the DS and select your operation target. To use the new syntax, you must know or obtain the DN of the NTDS settings object of the server that is being demoted. To use the new syntax for metadata cleanup, follow these steps:
  1. Run ntdsutil.
  2. Switch to the metadata cleanup prompt.
  3. Run the following command
    remove selected server
    An example of this command is as follows.

    Note The following is one line but has been wrapped.
    Remove selected server cn=servername,cn=servers,cn=sitename,cn=sites,cn=configuration,dc=
  4. Remove the cname record in the _msdcs.root domain of forest zone in DNS. Assuming that DC will be reinstalled and re-promoted, a new NTDS Settings object is created by using a new GUID and a matching cname record in DNS. You do not want the DCs that exist to use the old cname record.

    As best practice, you should delete the host name and other DNS records. If the lease time that remains on Dynamic Host Configuration Protocol (DHCP) address assigned to offline server is exceeded, another client can obtain the IP address of the problem DC.
  5. If the deleted computer was the last domain controller in a child domain, and the child domain was also deleted, use ADSIEdit to delete the trustDomain object for the child. To do this, follow these steps:
    1. Click Start, click Run, type adsiedit.msc, and then click OK.
    2. Expand the Domain NC container.
    3. Expand DC=Your Domain Name, DC=COM, PRI, LOCAL, NET.
    4. Expand CN=System.
    5. Right-click the Trust Domain object,, and then click Delete.
  6. Use Active Directory Sites and Services to remove the domain controller. To do this, follow these steps:
    1. Start Active Directory Sites and Services.
    2. Expand Sites.
    3. Expand the server's site. The default site is Default-First-Site-Name.
    4. Expand Server.
    5. Right-click the domain controller, and then click Delete.
For more information about how to forcefully demote a Windows Server 2003 or Windows 2000 domain controller, click the following article number to view the article in the Microsoft Knowledge Base:
332199 Domain controllers do not demote gracefully when you use the Active Directory Installation Wizard to force demotion in Windows Server 2003 and in Windows 2000 Server

Determine the DN of the server

There are several ways to obtain the DN of the server object that is to be removed. The following example uses Ldp.exe. To obtain the DN by using Ldp.exe, follow these steps:
  1. Run LDP.
  2. Bind to rootDSE.
  3. Select View\tree. Base DN should be cn=configuration,dc=rootdomain,dc=.
  4. Expand Sites.
  5. Expand the site where the server object resides.
  6. Expand Servers.
  7. Expand the server that you are removing.
  8. Look for a line on the right hand side that starts with DN.
  9. Copy whole line excluding the DN.

    Example snip of the first part of the LDP spew:

    Expanding base 'CN=DC1,CN=Servers,CN=Default-First-Site-Name,CN=Sites,CN=Configuration,DC=corp,DC=com'... Result <0>: (null) Matched DNs:  Getting 1 entries: >> Dn: CN=DC1,CN=Servers,CN=Default-First-Site-Name,CN=Sites,CN=Configuration,DC=corp,DC=com”  What you would copy would be   "CN=DC1,CN=Servers,CN=Default-First-Site-Name,CN=Sites,CN=Configuration,DC=corp,DC=com"
For more information, click the following article number to view the article in the Microsoft Knowledge Base:
887424 "DsRemoveDsDomainW error 0x2015" error message when you use Ntdsutil to try to remove metadata for a domain controller that was removed from your network in Windows Server 2003

Working Domain controller which must be replaced for some reason

  1. Demote the domain controller using the dcpromo tool. See the Microsoft Knowledge Base Article Q238369 at http://support.microsoft.com/default.aspx?scid=kb;en-us;238369 about how to Promote and Demote Domain Controllers in Windows 2000.
  2. Install the new domain controller.
  3. Promote the domain controller using the dcpromo tool. See the Microsoft Knowledge Base Article Q238369 at http://support.microsoft.com/default.aspx?scid=kb;en-us;238369

Wednesday, December 15, 2010

How to Backup and Restore your hard drive with DriveImage XML

Table of Contents:

Introduction

DriveImage XML is my program of choice for backing up and protecting my data. When I first began using this application, though, I had some difficulties restoring my backup image on my test boxes using the instructions found in other tutorials. Due to this, I pooled info from a variety of available tutorials, and with some work, I was able to figure out how to restore my data. With this in mind, I have put all of the information I researched into one guide so that others can properly restore their data without running into the problems that I encountered.

With this tutorial you will be able to accomplish the following tasks:

  1. Create a complete cloned image of your entire computer. This consists of all data, applications, the operating system, and files.
  2. Restore a backup image to your existing hard drive or another one in the event of total hard drive corruption or loss.
  3. Restore selected data if you do not need the entire OS restored.

In order to follow the steps in this tutorial, you will need an external hard drive or other removable media, CD-ROM burner, and a blank writeable CD.

Create a clone of your hard disk

The first step is to download DriveImage XML to the desktop of the computer that you wish to backup. When the file has finished downloading, double-click on the dixmlsetup.exe icon to start the installation program. Follow the prompts while selecting the default settings until you get to the last screen. Then press the Finish button to close the DriveImage XML installation program.

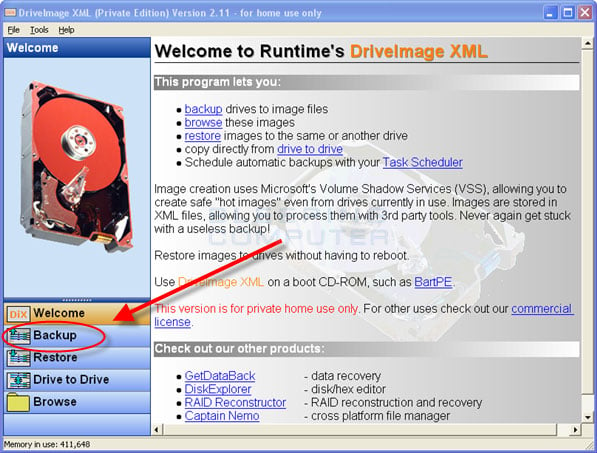
Once the program has been installed, there will now be an icon for the program on your desktop. Double-click on the DriveImage XML icon to start the program. When the program starts you will be greeted with a screen similar to the one below.

DriveImage XML Start Screen

Now press the Backup button as designated by the red arrow in the image above.

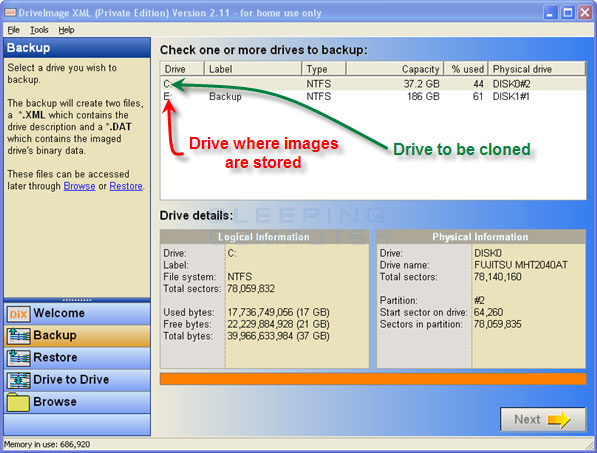
You will now be at a screen where the program asks you what drive you would like to backup as shown in the image below.

Select drive to backup

Select the drive you would like to backup by left-clicking once on it and then press the Next button.

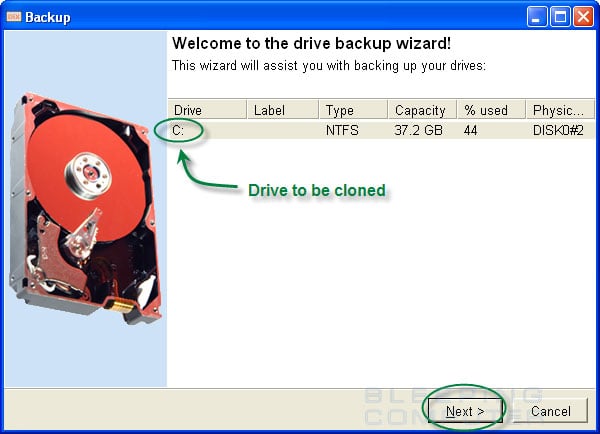
You will now be at the Drive backup wizard as shown in the image below.


Drive backup wizard
Drive backup wizard

Make sure the drive you want to backup is listed and then press the Next button.

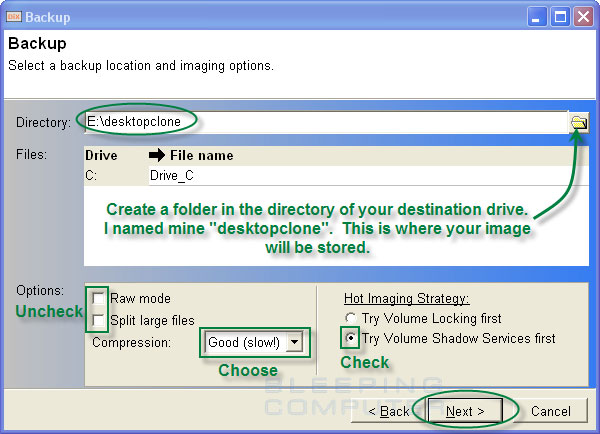
You will now be at the Backup options screen where you can configure various options as to how you want your backup to be created and where to save it to.


Backup option screen

For the purposes of this tutorial, I created a folder in my E:\ drive named desktopclone and set that as the directory where my backup image will be created. In the Options category you should set Compression to Good (slow!), to make the backup image smaller, and then uncheck all of the other items. Then in the Hot Imaging Strategy: category select Try Volume Shadow Services first. These suggested settings are shown in the image above. Once you have the options screen setup like you want it press the Next button to continue.

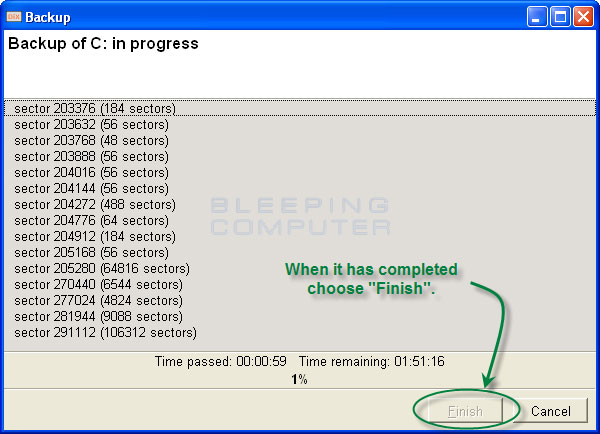
DriveImage XML will now start backing up your hard drive to the folder you specified in the previous screen as shown in the image below. This process can take a long time depending on how much data it has to backup. So please be patient while the backup proceeds.


Your hard drive being backed up

When the backup has finished, you should press the Finish button and then close the DriveImage XML program. You have now created a duplicate copy of your entire OS and stored it in a compressed manner. You can now do several things with that image. You can open it up and restore individual files or folders or you can restore that image to another drive.

How to restore individual files, folders and data:

In the future if you need to restore any files from a DriveImage XML backup image you can follow these steps.

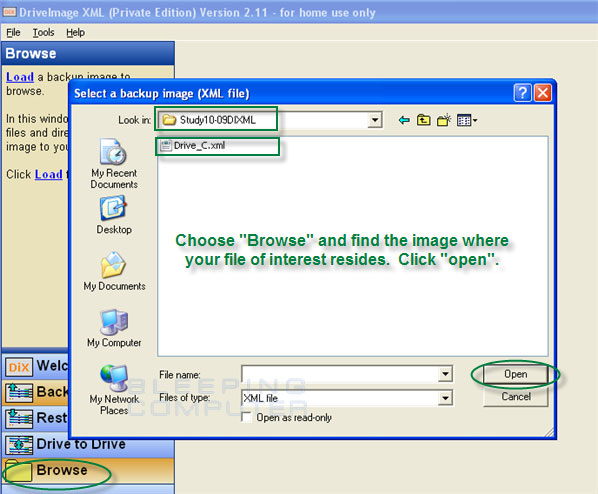
Double click DriveImageXML on the computer that you want to restore the file to. When the program is loaded, click on the Browse option on the left hand side menu. When you click on the Browse button you will be shown a screen, similar to the one below, where it asks you to select a backup image (XML) file.

select a backup image (XML) file
Select a backup image (XML) file

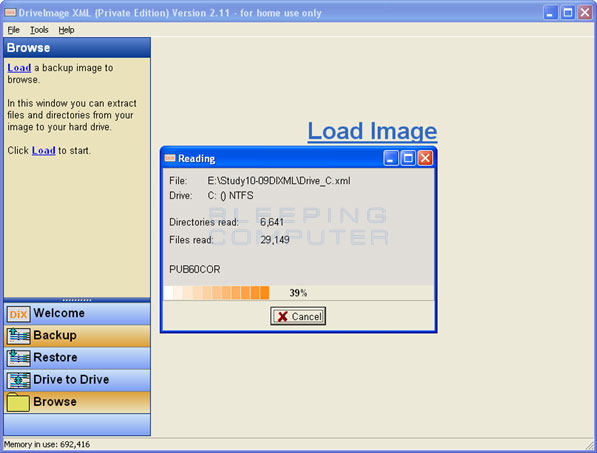
Left-click once on the XML file that you want to restore from and then press the OK button. DriveImage XML will now start loading the backup image into the program. This can take a while depending on how much data was backed up, so please be patient.

Backup image being loaded

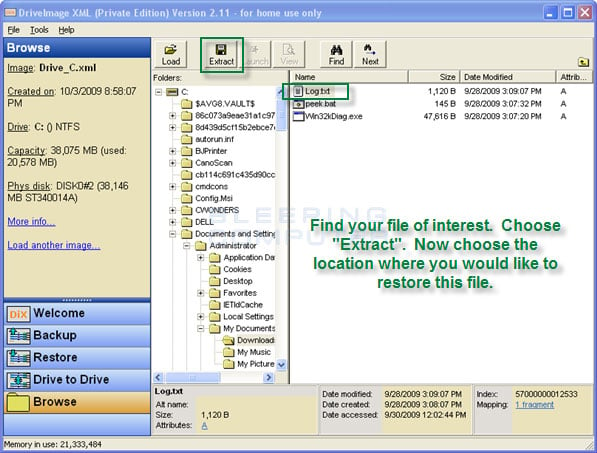
When it has finished loading the image you will see a screen showing you what files and folders were backed up.

List of files and folders that were backed up

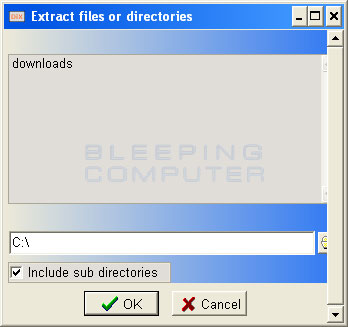
Now select the files or folders you would like to restore and click on the Extract button. This will bring up a dialog box asking where you would like to restore the files or folders.

Select location where you wish to restore to

Once you have entered the location that you would like the files or folders to be restored to, you should press the OK button to start the restoration process. DriveImage XML will now start to restore your files to the location you requested. When it has finished, you can then close the DriveImage XML program.

Please note, you can restore files or folders to any computer you wish. They do not have to be restored to the same computer or location where they were originally backed up on.

How to restore a cloned image to a different hard drive:

In this part of the tutorial we will cover how to restore a cloned image of your original hard drive to another hard drive after a hard disk failure. In order to accomplish this you will need the following:

  • Another hard drive that you will restore the cloned image to. This hard drive must as large, or larger, than the original drive that you made the image from.

  • Access to the media that contains the cloned image of your hard drive. This can be a USB flash drive, external hard drive, or another hard drive in your computer.

  • A bootable version of DriveImageXML that contains a disk partitioning program. For the purposes of this tutorial we suggest you use the Ultimate Boot CD 4 Windows as it already contains the SwissKnife partitioning program and DriveImage XML programs. Information and instructions on how to create the Ultimate Boot CD 4 Windows can be found at the below links:

    How to Build the Ultimate Boot CD for Windows
    UBCD4Win FAQ

It is also important to note, that we suggest that you restore a cloned image of your entire disk to another hard disk in the same computer it was originally backed up on. This way there won't be any Windows activation issues or driver issues. You can, though, restore a cloned image to a different computer than it was originally backed up on. Please note, though, that when the image is restored to another computer, the different hardware might prompt a red flag that would require you to reactivate Windows. To rectify this, you can usually just call Microsoft and explain the situation and they will allow you to activate your copy of Windows.

Once you have all the required items assembled, connect the external disk or media that contains the image you want to restore and the hard disk you plan to restore the image to your computer. Then insert the UBCD4Win disc into your CDRom and restart your computer to boot off of it. The computer should choose to boot from the UBCD4Win CD automatically. If it doesn't and you are asked if you want to boot from CD, then choose that option. Finally if that does not work, you may need to enter your computer's BIOS and change the boot order of your devices. To enter the BIOS you usually need to click on the F12, F2, or ESC keys right as the computer starts. You will typically see a message stating what key you need to press to enter Setup.

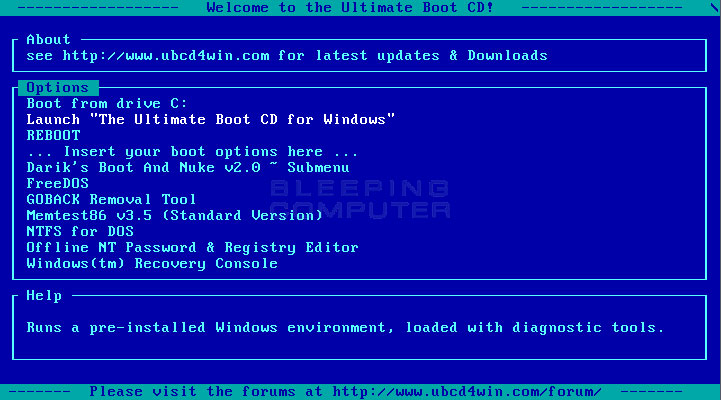
When the computer boots up with the UBCD4Win CD inserted you will come to a screen asking you what option you would like to select as shown in the image below.

UBCD4Win options menu
UBCD Options Menu

At this screen, select the Launch "The Ultimate Boot CD for Windows" option using the arrow keys on your keyboard and then press Enter on keyboard. UBCD4Win will now startup. This may take a while so please be patient. Once the desktop appears, you will receive a message asking Do you want to start Network support now?. At this prompt you should click on the No button.

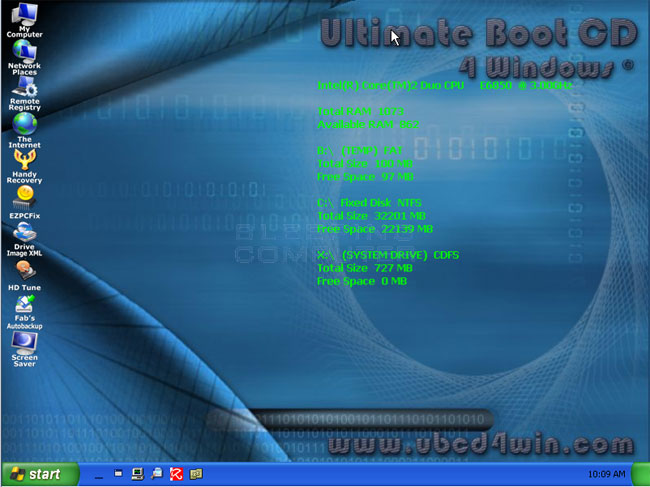
You should now be at the UBCD4Win desktop as shown in the image below.

UBCD4Win Desktop
UBCD4Win Desktop

Now we need to prepare the new hard disk that we will restore the image to. Click on the Start button, then select Programs, then Disk Tools, then Partition, and finally CompuApps SwissKnife. The SwissKnife program should now be open on your computer.

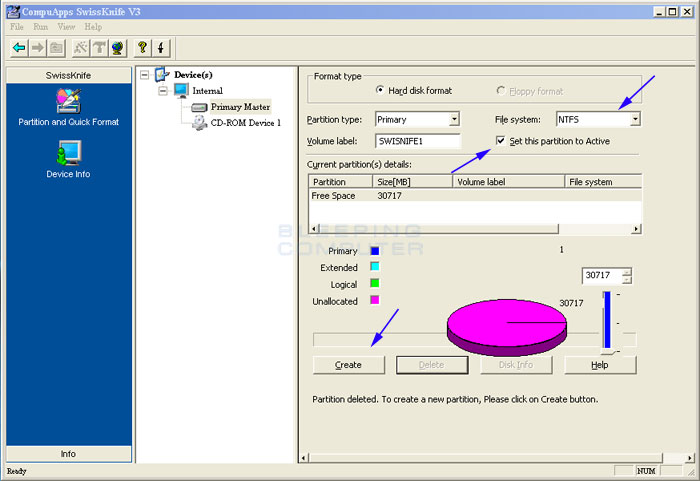
In SwissKnife, you should select the drive that you would like to create a partition on and then format. If this drive has been used in the past, you will first need to Delete the existing partition, so that you can create a empty new one. WARNING: Make certain you pick the correct hard disk to format as if you pick the wrong one, it will be erased and lost forever. Only select the drive that you want to format and restore to!

Once you select the right drive, make sure you change File System to NTFS, put a checkmark in the Set this partition to active checkbox, and then double-check you have have selected the correct drive. To see how your screen should look with the proper settings selected, please review the image below.

Create a partition with SwissKnife

If the settings are set as shown in the image above, click on the Create button to create the partition and format it. Once the formatting of the drive has been completed, you can close the SwissKnife program, but you should continue to stay in UBCD4Win.

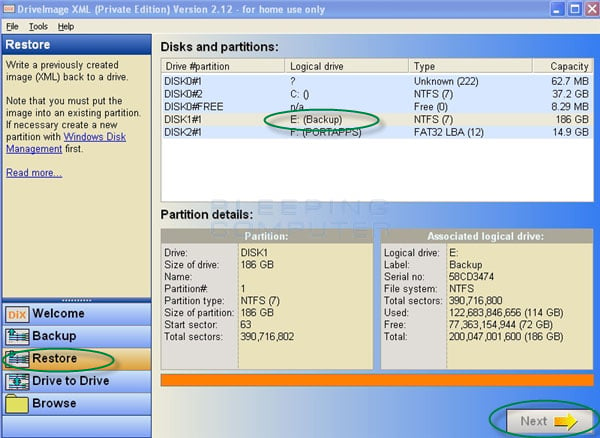
Now launch DriveImage XML by clicking on Start, then selecting Programs, then Disk Tools, then Backup and Cloning, and finally DriveImage XML. When the program opens, click on the Restore button to get to the screen shown below.


DriveImage XML Restore Screen

Select the partition that contains the backup image you would like to restore, as shown in the image above, and then press the Next button.

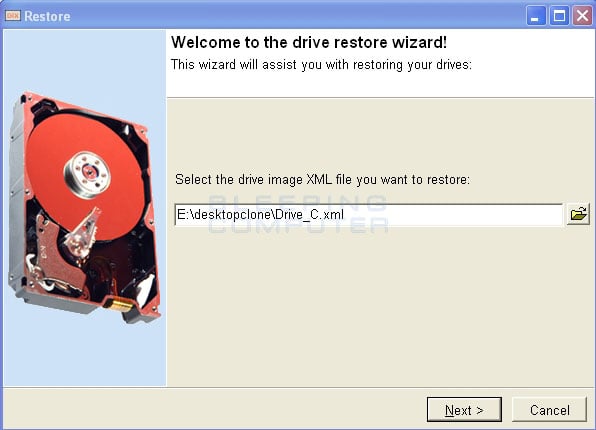
You will now be at a screen asking you to select the XML file for the stored image that you plan to restore.

Select the XML backup image

Either type in the path to the file or browse to it. Once you have select the image to restore, click on the Next button.

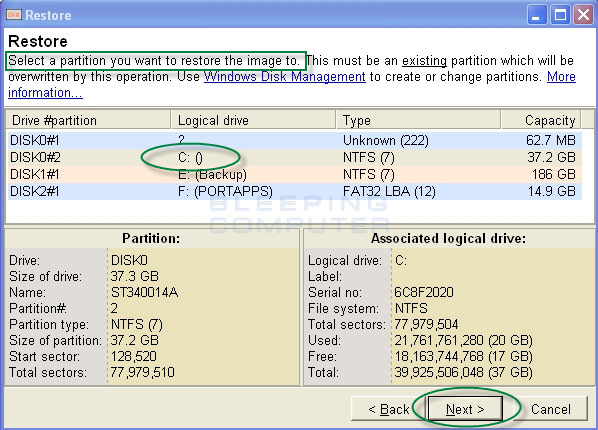
You will now be at a screen asking what drive you would like to restore the image to.

Select partition to restore image to

Select the partition that you just formatted and then click on the Next button. DriveImage XML will now restore the backup image that you had previously created to the new partition. Make sure you select the correct partition so that data on another partition is not mistakenly overwritten.

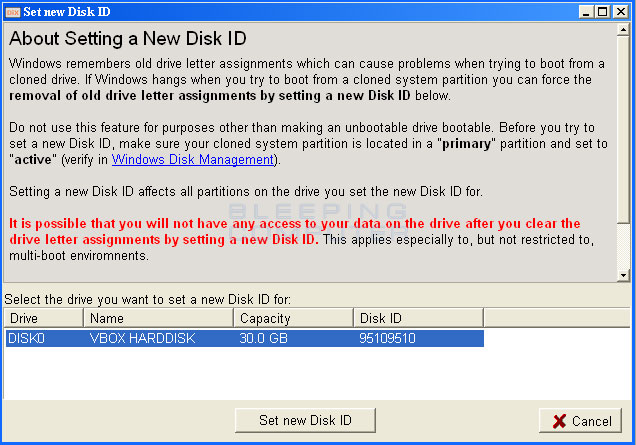
When it has finished you have one last very important thing to do before you will be able to boot up your new hard disk. You first need to setup a new Disk ID for the drive you restored the data to. At the main DriveImage XML screen, click on the Tools menu and then select Set New Disk ID. You will now be at a screen similar to the one below.

Set new Disk ID
Set new Disk ID

Select the new disk that you just restored and click on the Set new Disk ID button. Please make sure you select the correct hard disk as you do not want to perform this action on a disk that is already in use.

Once this is done, you can reboot your computer and remove the UBCD4Win CD so it boots normally. Your computer should now load from the new hard disk that you restored your data to and boot into Windows properly with your original cloned Operating System intact!!

Conclusion

Now that you know how to backup your computer using DriveImage XML, you should make sure you perform backups regularly on your computer. Having these backup images of your computer will make a hard drive malfunction or loss of data easier to manage as you will be able to easily restore your data using these instructions. Just make sure you do your backups onto a media other than the drive where the original data is stored! Otherwise, if your hard drive fails, you will not only lose your original data, but all of your backups. If you have any trouble using this tutorial, please ask us in the forums.

How to backup and restore your data using Cobian Backup

How to backup and restore your data using Cobian Backup: -

Table of Contents

  1. Introduction
  2. Installation of the backup software
  3. Using Cobian Backup to backup and restore your data
  4. Conclusion

Introduction

As many of you know, today's digital world comes with a lot of things that make our daily life easier. However, as time goes on you rely more and more on the information stored on your PC. No one is completely safe from power outages, corrupt hard disks, an infected system through a backdoor or trojan, or even a fire. To make sure that a computer can easily be restored to a previous point, software developers created what is called backup software or imaging software.

In order to view our videos you need the Macromedia Flash Player.

Download Flash now!
Cobian Video Tutorial
There are different methods of creating a backup of your partition or hard drive, but this tutorial will only focus on one possibility, using a freeware tool called Cobian Backup.

If you wish to receive a broader overview of the different forms of backing up data, you can browse this excellent Wikipedia article on backups or another one on images.

Installation of the backup software

The first step is to download the software from the author's page. You will find a download link at the bottom of that site and the current version of the software is version 8 (Black Moon).

Once the setup file is downloaded you need to double-click it to start the setup process.

  1. On the first window you will be asked what language you want the tool to be installed in. English language is pre selected, but there is a wide range of choices to choose from.

  2. Next you will be shown a window containing the License Agreement. You need to accept the agreement by putting a check mark in the box next to I accept the conditions. The button Next will not be grayed out anymore. Click the Next button to proceed

  3. The next window will prompt you for the path where Cobian Backup should be installed. It should be preset to C:\Program Files\Cobian Backup 8. Click on the Next button.

  4. You will now see a screen asking for the Installation type. At this screen select the As an application (No autostart) radio button and press the Next button. This way the backup software is not started every time you boot Windows. If you wish to have it start every time do not change any of the defaults. When ready to proceed click on Next button.

  5. The program will now install. When it has completed installing click on the Done button to finish the installation.

At this point you have successfully installed Cobian Backup. A small black half moon should now be showing in your taskbar at the bottom right of your screen near your time. This taskbar icon will look like this: black half moon

Now that the program has been installed, lets move on to learning how to use it.

Using "Cobian Backup" to backup and restore your data

To open Cobian Backup, you go to the black half moon icon located on your taskbar and right-click the icon. Then left-click on the Open option.

Before we can backup our data, it is a good idea to check the options. To do that, please click on the Tools menu and then select Options.

The program is pretty much pre-configured, but if you don't want empty folders in your backups, you can select the Engine category on the left-hand-side menu and then from there put a check mark next to Delete empty folders. When done press the OK button to exit the Options screen.

We now need to create a new task to start the backup. To do this, you just need to click the clipboard icon which looks like this : create_task.

A window will now appear containing the general properties for your backup job. There are a couple of settings that should be configured. First you have to give your backup an easily identifiable name and enter it in the Task name field as shown in Figure 1 below. There is no right way in naming such files. Just use what best suits your needs and what is easiest to remember. In our example we will call it Backup 1 so we enter it into the Task name field.


properties
Figure 1. Backup Task Properties


The area surrounded by the red rectangle defines what kind of backup you wish to make. Now you can see there is four different possibilities:

Backup Type
Description
FULL This means that Cobian will copy or compress every single file that you specify to backup in the Source section of the Files category. By default this type of backup will create backup folders containing the time stamp of when the backup ran. This is also the setting used to create the first backup regardless of which Backup type you choose.
INCREMENTAL This is the feature you will most likely be using after creating your first backup instance. It checks if the source has changed from the last backup and only will backup those files that are new or have changed since the last backup. This saves a lot of time and space on your PC or the medium you will store your backup upon.
DIFFERENTIAL This setting works in the same way as incremental but instead compares the files from the last Full backup. If the current files are different compared to the last Full backup it will back them up.
DUMMY This setting does not actually back up any files but can be used to schedule the execution of programs, close services, reboot the computer, etc.


For now, until you become more familiar with the program, we suggest you select the Incremental setting.

While still in the properties window click on the Archive option, as shown in Figure 2 below, which is located in the left-hand-side menu. This lets us set how we would like the backups archived. We have two options to choose, SQX or Zip. SQX provides better compression, thus saving storage space on your computer, but I still suggest Zip compression so that you can extract the files from a backup more easily. This is because most compression tools support ZIP compression and the latest versions of Windows (XP, 2003, Vista) have zip manipulation tools built into the operating system.

Note: When you chose to compress or encrypt your backup, you should always watch for this setting to be activated on your next backup session!


compression
Figure 2: Backup Job Archive Settings


It is also possible to enter a comment, to protect your backup with a password, or to encrypt your backup. Each of these options are illustrated in Figure 2 above. To finish off our preparation, we need to select a source and a destination. The source is the files, directories, ftp site, etc that we want to backup. The destination is where the backup will be created. To start, lets choose the data we want to backup by clicking the Files option on the left-hand-side menu. This will present you with a screen similar to Figure 3 below:


get source
Figure 3. Select the data you want to backup.

To add data to be backed up you need to click on the Add button under the Source window. This will present you with 4 options. These options are described below.

Source Type
Description
Files This will allow you to select individual files that you would like to backup.
Directory This will allow you to select directories that you would like to backup. If you add a directory as your source then all files and subdirectories underneath that directory will be backed up.
FTP Site This will allow you to backup files stored on a remote FTP site. If you select this option you will need to enter your FTP site login information in order for the program to access the files.
Manually This will allow you to type out the path to the files or directories you would like to backup.

In our example, we will manually select the directory we want to backup by clicking on the Add button under Source and then selecting Manually. At the window that pops up we type C:\ and press the OK button. You should now see the C:\ folder in your Source window. This job will now backup up everything on the C: drive.

Next we need to specify where to create the backup file. In our example we want to store the backups in our G:\ folder. So I click on the Add button under the Destination window and then click on Manually. I then type in G:\ and press the OK button. Once I click on the OK button, if the directory does not exist, it will be created.

Once we have selected all our settings for our backup job, we then press the OK button at the bottom of the properties window. This will bring us back to the main Cobian Backup screen and you will now see our new backup job listed on the left hand side of the screen as shown in Figure 4 below.


start backup
Figure 4: Backup Job Created


The above image shows the newly created task and the play-like button. You are now only one click away from starting your backup. To start it, you just need to click once on the backup job and then press the Play button as shown in Figure 4 above. Once you press OK a confirmation box will pop up asking if you would like to run the selected task. You also have the option of shutting down your computer when the backup job is completed. If you want to shutdown the computer put a check in this box. When you are ready to start the backup simply press the OK button.

Your backup will now start, and when completed, the backup will appear in the G:\ folder.


Conclusion

As you have seen in this tutorial, backing up your data can be done free of charge and in with little of your time. Having these backups on hand can save you a lot of trouble and stress when having power problems, infected machines, corrupt hard drives , or just when you need to reinstall the operating system. At the top of the page you will also find a companion video that summarizes the steps taken in this tutorial.