Table of Contents:
- Introduction
- Create a clone of your hard disk
- How to restore individual files, folders and data
- How to restore a cloned image to a different hard drive
- Conclusion
DriveImage XML is my program of choice for backing up and protecting my data. When I first began using this application, though, I had some difficulties restoring my backup image on my test boxes using the instructions found in other tutorials. Due to this, I pooled info from a variety of available tutorials, and with some work, I was able to figure out how to restore my data. With this in mind, I have put all of the information I researched into one guide so that others can properly restore their data without running into the problems that I encountered.
With this tutorial you will be able to accomplish the following tasks:
- Create a complete cloned image of your entire computer. This consists of all data, applications, the operating system, and files.
- Restore a backup image to your existing hard drive or another one in the event of total hard drive corruption or loss.
- Restore selected data if you do not need the entire OS restored.
In order to follow the steps in this tutorial, you will need an external hard drive or other removable media, CD-ROM burner, and a blank writeable CD.
Create a clone of your hard disk
The first step is to download DriveImage XML to the desktop of the computer that you wish to backup. When the file has finished downloading, double-click on the dixmlsetup.exe icon to start the installation program. Follow the prompts while selecting the default settings until you get to the last screen. Then press the Finish button to close the DriveImage XML installation program.
Once the program has been installed, there will now be an icon for the program on your desktop. Double-click on the DriveImage XML icon to start the program. When the program starts you will be greeted with a screen similar to the one below.
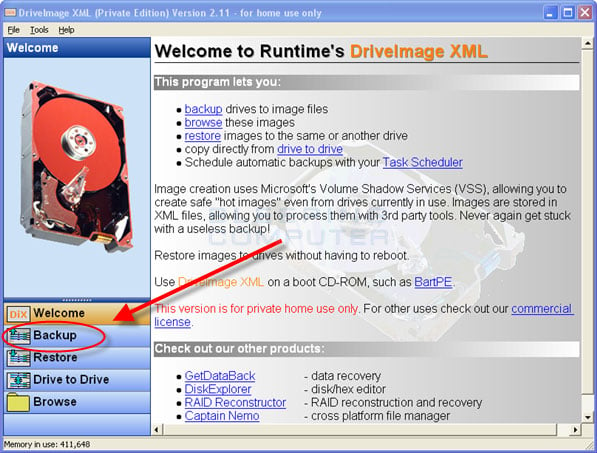
DriveImage XML Start Screen
Now press the Backup button as designated by the red arrow in the image above.
You will now be at a screen where the program asks you what drive you would like to backup as shown in the image below.
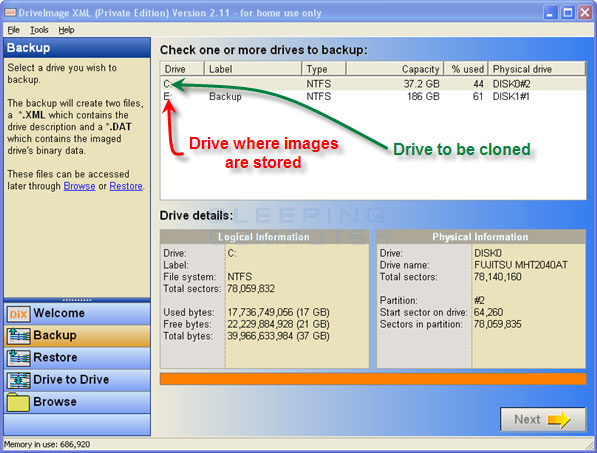
Select drive to backup
Select the drive you would like to backup by left-clicking once on it and then press the Next button.
You will now be at the Drive backup wizard as shown in the image below.
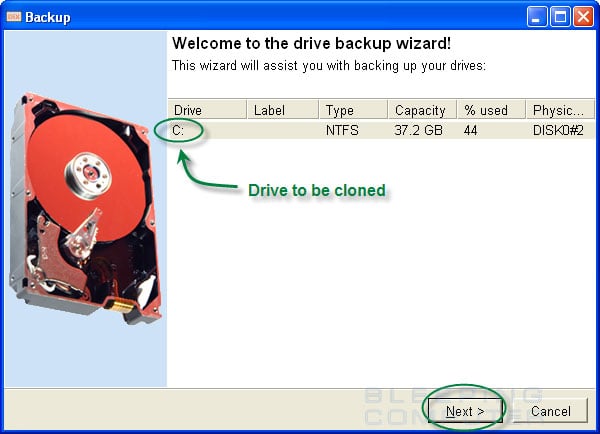
Drive backup wizard
Make sure the drive you want to backup is listed and then press the Next button.
You will now be at the Backup options screen where you can configure various options as to how you want your backup to be created and where to save it to.
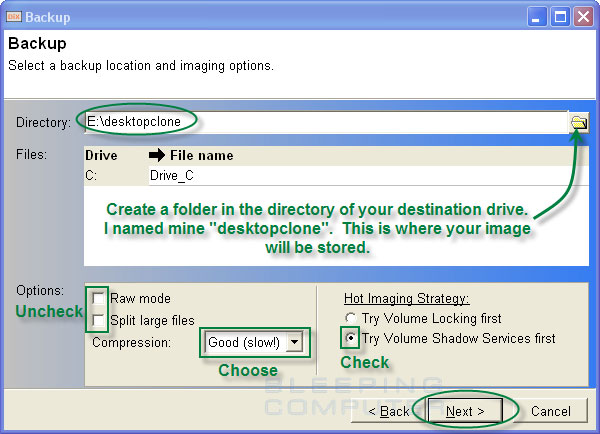
Backup option screen
For the purposes of this tutorial, I created a folder in my E:\ drive named desktopclone and set that as the directory where my backup image will be created. In the Options category you should set Compression to Good (slow!), to make the backup image smaller, and then uncheck all of the other items. Then in the Hot Imaging Strategy: category select Try Volume Shadow Services first. These suggested settings are shown in the image above. Once you have the options screen setup like you want it press the Next button to continue.
DriveImage XML will now start backing up your hard drive to the folder you specified in the previous screen as shown in the image below. This process can take a long time depending on how much data it has to backup. So please be patient while the backup proceeds.
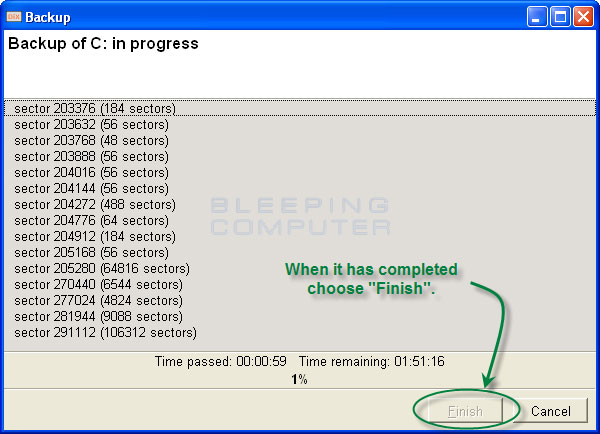
Your hard drive being backed up
When the backup has finished, you should press the Finish button and then close the DriveImage XML program. You have now created a duplicate copy of your entire OS and stored it in a compressed manner. You can now do several things with that image. You can open it up and restore individual files or folders or you can restore that image to another drive.
How to restore individual files, folders and data:
In the future if you need to restore any files from a DriveImage XML backup image you can follow these steps.
Double click DriveImageXML on the computer that you want to restore the file to. When the program is loaded, click on the Browse option on the left hand side menu. When you click on the Browse button you will be shown a screen, similar to the one below, where it asks you to select a backup image (XML) file.
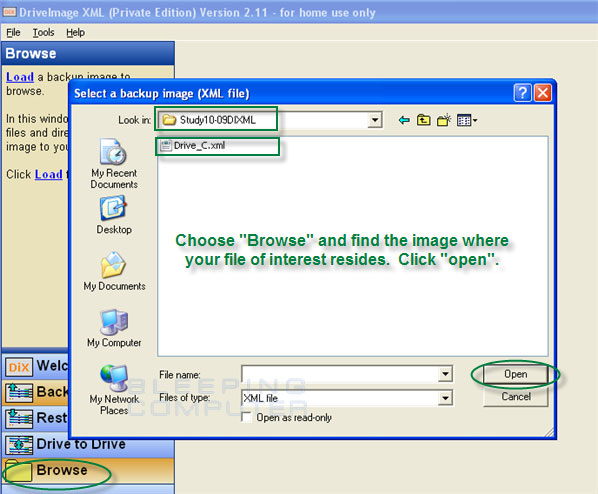
Select a backup image (XML) file
Left-click once on the XML file that you want to restore from and then press the OK button. DriveImage XML will now start loading the backup image into the program. This can take a while depending on how much data was backed up, so please be patient.
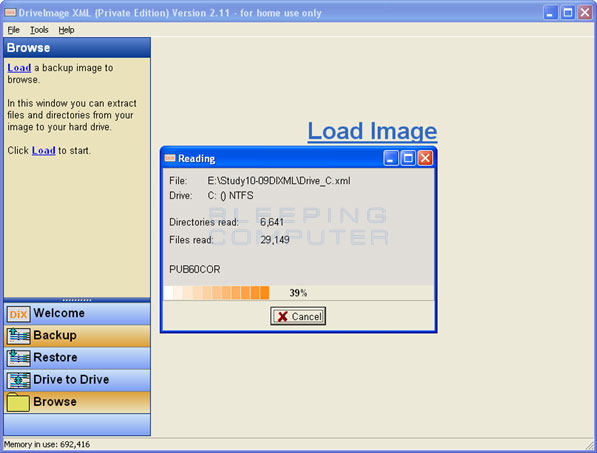
Backup image being loaded
When it has finished loading the image you will see a screen showing you what files and folders were backed up.
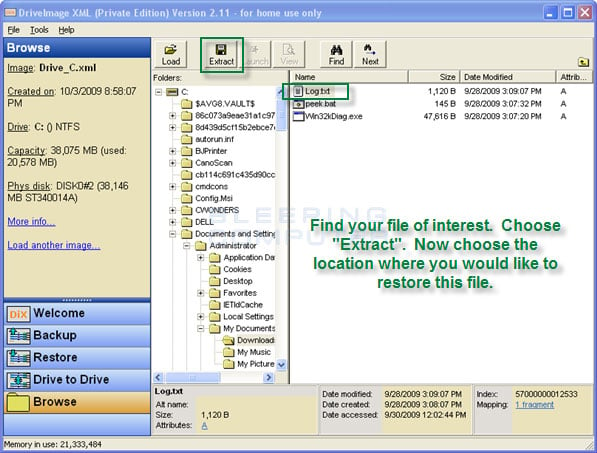
List of files and folders that were backed up
Now select the files or folders you would like to restore and click on the Extract button. This will bring up a dialog box asking where you would like to restore the files or folders.
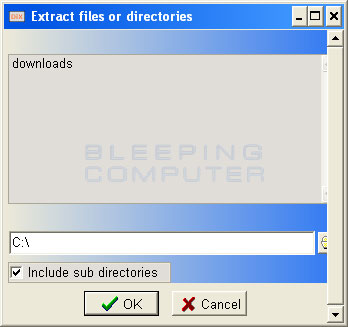
Select location where you wish to restore to
Once you have entered the location that you would like the files or folders to be restored to, you should press the OK button to start the restoration process. DriveImage XML will now start to restore your files to the location you requested. When it has finished, you can then close the DriveImage XML program.
Please note, you can restore files or folders to any computer you wish. They do not have to be restored to the same computer or location where they were originally backed up on.
How to restore a cloned image to a different hard drive:
In this part of the tutorial we will cover how to restore a cloned image of your original hard drive to another hard drive after a hard disk failure. In order to accomplish this you will need the following:
- Another hard drive that you will restore the cloned image to. This hard drive must as large, or larger, than the original drive that you made the image from.
- Access to the media that contains the cloned image of your hard drive. This can be a USB flash drive, external hard drive, or another hard drive in your computer.
- A bootable version of DriveImageXML that contains a disk partitioning program. For the purposes of this tutorial we suggest you use the Ultimate Boot CD 4 Windows as it already contains the SwissKnife partitioning program and DriveImage XML programs. Information and instructions on how to create the Ultimate Boot CD 4 Windows can be found at the below links:
How to Build the Ultimate Boot CD for Windows
UBCD4Win FAQ
It is also important to note, that we suggest that you restore a cloned image of your entire disk to another hard disk in the same computer it was originally backed up on. This way there won't be any Windows activation issues or driver issues. You can, though, restore a cloned image to a different computer than it was originally backed up on. Please note, though, that when the image is restored to another computer, the different hardware might prompt a red flag that would require you to reactivate Windows. To rectify this, you can usually just call Microsoft and explain the situation and they will allow you to activate your copy of Windows.
Once you have all the required items assembled, connect the external disk or media that contains the image you want to restore and the hard disk you plan to restore the image to your computer. Then insert the UBCD4Win disc into your CDRom and restart your computer to boot off of it. The computer should choose to boot from the UBCD4Win CD automatically. If it doesn't and you are asked if you want to boot from CD, then choose that option. Finally if that does not work, you may need to enter your computer's BIOS and change the boot order of your devices. To enter the BIOS you usually need to click on the F12, F2, or ESC keys right as the computer starts. You will typically see a message stating what key you need to press to enter Setup.
When the computer boots up with the UBCD4Win CD inserted you will come to a screen asking you what option you would like to select as shown in the image below.
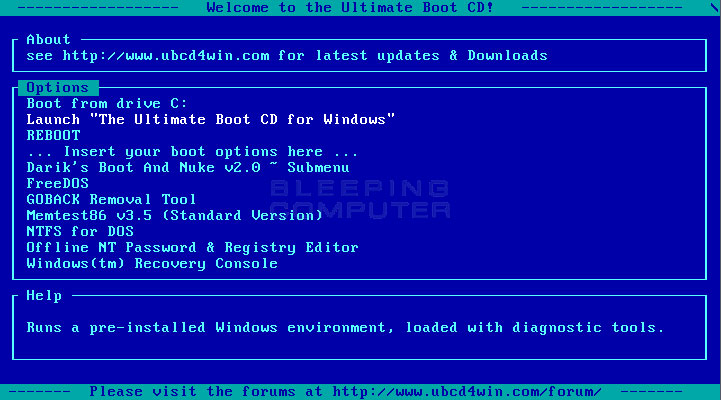
UBCD Options Menu
At this screen, select the Launch "The Ultimate Boot CD for Windows" option using the arrow keys on your keyboard and then press Enter on keyboard. UBCD4Win will now startup. This may take a while so please be patient. Once the desktop appears, you will receive a message asking Do you want to start Network support now?. At this prompt you should click on the No button.
You should now be at the UBCD4Win desktop as shown in the image below.
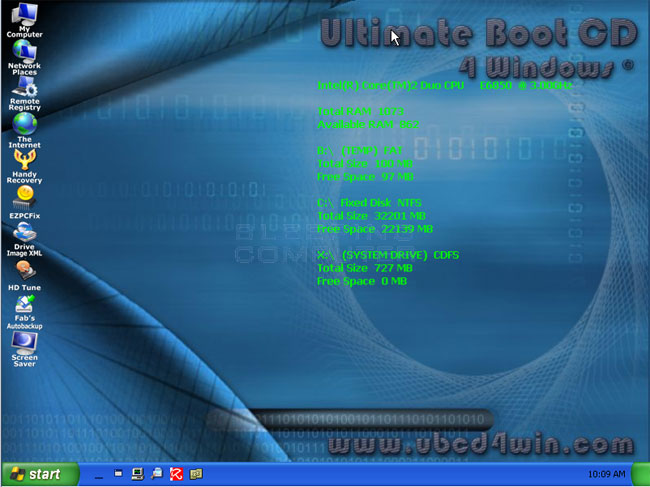
UBCD4Win Desktop
Now we need to prepare the new hard disk that we will restore the image to. Click on the Start button, then select Programs, then Disk Tools, then Partition, and finally CompuApps SwissKnife. The SwissKnife program should now be open on your computer.
In SwissKnife, you should select the drive that you would like to create a partition on and then format. If this drive has been used in the past, you will first need to Delete the existing partition, so that you can create a empty new one. WARNING: Make certain you pick the correct hard disk to format as if you pick the wrong one, it will be erased and lost forever. Only select the drive that you want to format and restore to!
Once you select the right drive, make sure you change File System to NTFS, put a checkmark in the Set this partition to active checkbox, and then double-check you have have selected the correct drive. To see how your screen should look with the proper settings selected, please review the image below.
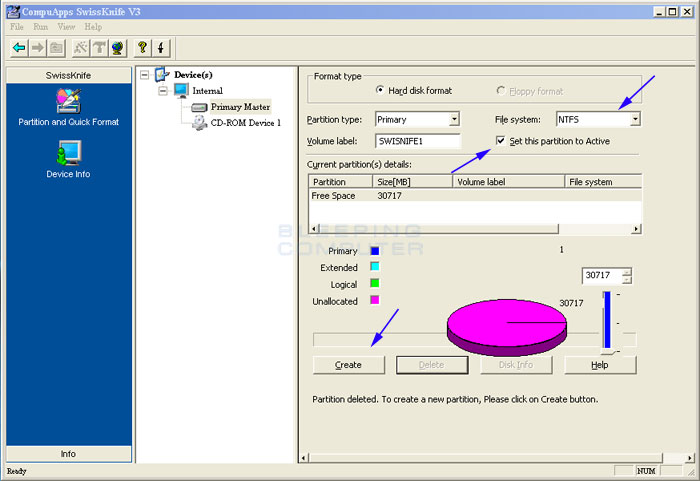
Create a partition with SwissKnife
If the settings are set as shown in the image above, click on the Create button to create the partition and format it. Once the formatting of the drive has been completed, you can close the SwissKnife program, but you should continue to stay in UBCD4Win.
Now launch DriveImage XML by clicking on Start, then selecting Programs, then Disk Tools, then Backup and Cloning, and finally DriveImage XML. When the program opens, click on the Restore button to get to the screen shown below.
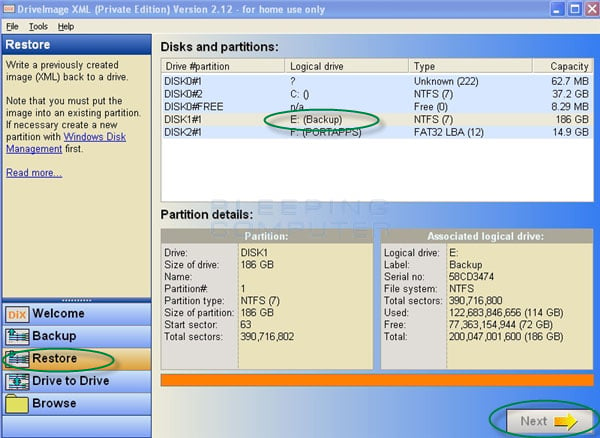
DriveImage XML Restore Screen
Select the partition that contains the backup image you would like to restore, as shown in the image above, and then press the Next button.
You will now be at a screen asking you to select the XML file for the stored image that you plan to restore.
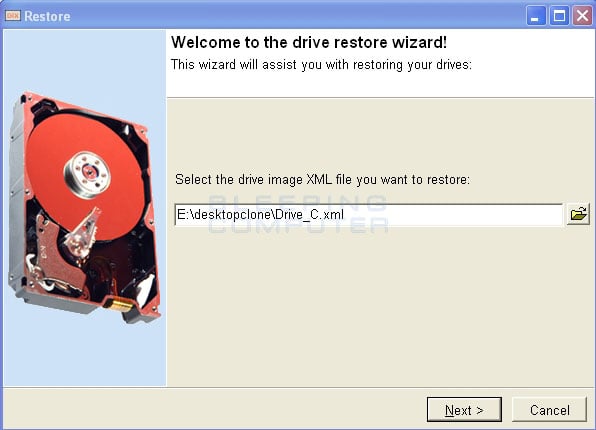
Select the XML backup image
Either type in the path to the file or browse to it. Once you have select the image to restore, click on the Next button.
You will now be at a screen asking what drive you would like to restore the image to.
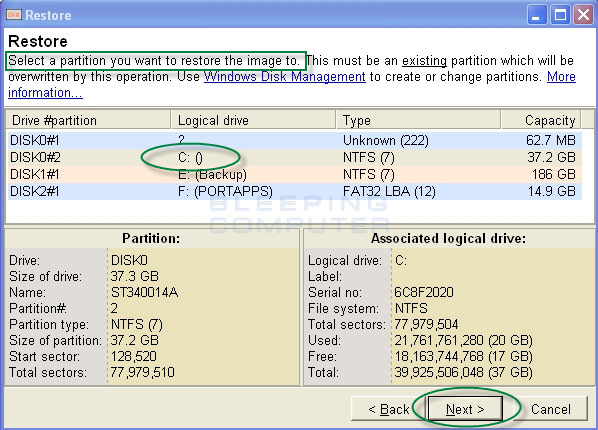
Select partition to restore image to
Select the partition that you just formatted and then click on the Next button. DriveImage XML will now restore the backup image that you had previously created to the new partition. Make sure you select the correct partition so that data on another partition is not mistakenly overwritten.
When it has finished you have one last very important thing to do before you will be able to boot up your new hard disk. You first need to setup a new Disk ID for the drive you restored the data to. At the main DriveImage XML screen, click on the Tools menu and then select Set New Disk ID. You will now be at a screen similar to the one below.

Set new Disk ID
Select the new disk that you just restored and click on the Set new Disk ID button. Please make sure you select the correct hard disk as you do not want to perform this action on a disk that is already in use.
Once this is done, you can reboot your computer and remove the UBCD4Win CD so it boots normally. Your computer should now load from the new hard disk that you restored your data to and boot into Windows properly with your original cloned Operating System intact!!
Now that you know how to backup your computer using DriveImage XML, you should make sure you perform backups regularly on your computer. Having these backup images of your computer will make a hard drive malfunction or loss of data easier to manage as you will be able to easily restore your data using these instructions. Just make sure you do your backups onto a media other than the drive where the original data is stored! Otherwise, if your hard drive fails, you will not only lose your original data, but all of your backups. If you have any trouble using this tutorial, please ask us in the forums.
No comments:
Post a Comment