Introduction
After a version of Windows is released, over time bugs are found or new enhancements are added by Microsoft. In order to fix these bugs and add these new enhancements, Microsoft will occassionally release a large update called a Windows service pack that contains all of bug fixes, enhancements, and new features created since Windows was released. Unfortunately, CDs that you have for Windows usually do not have these newer Service Packs already installed. This means that if you ever need to reinstall Windows with your CD, you will also have to deal with the timely task of reinstalling the service packs. To make matters worse, some of the fixes in these service packs are security related, and by not having them installed, your computer may be at risk from viruses or vulnerable to hackers. Therefore, not having these service packs installed after you install Windows could open yourself up to big security risks.
In order to resolve these types of issues it is possible to integrate the newer service packs over an an older copy of the Windows installation files. This allows you to install Windows with the service pack already installed so that you do not have to install them after the installation process. This process of integrating the newer service packs with older installation files is called slipstreaming. The goal of this tutorial is to walk you through creating a slipstreamed Windows installation CD or DVD that already contains Windows XP Service Pack 3. That way if you install Windows using this CD/DVD, your installation will already have these large updates installed, your computer will not be in as much danger, and you can just focus on installing the latest updates and the applications that you want on your computer.
Before we can start the process of creating Windows install disc, we first need to gather some software. Below is a list of software that you will need to download and install, as well as CDs that you should have on hand in order to continue.
- An existing copy of Windows XP home, Professional, or Media Center. Unfortunately, for this step you can not use an OEM CD provided by your computer manufacturer (Dell, HP, etc).
- Nero Burning Rom or nLite if you do not have NERO
- ISOBUSTER
- Network installation copy of Windows XP Service pack 3
- A copy of your SATA drivers from your motherboard Web site if you have a SATA HDD that requires special drivers.
- A blank writable CD or DVD and a CD/DVD burner.
Once you have made sure you have all the software or media listed above, you should create a folder that will be used to store the files that will be written to the installation disc. For this tutorial, we suggest you create a folder on your C: drive labeled XPCD. Once the folder is created, please copy the entire contents of your XP CD to this folder.
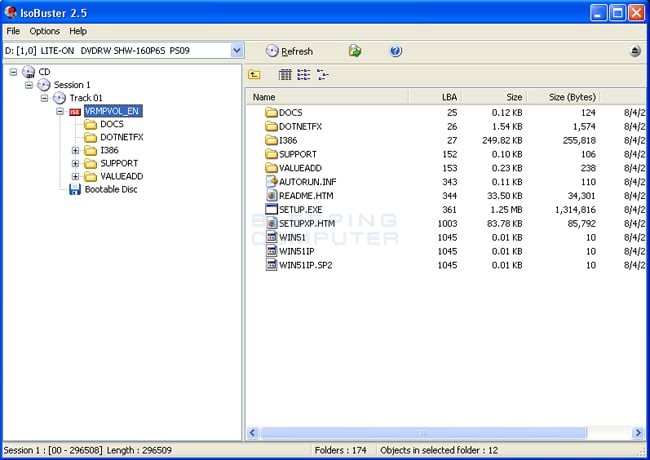
After you have completed copying your windows XP CD you will need to create a boot image by extracting it from your existing XP CD. To do this, have your XP CD inserted in your computer and start ISOBuster. When the program starts you will see a screen similar to the following. If you do not, change the selected drive so that it is pointing to the drive that contains your Windows XP CD.
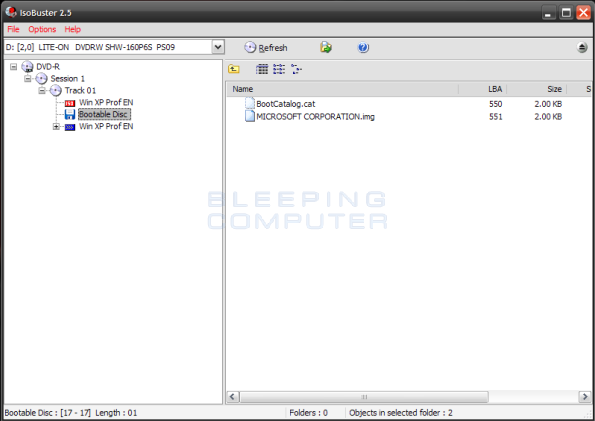
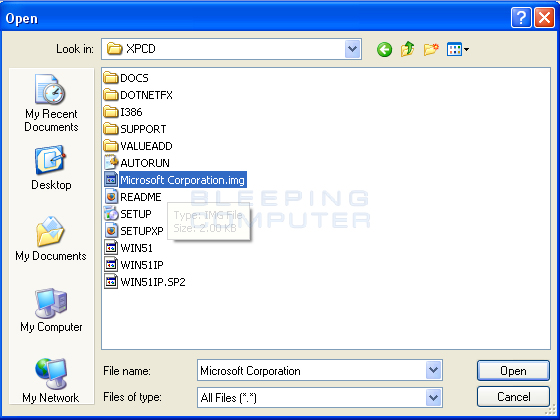
In the left hand pane you should select Bootable Disc. Click once on this Bootable Disc option, so it is selected, and you will now see a file called Microsoft Corporation.img in the right hand panel as shown in the image below.
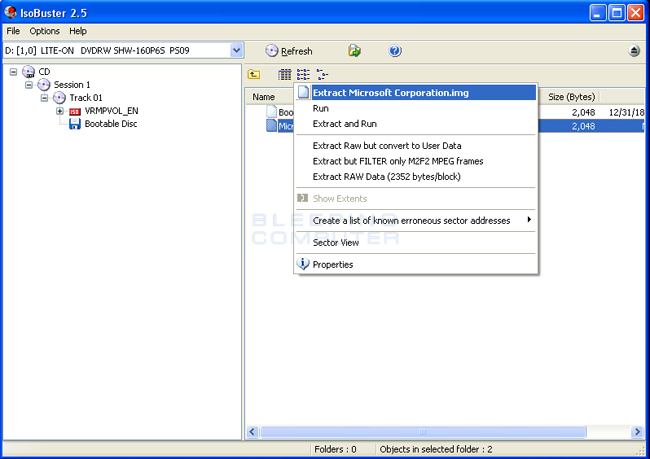
Now right-click on the MICROSOFT CORPORATION.img file and select the extract MICROSOFT CORPORATION.img option as shown in the image below.
When it prompts you for the location where you would like to extract the file, save it to the folder you copied the contents of your XP CD earlier in the guide. If you are following the guide step-by-step, this folder will be C:\XPCD.
How to slipstream Windows Service Pack 3
Now that we have extracted the boot image we need to slipstream the service pack over the Windows files you previously copied into the C:\XPCD folder. Please make sure you have downloaded the network installation version Windows XP Service Pack 3 before continuing as we will need it during this step. When downloading the service pack, please download the files to the root directory of your C: drive.
Once the service pack is downloaded, you can slipstream the service pack using two methods. The first method is to use the command line and the second is to use the nLite program. The command line method will probably be a bit easier if you are comfortable with the Windows command prompt. Otherwise, use the nLite method described below.
Using the Command Line to slipstream the service pack:
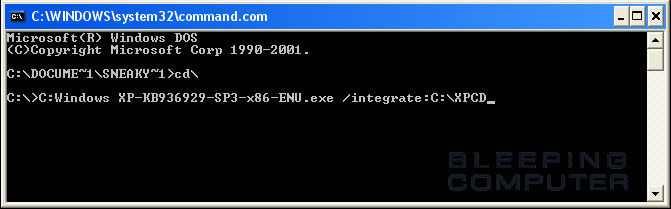
Click on the Start Menu and then select Run. Then type command into the Open: field. Finally, click on the OK button. You will now be at a command prompt where you should type the following bolded lines. After each line, press enter on your keyboard as shown in the figure below.
CD\
C:WindowsXP-KB936929-SP3-x86-ENU.exe /integrate:C:\XPCD
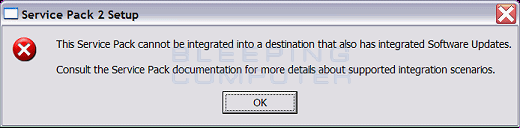
If you are using an OEM Windows XP CD you will receive the following error. This error means that you cannot use this type of CD to create a slipstreamed installation and will not be able to continue with this tutorial.
Now that you are done slipstreaming the service pack using the command line. You should now skip to the section detailing how to slipstream your SATA hard drive drivers. If you are not using a SATA drive you can skip ahead to learn how to burn the DVD.
Using nLite to slipstream the service pack:
Download nLite and install the program. When the program starts, click on the Next button, and then at the next screen, select the Browse button to see a screen similar to the one below.
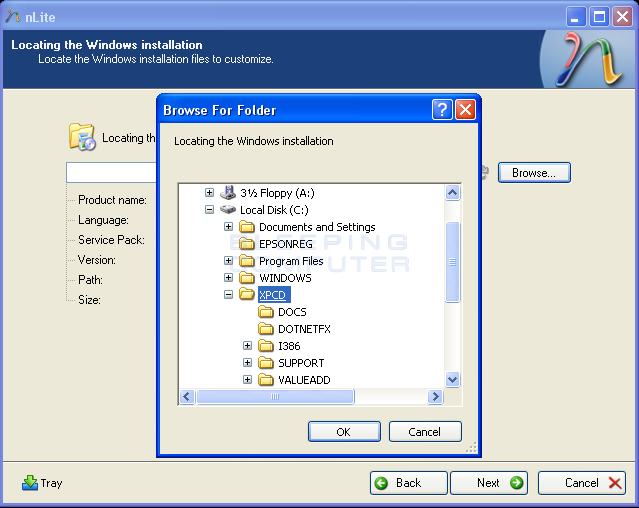
Now select your Windows installation folder that we created at C:\XPCD and then click on the OK button. nLite will scan the directory and identify any previously installed Service Packs. When it has finished, click on the Next button. You will now be on a screen asking if there are any presets that you would like to use. Just click on the Next button again to continue.
You will now be on the Task Selection screen. Simply click once on the Service Pack button so that the circle becomes green as shown in the image below.
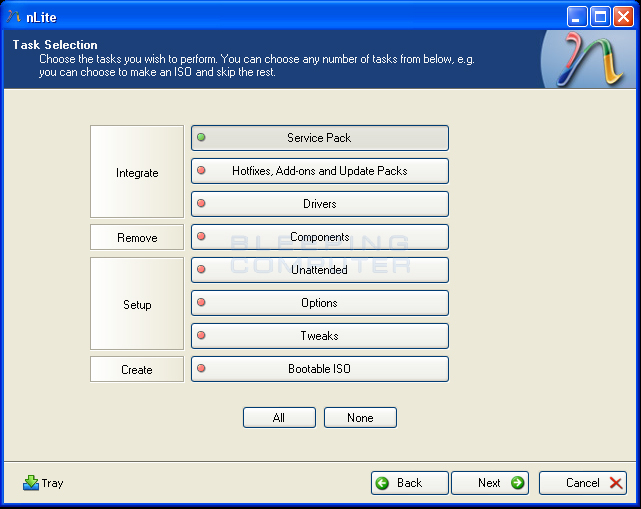
Now that it is selected, click on the Next button. You will now be prompted for the location of your service pack installation file that you downloaded earlier as shown in the image below.
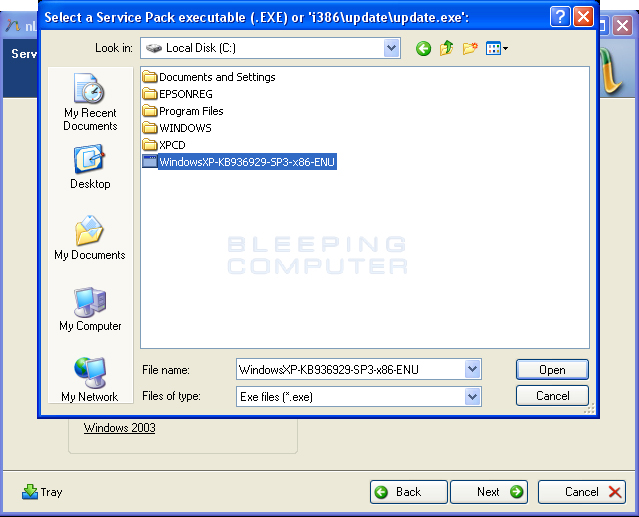
Browse to the service pack file and select it. Then click on the Open button. file. Once you click on the open button, nLite will automatically slipstream the service pack into your C:\XPCD folder. When it has finished, click on the Next button, and then at the next screen, click on the Finish button to close the program.
You should now continue to the section detailing how to slipstream your SATA hard drive drivers. If you are not using a SATA drive you can skip ahead to learn how to burn the DVD.
How To slipstream SATA Drivers Using nLite
If you have not already installed nLite, you will need to download and install the program first. Next, you will need to download your SATA drivers from your motherboard or computer manufacture's web site. In our example, I will be using VIA raid drivers from Biostar. Once the SATA drivers have been downloaded, you should extract them to a folder on your hard drive. In our example, we have extracted the drivers into the C:\SATA Driver folder.
Now that everything is prepared you should start the nLite program. When the program starts, click on the Next button, and then at the next screen, select the Browse button to see a screen similar to the one below.
Now select your Windows installation folder that we created at C:\XPCD and then click on the OK button. nLite will scan the directory and identify any previously installed service packs. When it has finished, click on the Next button. You will now be on a screen asking if there are any presets that you would like to use. Just click on the Next button again to continue.
You will now be on the Task Selection screen. Simply click once on the Drivers button so that the circle becomes green as shown in the image below.
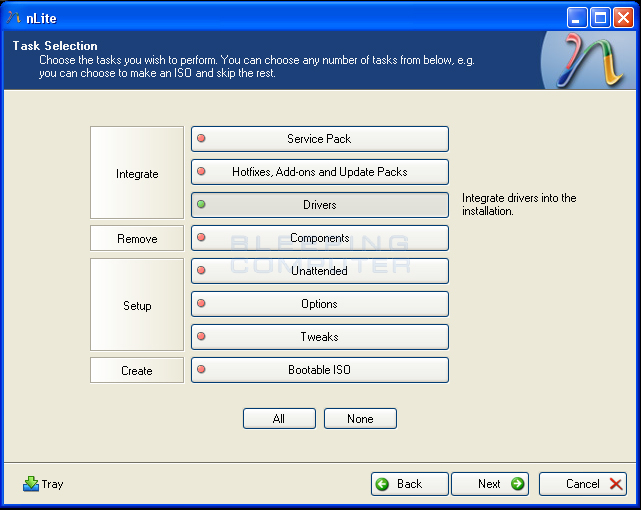
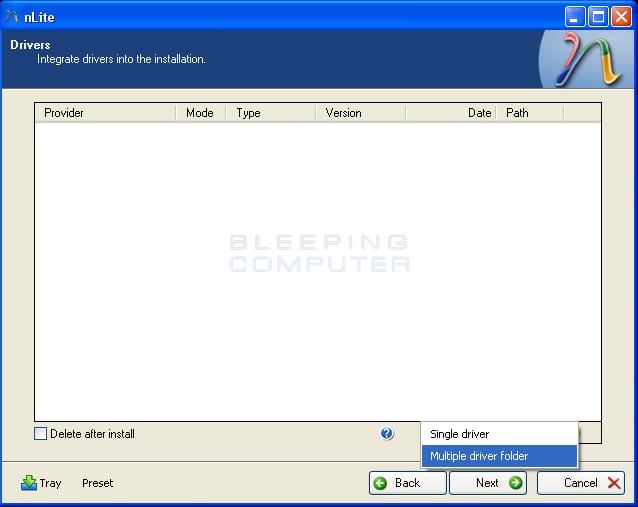
After selecting Drivers, you should click on the Next button. You will now be at the Drivers screen. You should now click on the Insert button and then select the Multiple driver folder option so you can include all of the drivers for your specific operating system.
You will now be prompted for the folder where your extracted drivers are. You now want to browse to this folder, and when there, locate the correct folder for your Operating system. In our case it is the x86 directory since I am using 32bit Windows XP Pro.
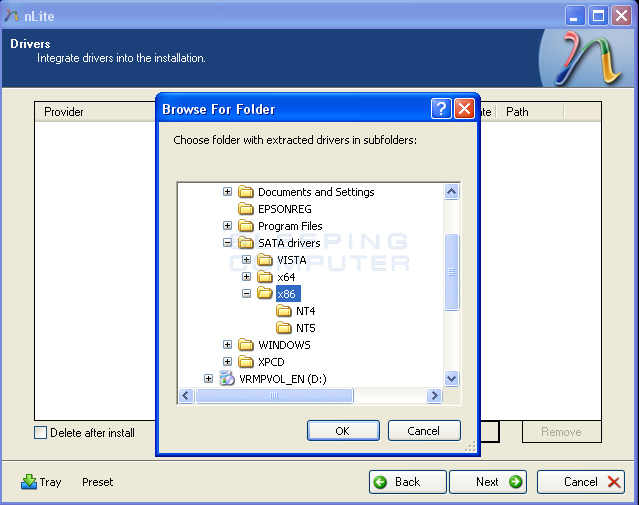
You should now select the folder, and then press the OK button. nLite will now automatically install the drivers contained in both subdirectories. You will now see a screen showing the available drivers found in these folders. You should click the All button to select all drivers for your system and then press the OK button.
NOTE: If there are drivers for other versions of windows, for example Vista or 64 bit drivers, do not install them as it will cause file load errors. If you do select them, nLite will notify you of the problem.
When done selecting the correct drivers, click on the OK button.
A new screen will appear asking what driver mode you would like to select. At this screen, you should select the Textmode Driver as shown in the image below.
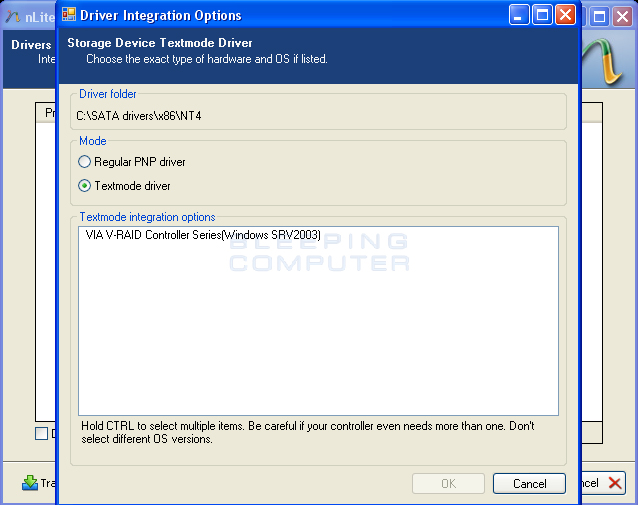
If multiple are listed in the Textmode integration options box, select the appropriate driver for your operating system. The OK button will now become available and you should click on it. Do this same routine for for each and every driver that you are installing.
After selecting Textmode Driver you will be at a page listing all the drivers that will be installed. You should click on the Next button and then click on the OK button when it asks if you want to start the process. Your SATA drivers will now be integrated into your Windows files folder. When the process has finished, click on the Next button and then the Finish button.
You are now ready to burn the Windows files to your a bootable DVD. If you will be using Nero to create this DVD, then you can continue to the next section. Otherwise, you can skip ahead to instructions on how to use the free nLite utility to create your DVD.
Burn a bootable CD or DVD Using Nero
Please note that older versions of NERO may not use the same steps as what are outlined in this guide. These steps were created for use with Nero 7 and above.
If you own Nero, then start the Nero Burning ROM program. Once started, if you do not see an option labeled Make Bootable DVD, as shown in the image below, you will need to enable the advanced user settings.
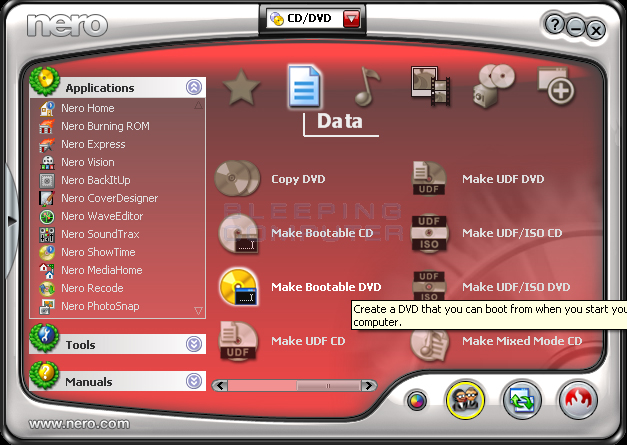
To start, select the Make Bootable DVD option. On the next screen you will be asked to select a Boot image. You should browse to the folder where you saved the Microsoft Boot image that you extracted using Isobuster in previous steps and select it. Please note, that by default Nero will be looking for a file with a .IMA extension, so you will need to change the file type to All Files (*.*) in order to select the MICROSOFT CORPORATION.img boot image. This is shown in the figure below.
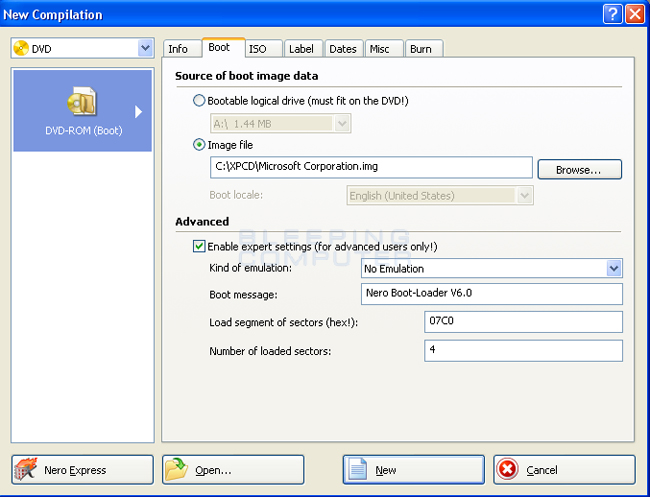
You should now click on the Boot tab and put a checkmark in Enable expert settings. Then change Kind of Emulation to No Emulation. Then change the Number of loaded sectors to 4. When done your screen should look similar to the image below.
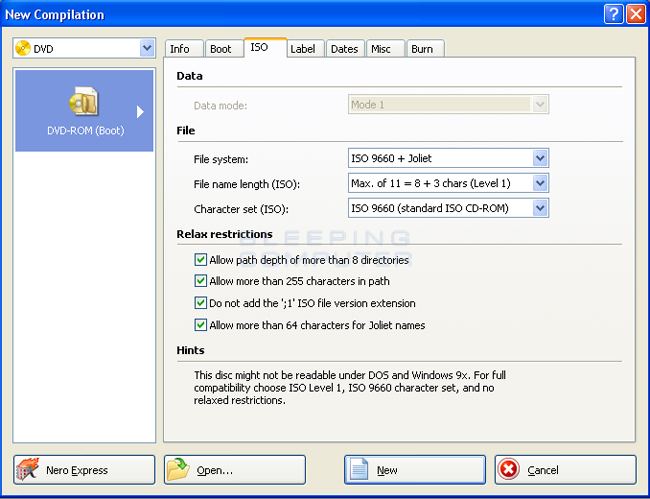
Under the ISO tab, you should not have to change any settings. Just click on the tab to make sure it is configured as shown in the image above. If you have an older version of Nero you will not have the option Do not add the ';1' ISO file version extension under the Relax restrictions category.
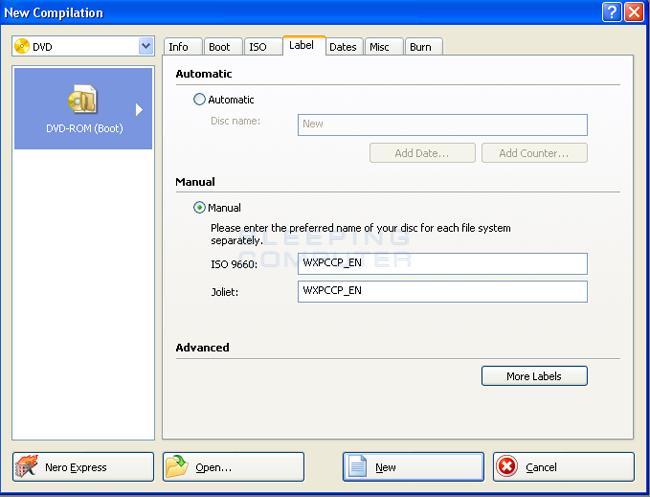
Now click on the Label tab. We recommend changing the labels on your completed CD or DVD so that they match your Windows CD. To do that Select Manual and then enter the labels into the ISO 9660 and Joilet fields. For Windows XP Pro you should enter WXPCCP_EN. For Windows XP Home you should enter WXHCCP_EN. An example of this is shown in the image below.
Now click on the New button to open the file browser as shown in the image below.
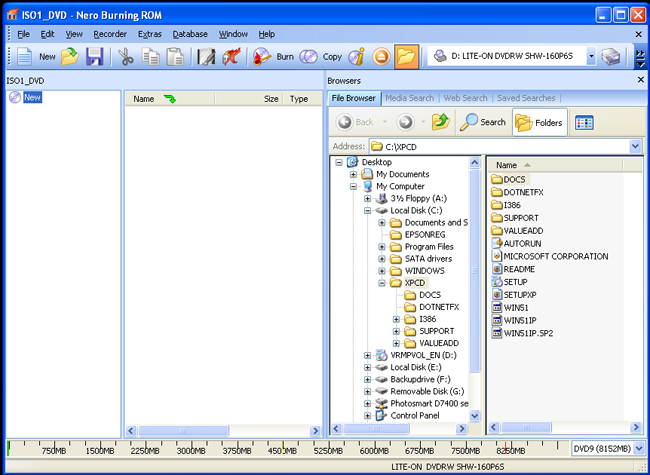
In the right hand pane you will navigate to your slipstreamed location, C:\XPCD, and left-click once on it to select it. Then select all of the files in the right-hand pane and drag them into the left-hand pane. When this is completed, click on the Burn button in the top menu bar. Nero will create the bootable CD for you and you will now have a Slipstreamed Windows XP SP3 CD or DVD!
Burn a bootable CD or DVD using nLite
If you have not already installed nLite, you will need to download and install the program first and then start it.When the program starts, click on the Next button, and then at the next screen, select the Browse button to see a screen similar to the one below.
Now select your Windows installation folder that we created at C:\XPCD and then click on the OK button. nLite will scan the directory and identify any previously installed Service Packs. When it has finished, click on the Next button. You will now be on a screen asking if there are any presets that you would like to use. Just click on the Next button again to continue.
You will now be on the Task Selection screen.
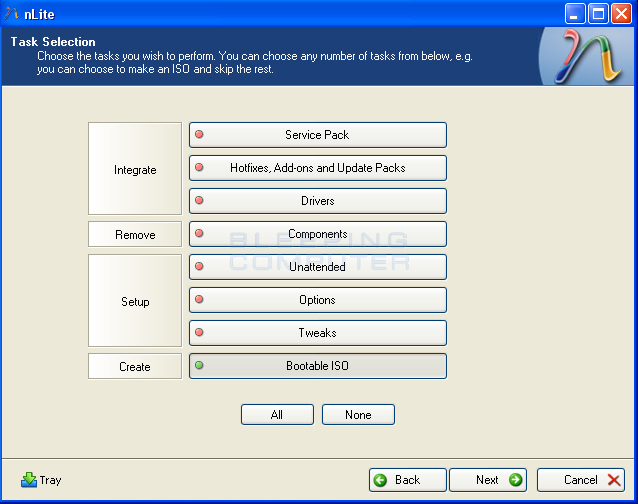
On this screen select the Bootable ISO option as shown in the image above and then click on the Next button.You will now be at the Bootable ISO screen that will look similar to the image below.
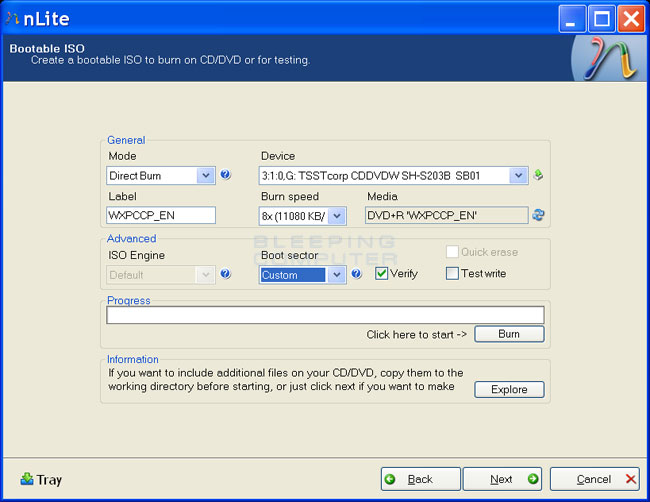
If the screen above does not look exactly like what you see on your computer, do not be concerned as we need to make some changes first. First change the Mode option to Direct Burn. Then, for the Label field we recommend using the same label that was on your original Windows CD. For Windows XP Pro you should enter WXPCCP_EN into the Label field. For Windows XP Home you should enter WXHCCP_EN into the label field. Next, make sure your CD/DVD burner is selected in the Device menu. Last, but not least, change the Burn Speed to 8X in order to get a reliable burn.
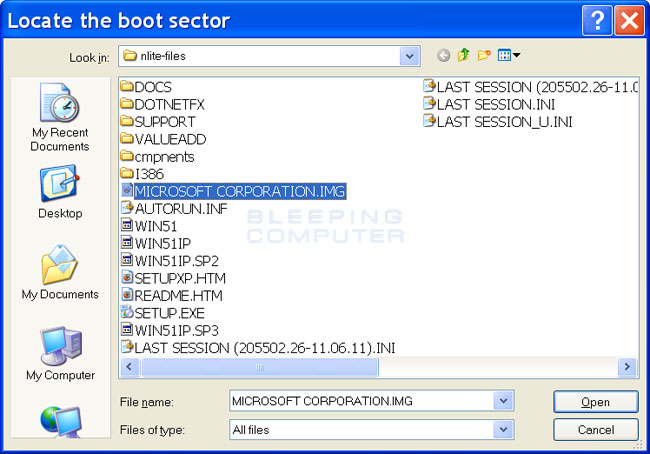
When you have finished configuring these settings, we need to specify our boot image. To do that, change Boot Sector to custom and a window will open asking you to locate your boot sector. You should browse to the folder where you saved the Microsoft Boot image that you extracted using Isobuster in previous steps and select it. Please note, that by default nLite will be looking for .bin or .dat files, so you will need to change Files of type to All Files. Once you do that you will be able to select the MICROSOFT CORPORATION.img boot image as shown in the image below.
Once you have changed all of your settings and selected your boot image, we are ready to create the Windows installation media. To start this process, click on the Burn button. A confirmation prompt will appear asking if you are sure you want to burn the content to the media. You should click on the Yes button to start the process. nLite will now start preparing the content that will be copied to your media. This may take some time, so please be patient. When it has finished preparing the files, nLite will start writing them to your media as shown in the image below.
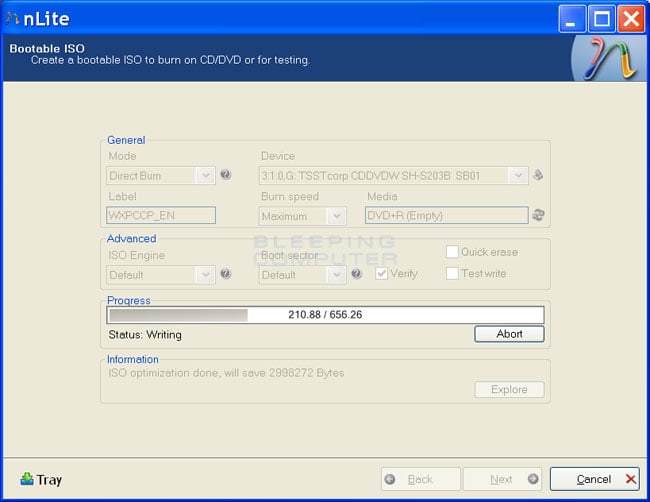
Please be patient while the files are written to your media. When it has finished, you will see a message stating the written files were verified successfully. You can then click on the Next button and then click on the Finish button to close nLite.
You now have a Slipstreamed SP3 CD or DVD!
Now that you have learned how to make a bootable Windows installation disc you can make an install or reinstall process much quicker and secure. Using a disk like this you can now install Windows XP and be at a high patch level so that your freshly installed operating system is less vulnerable to malware and hackers. This also enables you to go to locations where there is not a lot of bandwidth and install Windows with all of the latest service packs installed so you do not have to wait for a long time while the service pack downloads. If you have any questions regarding this process, or tutorial, please feel free to ask us in the Windows XP forum.
No comments:
Post a Comment