Friday, April 29, 2011

How to use the removal tools

Home Users


Just download the removal tool (.zip file - 3MB), double click on it, chose "Extract all files..." from the File menu, and follow the wizard's instructions. You can use any other archiver, like WinZip. This will create a folder called bd_rem_tool.

Inside it, find the program called "bd_rem_tool_gui.exe" (or just "bd_rem_tool_gui") and double click on it. It is very important to extract all the files from the zip archive, and not only bd_rem_tool_gui.exe, because all the other files are needed for the disinfection. Then follow the tool's instructions.

If you have Windows Vista with User Acccess Control enabled, or if you are running as a restricted user in Windows XP, right click the "bd_rem_tool_gui" program and choose "Run as Administrator". You will be prompted to enter credentials for an admin account.

We recommend a system reboot after the disinfection is complete, to restore full internet access.

If you don't already have permanent antivirus protection or if your current antivirus has failed you, consider using the advanced protection tool provided by BitDefender.


Network administrators

The removal kit (.exe file - 13MB)contains the BitDefender Deployment tool and a deployable removal tool to be installed on all the possibly affected computers.


Download and install the kit on a network computer (preferably, but not neccessarily, on a known clean one).


Run the DptTool from the Desktop shortcut or from the Start menu.


On the settings screen, set the reboot option to "Restart if needed".
Set the other options as needed.

General Options

The options in the General Options category allow you to specify the deployment behaviour on the target computers. You can check:
  • Notify user before and after deploying the package - to alert the user logged on the target computers about the deployment process. Two dialogs will appear on the user's screen, before and after the deployment process.
  • Do not display user interface on the target computers (recommended) To install the package silently in the background. The Windows Installer interface will not be displayed on target computers.
  • Use non interactive Authentication - to provide the administrative credentials (username and password) that will be used to authenticate on the target computers.

If the computers to be scanned are set up to not respond to ping (i.e. they have very restrictive firewall policies), set the tool to NOT ping before installing, or the installation will not take place. Click Next to continue.


Select the computers to be scanned from the Active Directory listing provided and start the deployment. Please note that the process may take a very long time if some of the computers selected are not online and the "ping before installing" option was de-selected in the previous screen, due to timeouts. Click Start to continue.


The Deployment tool will now install and run the Downadup removal tool on the selected computers.


The tool will exit cleanly and return "job Finished" if no infection is found.If an infection is found, it will be removed and the affectted machine will be scheduled to reboot after 30 seconds. The return message will also be "Job Finished"Any other situations (target machine not online, removal tool could not be run, etc) will be reported as such.The returned messages can be sorted and saved for later use - e.g. to create a list of machines that need to be cleaned later.

Worm:W32/Downadup.AL


Disinfection

Removal Tools

F-Downadup
Specific tool with heuristics for Downadup worm variants:


FSMRT
Non-specific detection tool, larger file size:


Note: these are command line tools, please read the text file included in the ZIP for additional details.

Updates

These are beta tools. Use the following FTP location to determine the file dates:


Scanning Options

Downadup makes use of random extension names in order to avoid detection.

During disinfection scanning options should be set to:

• Scan all files

Microsoft Help and Support

Knowledge Base Article 962007 provides numerous details for manual disinfection of Conficker.B (alias Downadup).

Additional Details

Worm:W32/Conficker.AL is a variant of Worm:W32/Downadup.A which is able to spread copies of itself over a network using three different methods: file sharing, exploitation of a vulnerability and exploitation of Windows Autorun.

In addition to attempting to connect to remote sites, Conficker.AL uses stealth techniques to hide its actions, and makes a number of changes to the Windows Registry.

More technical information is also available in the related descriptions:


Installation


Upon execution, Downadup creates copies of itself in:

• %System%\[Random].dll
• %Program Files%\Internet Explorer\[Random].dll
• %Program Files%\Movie Maker\[Random].dll
• %All Users Application Data%\[Random].dll
• %Temp%\[Random].dll
• %System%\[Random].tmp
• %Temp%\[Random].tmp

* Note: [Random] represents a randomly generated name.

Each file's timestamp is amended to match the timestamp of the %System%\kernel32.dll file. The worm then creates autorun entries in the registry, which ensure that a copy of the worm is executed at every system startup.

The worm then attach itself to the following processes:

• svchost.exe
• explorer.exe
• services.exe


Activity

The worm disables a number of system features, in order to facilitate its activities. It disables the following Windows services:

• Windows Automatic Update Service (wuauserv)
• Background Intelligent Transfer Service (BITS)
• Windows Security Center Service (wscsvc)
• Windows Defender Service (WinDefend)
• Windows Error Reporting Service (ERSvc)
• Windows Error Reporting Service (WerSvc)

In addition to disabling these services, it checks to see whether it is running on a Windows Vista machine; if so, it also runs the following command to disable Windows Vista TCP/IP auto-tuning:

• netsh interface tcp set global autotuning=disabled

The worm also hooks the following API's in order to block access when the user attempts to access a long list of domains:

• DNS_Query_A
• DNS_Query_UTF8
• DNS_Query_W
• Query_Main
• sendto

W32.Downadup Removal Tool

W32.Downadup Removal Tool

Discovered:
January 13, 2009
Type:
Removal Information
http://www.symantec.com/business/security_response/writeup.jsp?docid=2009-011316-0247-99
This tool is designed to remove the infections of:


Important:
  • If you are on a network or have a full-time connection to the Internet, such as a DSL or cable modem, disconnect the computer from the network and Internet. Disable or password-protect file sharing, or set the shared files to Read Only, before reconnecting the computers to the network or to the Internet. Because this worm spreads by using shared folders on networked computers, to ensure that the worm does not reinfect the computer after it has been removed, Symantec suggests sharing with Read Only access or by using password protection.

    For instructions on how to do this, refer to your Windows documentation, or the document: How to configure shared Windows folders for maximum network protection.

    For further information on the vulnerability and patches to resolve it please refer to the following document:
    Microsoft Windows Server Service RPC Handling Remote Code Execution Vulnerability


  • If you are removing an infection from a network, first make sure that all the shares are disabled or set to Read Only.

  • This tool is not designed to run on Novell NetWare servers. To remove this threat from a NetWare server, first make sure that you have the current virus definitions, and then run a full system scan with the Symantec antivirus product.

How to download and run the tool

Important: You must have administrative rights to run this tool on Windows NT 4.0, Windows 2000, or Windows XP.

Note for network administrators: If you are running MS Exchange 2000 Server, we recommend that you exclude the M drive from the scan by running the tool from a command line, with the Exclude switch. For more information, read the Microsoft knowledge base article: XADM: Do Not Back Up or Scan Exchange 2000 Drive M (Article 298924).

Follow these steps to download and run the tool:
  1. Download the D.exe file from: http://www.symantec.com/content/en/us/global/removal_tool/threat_writeups/D.exe.
  2. Save the file to a convenient location, such as your Windows desktop.
  3. Optional: To check the authenticity of the digital signature, refer to the "Digital signature" section later in this writeup.

    Note: If you are sure that you are downloading this tool from the Security Response Web site, you can skip this step. If you are not sure, or are a network administrator and need to authenticate the files before deployment, follow the steps in the "Digital signature" section before proceeding with step 4.

  4. Close all the running programs.
  5. If you are on a network or if you have a full-time connection to the Internet, disconnect the computer from the network and the Internet.
  6. If you are running Windows Me or XP, turn off System Restore. For instructions on how to turn off System Restore, read your Windows documentation, or one of the following articles:

    How to disable or enable Windows Me System Restore

    How to turn off or turn on Windows XP System Restore

  7. Locate the file that you just downloaded.
  8. Double-click the D.exe file to start the removal tool.
  9. Click Start to begin the process, and then allow the tool to run.

    NOTE: If you have any problems when you run the tool, or it does nor appear to remove the threat, restart the computer in Safe mode and run the tool again.

  10. Restart the computer.
  11. Run the removal tool again to ensure that the system is clean.
  12. If you are running Windows Me/XP, then reenable System Restore.
  13. If you are on a network or if you have a full-time connection to the Internet, reconnect the computer to the network or to the Internet connection.
  14. Run LiveUpdate to make sure that you are using the most current virus definitions.

When the tool has finished running, you will see a message indicating whether the threat has infected the computer. The tool displays results similar to the following:
  • Total number of the scanned files
  • Number of deleted files
  • Number of repaired files
  • Number of terminated viral processes
  • Number of fixed registry entries
What the tool does
The Removal Tool does the following:
  • Terminates the associated processes
  • Deletes the associated files
  • Deletes the registry values added by the threat
Switches
The following switches are designed for use by network administrators:
/HELP, /H, /?
Displays the help message.
/NOFIXREG
Disables the registry repair (We do not recommend using this switch).
/SILENT, /S
Enables the silent mode.
/LOG=[PATH NAME]
Creates a log file where [PATH NAME] is the location in which to store the tool's output. By default, this switch creates the log file, FixDwndp.log, in the same folder from which the removal tool was executed.
/MAPPED
Scans the mapped network drives. (We do not recommend using this switch. See the following Note.)
/START
Forces the tool to immediately start scanning.
/EXCLUDE=[PATH]
Excludes the specified [PATH] from scanning. (We do not recommend using this switch. See the following Note.)
/NOCANCEL
Disables the cancel feature of the removal tool.
/NOFILESCAN
Prevents the scanning of the file system.
/NOVULNCHECK
Disables checking for unpatched files.

Important: Using the /MAPPED switch does not ensure the complete removal of the virus on the remote computer, because:
  • The scanning of mapped drives scans only the mapped folders. This may not include all the folders on the remote computer, which can lead to missed detections.
  • If a viral file is detected on the mapped drive, the removal will fail if a program on the remote computer uses this file.
Therefore, you should run the tool on every computer.

The /EXCLUDE switch will only work with one path, not multiple. An alternative is the /NOFILESCAN switch followed by a manual scan with AntiVirus. This will let the tool alter the registry. Then, scan the computer with AntiVirus with current virus definitions. With these steps, you should be able to clean the file system.

The following is an example command line that can be used to exclude a single drive:

"C:\Documents and Settings\user1\Desktop\D.exe" /EXCLUDE=M:\ /LOG=c:\FixDwndp.txt

Alternatively, the command line below will skip scanning the file system, but will repair the registry modifications. Then, run a regular scan of the system with proper exclusions:

"C:\Documents and Settings\user1\Desktop\D.exe" /NOFILESCAN /LOG=c:\FixDwndp.txt

Note: You can give the log file any name and save it to any location.

Digital signature
For security purposes, the removal tool is digitally signed. Symantec recommends that you use only copies of the removal tool that have been directly downloaded from the Symantec Security Response Web site.

If you are not sure, or are a network administrator and need to authenticate files before deployment, you should check the authenticity of the digital signature.

Follow these steps:
  1. Go to http://www.wmsoftware.com/free.htm.
  2. Download and save the Chktrust.exe file to the same folder in which you saved the removal tool.

    Note: Most of the following steps are done at a command prompt. If you downloaded the removal tool to the Windows desktop, it will be easier if you first move the tool to the root of the C drive. Then save the Chktrust.exe file to the root of C as well.

    (Step 3 to assume that both the removal tool and Chktrust.exe are in the root of the C drive.)

  3. Click Start > Run.
  4. Type one of the following:

    Windows 95/98/Me:
    command

    Windows NT/2000/XP:
    cmd

  5. Click OK.
  6. In the command window, type the following, pressing Enter after typing each line:

    cd\
    cd downloads
    chktrust -i D.exe

  7. You should see one of the following messages, depending on your operating system:

    Windows XP SP2:
    The Trust Validation Utility window will appear.

    Under Publisher, click the Symantec Corporation link. The Digital Signature Details appears.
    Verify the contents of the following fields to ensure that the tool is authentic:

    Name: Symantec Corporation
    Signing Time: 05/02/2009 08:25:37 AM

    All other operating systems:
    You should see the following message:

    Do you want to install and run "D.exe" signed on May 2, 2009 8:25:37 AM and distributed by Symantec Corporation?

    Notes:
    The date and time in the digital signature above are based on Pacific time. They will be adjusted your computer's time zone and Regional Options settings.

    If you are using Daylight Saving time, the displayed time will be exactly one hour earlier.

    If this dialog box does not appear, there are two possible reasons:

    The tool is not from Symantec: Unless you are sure that the tool is legitimate and that you downloaded it from the legitimate Symantec Web site, you should not run it.

    The tool is from Symantec and is legitimate: However, your operating system was previously instructed to always trust content from Symantec. For information on this and on how to view the confirmation dialog again, read the document: How to restore the Publisher Authenticity confirmation dialog box.

  8. Click Yes or Run to close the dialog box.
  9. Type exit, and then press Enter. (This will close the MS-DOS session.)

How to remove new folder exe or regsvr exe or autorun inf virus

Remove virus Manually as it eats up Ur my empty hard disk space of around 700 MB .

This virus is know popularly as regsvr.exe virus, or as new folder.exe virus and most people identify this one by seeing autorun.inf file on their pen drives, But trend micro identified it as WORM_DELF.FKZ. It is spreading mostly using this pen drives as the medium.

newfolder thumb How to remove new folder exe or regsvr exe or autorun inf virus

Download New Folder virus removal tool, unzip it, and double click on RemoveVirus.bat file. Tell me if you get rid of virus in comments section.

or

Try these tools

In order to remove the newfolder.exe virus you can use two types of tools, the tools mentioned below are much better:

1. Newfolder virus removal tool by Muhammad Abdullah. Download it from here

2. Newfolder Virus removal tool by Albin. Download it from here

How to Clean a Virus Infected Flash Drive?

virus pendrive How to Clean a Virus Infected Flash Drive?

The USB flash drive is compact and easy to carry around. However, as the storage device is so common and easily used, the percentage of the drive being infected by viruses has also increased substantially.

In the Start–>Run and type cmd to run the Command Prompt Window.In the Command Window, type in your flash drive’s drive letter (if your pen drive is detected as G, then type G: and so on). Once you have gone in to your pen drive, now type dir/w/o/a/p and hit Enter. You will then see a list of files. Search whether any of these files appear or exist:

1. Autorun.inf

2. New Folder.exe

3. Bha.vbs

4. Iexplore.vbs

5. Info.exe

6. New_Folder.exe

7. Ravmon.exe

8. RVHost.exe or any other files with “.exe” extension

Flash Disinfector: was designed to remove unwanted files including autorun.inf on removable USB drives, flash drives and memory sticks. Use flash disinfector if you cannot access your USB drives, flash drives and memory stick due to modifications done by autorun Worms.

http://www.techsupportforum.com/sectools/sUBs/Flash_Disinfector.exe

1. Download Flash_Disinfector and save it ot your Desktop

2. After downloading, double-click on Flash_Disinfector to run it.

3. Just follow the prompts and continue until it begin scanning.

4. If asked to insert your flash drive or any removable device including USB Pen Drive and Memory Stick, please do so.

5. It will scan removable drives, wait for the scan to finish. Done.

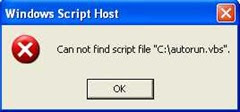
Clean Autoruns: When you open the drive , it says that it could not find the script file C:\autorun.vbs and whenever you right click on it some weird characters are shown.Now you cant open your drives unless you explore them.

The symptom occurs because when autorun.vbs is created by trojan horse or virus. The virus normally loads autorun.inf file to root folder of all hard drive or USB drive, and then execute autorun.bat file which contains script to apply and merge autorun.reg into the registry, with possible change to the following registry key to ensure that virus is loaded when system starts.:

[HKEY_LOCAL_MACHINE\SOFTWARE\Microsoft\Windows NT\CurrentVersion\Winlogon]Userinit=userinit.exe,autorun.exe

Finally, autorun.bat will call wscript.exe to run autorun.vbs

sparksspace1 How to Clean a Virus Infected Flash Drive?

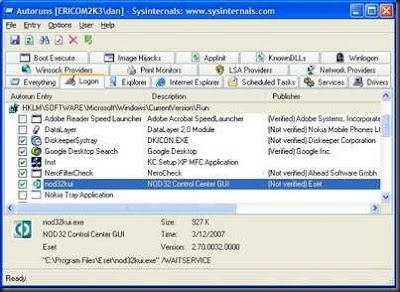
Autoruns utility, which has the most comprehensive knowledge of auto-starting locations of any startup monitor, shows you what programs are configured to run during system bootup or login, and shows you the entries in the order Windows processes them. These programs include ones in your startup folder, Run, RunOnce, and other Registry keys. You can configure Autoruns to show other locations, including Explorer shell extensions, toolbars, browser helper objects, Winlogon notifications, and auto-start services.

sparksspace2 How to Clean a Virus Infected Flash Drive?

  • Download autoruns.zip
  • Create a target folder for Autoruns, e.g. “%programfiles%\Autoruns”.
  • Extract all files from autoruns.zip to the target folder.
  • Inside your target folder you will find the following files now: autoruns.chm autoruns.exe autorunsc.exe Eula.txt
  • To launch Autoruns GUI version double click autoruns.exe.
  • If this is the first time you launch autoruns, you may be prompted to agree to the license terms. Either accept them and use autoruns or decline them and remove autoruns from your hard disk, please.
  • To launch Autoruns command line version, open cmd.exe. Change to the target folder, e.g. “cd %programfiles%\autoruns”. Execute autorunsc.exe plus the appropriate command line arguments.
  • To launch Autoruns help file, double click autoruns.chm.

Download Autoruns Virus Remover and Washer: Autoruns Remover and Washer

Download Autorun virus removal tool :It will clean the autorun viruses which are attack to flash drive and only remove autorun viruses when you run the tool.

Autorun Eater:Autorun Eater was born due to increase of malwares using the ‘autorun.inf’ tactic to infect users unknowingly be it from flash drives, removable hard disks or any other removable storage device.

Download :Autorun Eater

Download : Newfolder.exe Removal Tool 2.5

Download BezictoSoft Malwares Loadpoint Removal Tool to remove bha.vbs,RavMon.exe,new folder.exe etc

Ravmon Removal Tools:

http://technodigits.wordpress.com/2007/06/06/ravmon-virus-killer/

Virus RVHost- How to remove it?

The use of USB pen drive devices to spread the virus RVHost and other nasty things is rampant in your part of the world

1. Download and Run ComboFix (how to use it Click here)

Download this file from either of the two below listed places :

http://www.techsupportforum.com/combofix.exe

http://download.bleepingcomputer.com/sUBs/ComboFix.exe

2. Doubleclick on combofix.exe and follow the prompts. A window will open with a warning. Type “1″ (and Enter) to start the fix. When the scan completes Notepad will open with with your results log open. Do a File, Exit and answer ‘Yes’ to save changes.

A caution – Do not touch your mouse/keyboard until the scan has completed, as this may cause the process to stall or your computer to lock. The scan will temporarily disable your desktop, and if interrupted may leave your desktop disabled. If this occurs, please reboot to restore the desktop. Even when ComboFix appears to be doing nothing, look at your Drive light. If it is flashing, Combofix is still at work.

2. Clean any remaining autoruns infections.

How to Re-Partition Hard Disk Without Losing Data

easeus partition manager 2 free windows disk partition tools How to Re Partition Hard Disk Without Losing Data

Re-Partition Your Hard Disk Without Losing Data With EASEUS Partition Manager:


Hard disk is place where to keep all data and information within the computer, it’s good to separate and keep the data in hard disk by partition. Normally most of the users will partition their hair disk to two partitions (OS and Data), this is to ensure all their data still remain in the hard disk while their operating system partition corrupted. For those hard disk where no have partition, all the data are keep together with the operating system, and there is a risk hard to recover their data when operating system was corrupted and cannot boot-in to the windows. To prevent this happen, now users can use EASEUS Partition Manager Home Edition.

What is EASEUS Partition Manager ?
EASEUS Partition Manager Home Edition is free comprehensive hard disk partition management software to let you enjoy free with all the powerful functions: Resize and Move partitions, Create, Delete and Format partitions, Hide and Unhide partitions and much more. What’s more, the freeware works perfectly with hardware RAID and Windows 2000/XP/Vista Operating Systems. Your data is completely protected during all operations. Its great free tool that users can use to re-partition hard disk rather use other partition software where need pay for the license.

Features of EASEUS Partition Manager:

  • Support hardware RAID.
  • Resize and move partitions without losing data.
  • Create, delete and format partitions with simple step.
  • Label partitions – assigned to a partition for easier recognition.
  • View Disk/Partition property of each partition.
  • Hide and unhide partitions – protect important data from unauthorized or casual access.
  • Set an active partition – specify one partition to be the boot partition.
  • Powerful safety features protect you against system failures while partitioning.
  • Step-by-step wizard walks you through partitioning process.
  • Preview any partitioning tasks before completing it.
  • Change cluster size automatically and manually.
  • Undo feature any partition step.
  • Support hard disks from 2 GB to 1 TB.
  • User-friendly interface.

0.0down How to Re Partition Hard Disk Without Losing Data
EASEUS Partition Manager

Eraser 6.0.8 – Powerful Tool To Erase Data’s Permanently

Eraser 6.0.8 Powerful Tool To Erase Data’s Permanently Eraser 6.0.8   Powerful Tool To Erase Data’s Permanently

Eraser
is free security tool which plays vital role in erasing vital information from Hard disk permanently. Most of the IT sectors in India use this freeware to completely remove sensitive data from hard drive. Eraser supports Windows Xp, Vista, Windows 7 and Windows server 2003 and 2008.
Why do we need Eraser?

Most of the time we delete important documents, pictures, movies, and office secure files, personal information, financial records, etc. The deleted file remains on the disk until another file is created over it, and even after that, it might be possible to recover data by studying the magnetic fields on the disk platter surface. Then by using some recovery tools its easy to retrieve back all the deleted datas. By using Eraser 99% datas can be erased completely.

How to use Eraser?

Just drag and drop files and folders to the on-demand eraser, use the convenient Explorer shell extension or use the integrated scheduler to program overwriting of unused disk space or, for example, browser cache files to happen regularly, at night, during your lunch break, at weekends or whenever you like.

Methods used in Eraser:

The patterns used for overwriting are based on Peter Gutmann’s paper “Secure Deletion of Data from Magnetic and Solid-State Memory” and they are selected to effectively remove the magnetic remnants from the hard disk.
Other methods include the one defined in the National Industrial Security Program Operating Manual of the US Department of Defense and overwriting with pseudo-random data. Furthermore, with Eraser you have the possibility to define your own overwriting methods.

Key Features of “Eraser”

  • User friendly
  • Secure drive erasure methods are supported out of the box
  • Erases files, folders and their previous deleted counterparts
  • Works with an extremely customizable Scheduler
  • It works with any drive that works with Windows

Download: Eraser 6.0.8

Thursday, April 28, 2011

Create a System Repair Disc in Windows 7

The new version of Windows seems to be a lot for stable than previous releases, however you never know when a malfunction might occur. Today we take a look at an option in Windows 7 that lets you create a System Repair disc in case you need to boot from it to recover your OS.

Create System Repair Disc

Type system repair disc into the search box in the Start menu.

1-sysp

The dialog box opens where you select the right drive and click Create disc. A CD will be fine as it only takes up 142MB of space.

3-sysp

Using the Disc

If you are having problems with your machine just pop in the recovery disc and boot from it and enter into Windows Setup [EMS Enabled].

4-sysp

After it boots up you can access recovery tools or restore the computer back to a system image (see our article on creating a system image in Windows 7).

5-sysp

Now you can choose from different recovery options to help you get your machine back up and running.

6-sysp

You never know when an Operating System disaster might occur, but having a System Recovery Disc to boot from should be part of your backup and recovery toolbox in case it does.

Troubleshoot Startup Problems with Startup Repair Tool in Windows 7 & Vista

It can be a horrible feeling if your new Windows 7 computer doesn’t boot properly into Windows or startup at all. If it happens to your machine, don’t panic, and try out the Startup Repair Tools included with the OS.

Startup Repair in Windows 7 is a recovery tool that can fix some system problems that prevent it from starting. I will scan the computer for problems and try to fix them so it will boot correctly. It can fix issues like missing or damaged system files. It can’t fix hardware issues or installation problems, and it can’t recover any missing personal data files. It is however, a great place to start if your experiencing trouble booting into Windows.

Startup Repair Tool in Windows 7

A lot of times if Windows can’t boot properly because of a hardware change, unexpected shutdown, or other errors, it will come up with the Windows Error Recovery screen. This gives you the option to go into Startup Repair or try to boot Windows normally.

sshot-2009-12-17-[02-02-32]

If Windows won’t boot properly and doesn’t give you the Error Recovery screen, you can get into it manually. Power the computer completely down, and when you power it up again, keep hitting the F8 key until you see the Advanced Boot Options screen. Once you get to this screen, highlight Repair Your Computer and hit Enter.

10srt

You will see the message…Windows is loading files

11srt

Next choose the right keyboard input method.

12srt

You’ll need to log on as a local user, or as administrator if you want to access the command prompt too.

13srt

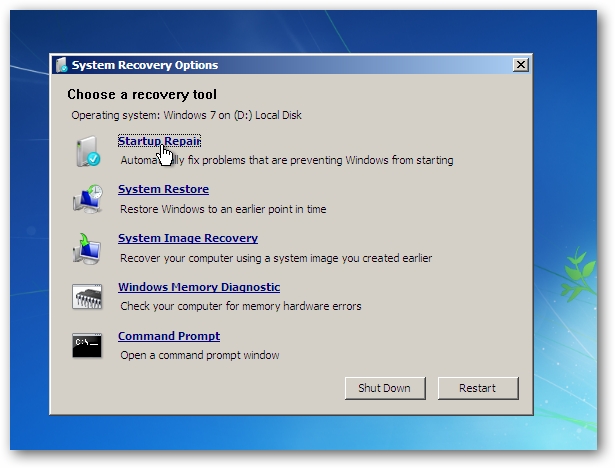
Now you have different System Recovery Options to choose from. Click on Startup Repair to begin the troubleshooting process as it can detect and fix problems.

14srt

Startup Repair begins the scan and attempts to repair the system. Be patient while it finishes, sometimes it can take a while for it to complete.

15srt

In this particular instance a System Restore is recommended. You don’t have to use this option, you can cancel it and allow the tool to keep trying to fix the issue.

16srt

The System Restore process starts and returns system settings to a time when it worked correctly. You should have a few different date ranges to choose from, but you’ll want to select the most recent one.

19srt

After it’s been restored, you’ll get a message indicating it was successful and you need to Restart.

20srt

If the problem cannot be fixed, you’ll get a message indicating it can’t be fixed automatically, and you’ll get a summary of the error that can be sent to Microsoft. Depending on what the error is, sometimes you will get additional links to options or support. The manufacturer of the computer might also provide additional solutions.

18srt

The option to send the error details to Microsoft.

17srt

Startup Repair in Vista

You can also access Startup Repair in Vista by booting from the installation disc. Select your language settings and click on Next.

23srt

In the next screen click on Repair Your Computer.

24srt

The System Recovery Options windows comes up and finds the OS on your drive.

25srt

Then you can begin running Startup Repair or choose the other tools just like in the Windows 7 instructions we showed above.

26srt

Memory Diagnostics Tool

Another feature that’s there if you need it, is the Windows Memory Diagnostic Tool which will check for errors in the computer’s memory. Unless you get a message indicating an error in the memory, or you’re an experienced user, there is not much of a reason for running this test. The computer will restart and begin running the diagnostic before booting into Windows.

22srt

Conclusion

Startup Repair is a good place to start if your system starts acting up. If you can’t get the Advanced Boot Options screen by hitting F8, you can also access the tools by booting from a System Recovery Disc, or the Windows installation disc. While System Repair might not be able to recover your system in all situations, it’s a great starting point before getting into more detailed recoveries like Restoring from an image or clean install.

Use Remote Desktop To Access Other Computers On a Small Office or Home Network

If you have a home or small office network with computers in several locations, you may want to work on them all from one machine. Today we take a look at the Remote Desktop feature in Windows that allows you to connect to each computer on the network in XP, Vista, and Windows 7.

Note: Remote Desktop is not a client and host feature available in Home version of Windows.

Enable Remote Desktop in Vista and Windows 7

The first thing we need to do is enable Remote Desktop on a Windows 7 or Vista machine. Right-click on the Computer icon on the desktop or from the Start menu and select Properties.

1rd

Now click on the Advanced system settings link.

2rd

Click on the Remote tab and under Remote Desktop select the bottom radio button… Allow connections only from computers running Remote Desktop with Network Level Authentication (more secure).

3rd

You can also select what which users on the network will have Remote Desktop access.

sshot-2010-01-19-[23-02-57]

Enable Remote Desktop in XP

Enabling XP in Remote Desktop is basically the same. Right-click on My Computer and select Properties, click the Remote tab and under the Remote Desktop section, click the box next to Allow users to connect remotely to this computer.

remotedeskxp

Using Remote Desktop

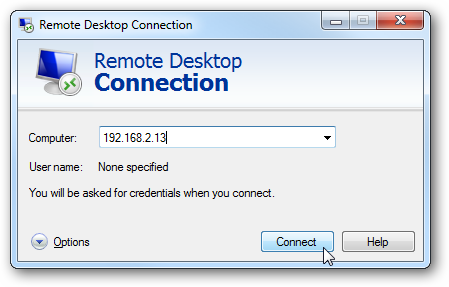
Now when a co-worker or member of your family needs help, or you want to work on computers in other locations and don’t want to site at each machine, you can remote into them. Pull up Remote Desktop and enter in the name or IP address of the other computer.

3con

The first time you try to remote in (where in this example I’m remoting into a home server), you may get a security screen which you’ll want to allow and can select to not show again.

2con

When you log in you will need to type in the name and password before connecting.

6saved credentials

Now you can work on the Windows Home Server from a desktop computer in the living room.

8con

Logging into a Vista machine is the same process…enter the user name and password for that machine.

11vista

And then you can can start working on the Vista machine.

12vista

Here we’re remoting from a Windows 7 machine into an XP computer on the home network, and another security message is displayed. It’s a bit different than when remoting into a server, but again you can choose not to have it pop up every time you connect.

9con to xp

Working a way on the XP laptop…

10xp

Options

When remoting into a machine, there are different options you can select before starting the session that will change the Remote Desktop experience. You’ll need to experiment with these settings to find what works best for you. If you’re looking to make the process faster, especially on older hardware, turn down the display size and color of the remote connection. It might not be as pretty, but you can get work done more quickly.

4con

While you’re logged into the other computer, the user will be locked out while your in it…

sshot-2010-01-19-[22-35-34]

So make sure the person sitting at the machine your working on doesn’t try to log in during your session because they will log you out.

13vista

Conclusion

Unfortunately Remote Desktop is not a client and host feature in Home editions of XP, Vista, or Windows 7. You can use Remote Desktop to initiate a connection From any edition of Windows. However, you can’t use it to connect to computers running Starter or Home versions. There are several free utilities and services you can use to get the same results, and we will take a look at some of them in the near future. IT guys already know about the great benefits of Remote Desktop, but if your starting out with a small network, this should help you get started in using it. If you do have Professional, Business, Enterprise, or Ultimate editions of Vista or Windows 7 or XP Pro installed on the machines on your network, using Remote Desktop is a great way to work on them from a central machine.