Wednesday, December 15, 2010

How to Backup and Restore your hard drive with DriveImage XML

Table of Contents:

Introduction

DriveImage XML is my program of choice for backing up and protecting my data. When I first began using this application, though, I had some difficulties restoring my backup image on my test boxes using the instructions found in other tutorials. Due to this, I pooled info from a variety of available tutorials, and with some work, I was able to figure out how to restore my data. With this in mind, I have put all of the information I researched into one guide so that others can properly restore their data without running into the problems that I encountered.

With this tutorial you will be able to accomplish the following tasks:

  1. Create a complete cloned image of your entire computer. This consists of all data, applications, the operating system, and files.
  2. Restore a backup image to your existing hard drive or another one in the event of total hard drive corruption or loss.
  3. Restore selected data if you do not need the entire OS restored.

In order to follow the steps in this tutorial, you will need an external hard drive or other removable media, CD-ROM burner, and a blank writeable CD.

Create a clone of your hard disk

The first step is to download DriveImage XML to the desktop of the computer that you wish to backup. When the file has finished downloading, double-click on the dixmlsetup.exe icon to start the installation program. Follow the prompts while selecting the default settings until you get to the last screen. Then press the Finish button to close the DriveImage XML installation program.

Once the program has been installed, there will now be an icon for the program on your desktop. Double-click on the DriveImage XML icon to start the program. When the program starts you will be greeted with a screen similar to the one below.

DriveImage XML Start Screen

Now press the Backup button as designated by the red arrow in the image above.

You will now be at a screen where the program asks you what drive you would like to backup as shown in the image below.

Select drive to backup

Select the drive you would like to backup by left-clicking once on it and then press the Next button.

You will now be at the Drive backup wizard as shown in the image below.
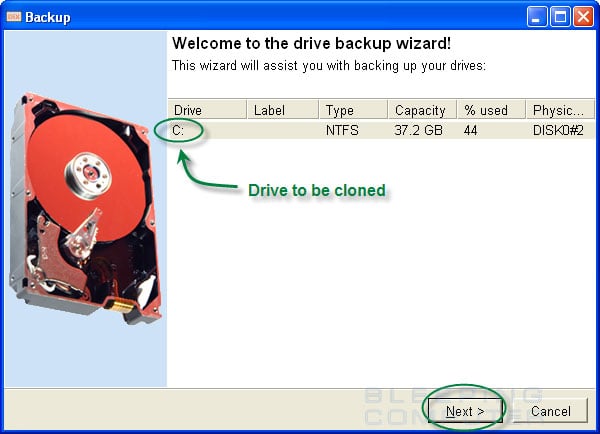

Drive backup wizard
Drive backup wizard

Make sure the drive you want to backup is listed and then press the Next button.

You will now be at the Backup options screen where you can configure various options as to how you want your backup to be created and where to save it to.
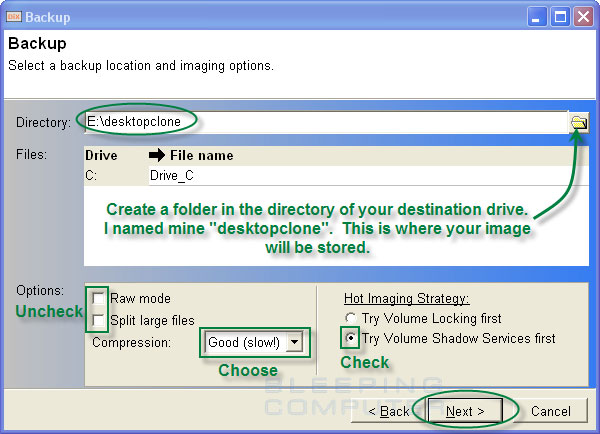

Backup option screen

For the purposes of this tutorial, I created a folder in my E:\ drive named desktopclone and set that as the directory where my backup image will be created. In the Options category you should set Compression to Good (slow!), to make the backup image smaller, and then uncheck all of the other items. Then in the Hot Imaging Strategy: category select Try Volume Shadow Services first. These suggested settings are shown in the image above. Once you have the options screen setup like you want it press the Next button to continue.

DriveImage XML will now start backing up your hard drive to the folder you specified in the previous screen as shown in the image below. This process can take a long time depending on how much data it has to backup. So please be patient while the backup proceeds.


Your hard drive being backed up

When the backup has finished, you should press the Finish button and then close the DriveImage XML program. You have now created a duplicate copy of your entire OS and stored it in a compressed manner. You can now do several things with that image. You can open it up and restore individual files or folders or you can restore that image to another drive.

How to restore individual files, folders and data:

In the future if you need to restore any files from a DriveImage XML backup image you can follow these steps.

Double click DriveImageXML on the computer that you want to restore the file to. When the program is loaded, click on the Browse option on the left hand side menu. When you click on the Browse button you will be shown a screen, similar to the one below, where it asks you to select a backup image (XML) file.
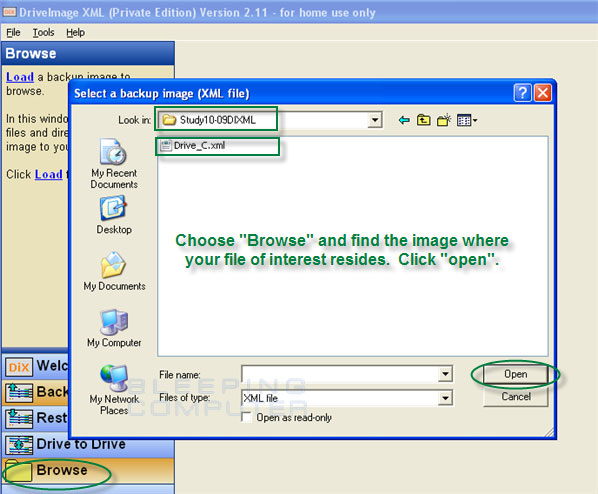
select a backup image (XML) file
Select a backup image (XML) file

Left-click once on the XML file that you want to restore from and then press the OK button. DriveImage XML will now start loading the backup image into the program. This can take a while depending on how much data was backed up, so please be patient.
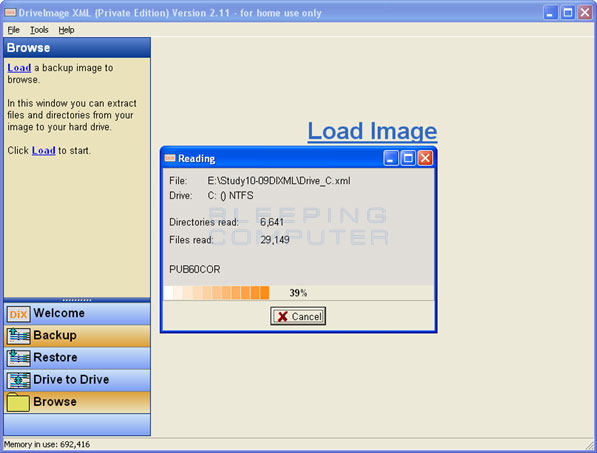
Backup image being loaded

When it has finished loading the image you will see a screen showing you what files and folders were backed up.
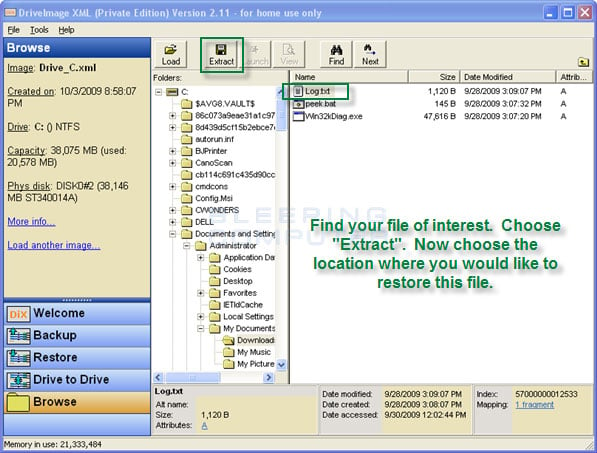
List of files and folders that were backed up

Now select the files or folders you would like to restore and click on the Extract button. This will bring up a dialog box asking where you would like to restore the files or folders.
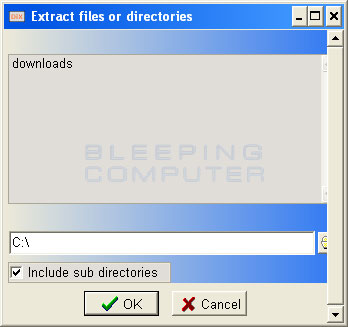
Select location where you wish to restore to

Once you have entered the location that you would like the files or folders to be restored to, you should press the OK button to start the restoration process. DriveImage XML will now start to restore your files to the location you requested. When it has finished, you can then close the DriveImage XML program.

Please note, you can restore files or folders to any computer you wish. They do not have to be restored to the same computer or location where they were originally backed up on.

How to restore a cloned image to a different hard drive:

In this part of the tutorial we will cover how to restore a cloned image of your original hard drive to another hard drive after a hard disk failure. In order to accomplish this you will need the following:

  • Another hard drive that you will restore the cloned image to. This hard drive must as large, or larger, than the original drive that you made the image from.

  • Access to the media that contains the cloned image of your hard drive. This can be a USB flash drive, external hard drive, or another hard drive in your computer.

  • A bootable version of DriveImageXML that contains a disk partitioning program. For the purposes of this tutorial we suggest you use the Ultimate Boot CD 4 Windows as it already contains the SwissKnife partitioning program and DriveImage XML programs. Information and instructions on how to create the Ultimate Boot CD 4 Windows can be found at the below links:

    How to Build the Ultimate Boot CD for Windows
    UBCD4Win FAQ

It is also important to note, that we suggest that you restore a cloned image of your entire disk to another hard disk in the same computer it was originally backed up on. This way there won't be any Windows activation issues or driver issues. You can, though, restore a cloned image to a different computer than it was originally backed up on. Please note, though, that when the image is restored to another computer, the different hardware might prompt a red flag that would require you to reactivate Windows. To rectify this, you can usually just call Microsoft and explain the situation and they will allow you to activate your copy of Windows.

Once you have all the required items assembled, connect the external disk or media that contains the image you want to restore and the hard disk you plan to restore the image to your computer. Then insert the UBCD4Win disc into your CDRom and restart your computer to boot off of it. The computer should choose to boot from the UBCD4Win CD automatically. If it doesn't and you are asked if you want to boot from CD, then choose that option. Finally if that does not work, you may need to enter your computer's BIOS and change the boot order of your devices. To enter the BIOS you usually need to click on the F12, F2, or ESC keys right as the computer starts. You will typically see a message stating what key you need to press to enter Setup.

When the computer boots up with the UBCD4Win CD inserted you will come to a screen asking you what option you would like to select as shown in the image below.
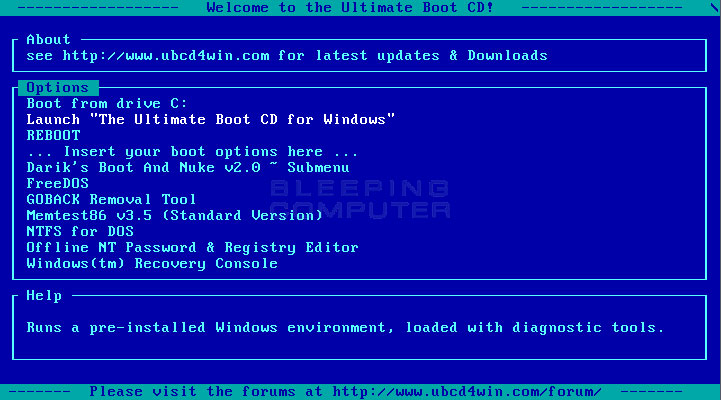
UBCD4Win options menu
UBCD Options Menu

At this screen, select the Launch "The Ultimate Boot CD for Windows" option using the arrow keys on your keyboard and then press Enter on keyboard. UBCD4Win will now startup. This may take a while so please be patient. Once the desktop appears, you will receive a message asking Do you want to start Network support now?. At this prompt you should click on the No button.

You should now be at the UBCD4Win desktop as shown in the image below.
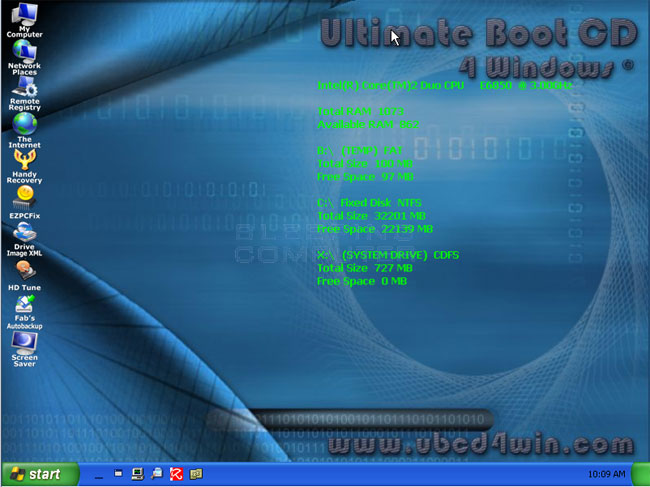
UBCD4Win Desktop
UBCD4Win Desktop

Now we need to prepare the new hard disk that we will restore the image to. Click on the Start button, then select Programs, then Disk Tools, then Partition, and finally CompuApps SwissKnife. The SwissKnife program should now be open on your computer.

In SwissKnife, you should select the drive that you would like to create a partition on and then format. If this drive has been used in the past, you will first need to Delete the existing partition, so that you can create a empty new one. WARNING: Make certain you pick the correct hard disk to format as if you pick the wrong one, it will be erased and lost forever. Only select the drive that you want to format and restore to!

Once you select the right drive, make sure you change File System to NTFS, put a checkmark in the Set this partition to active checkbox, and then double-check you have have selected the correct drive. To see how your screen should look with the proper settings selected, please review the image below.
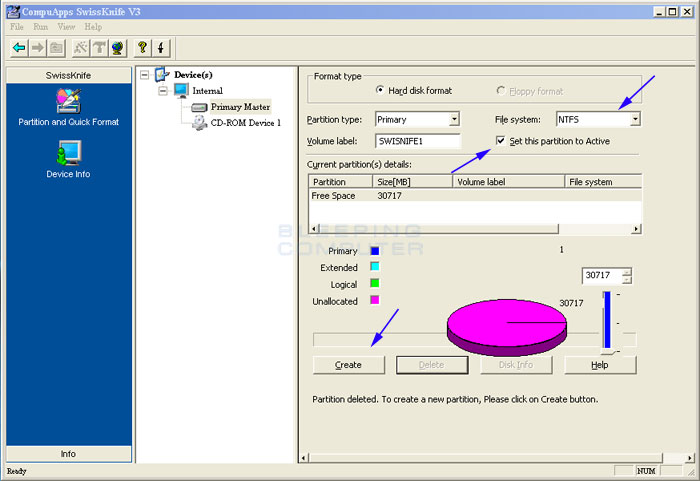
Create a partition with SwissKnife

If the settings are set as shown in the image above, click on the Create button to create the partition and format it. Once the formatting of the drive has been completed, you can close the SwissKnife program, but you should continue to stay in UBCD4Win.

Now launch DriveImage XML by clicking on Start, then selecting Programs, then Disk Tools, then Backup and Cloning, and finally DriveImage XML. When the program opens, click on the Restore button to get to the screen shown below.


DriveImage XML Restore Screen

Select the partition that contains the backup image you would like to restore, as shown in the image above, and then press the Next button.

You will now be at a screen asking you to select the XML file for the stored image that you plan to restore.
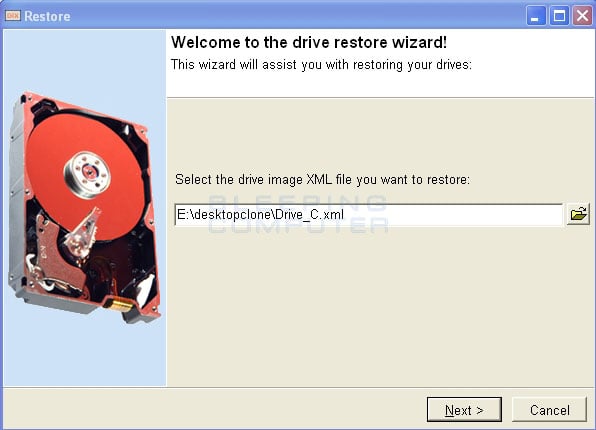
Select the XML backup image

Either type in the path to the file or browse to it. Once you have select the image to restore, click on the Next button.

You will now be at a screen asking what drive you would like to restore the image to.
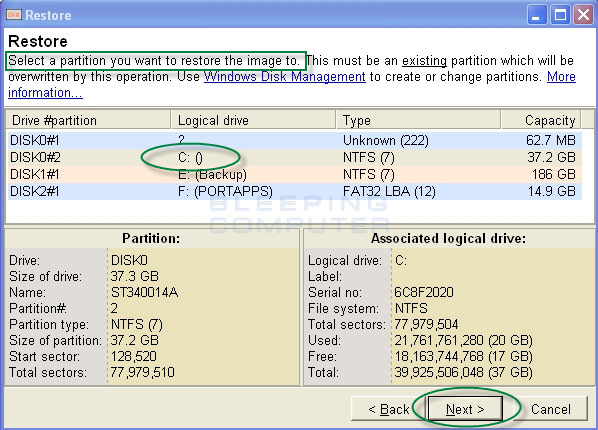
Select partition to restore image to

Select the partition that you just formatted and then click on the Next button. DriveImage XML will now restore the backup image that you had previously created to the new partition. Make sure you select the correct partition so that data on another partition is not mistakenly overwritten.

When it has finished you have one last very important thing to do before you will be able to boot up your new hard disk. You first need to setup a new Disk ID for the drive you restored the data to. At the main DriveImage XML screen, click on the Tools menu and then select Set New Disk ID. You will now be at a screen similar to the one below.
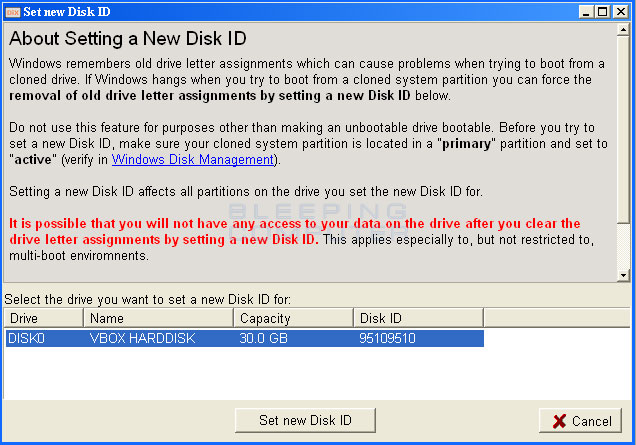
Set new Disk ID
Set new Disk ID

Select the new disk that you just restored and click on the Set new Disk ID button. Please make sure you select the correct hard disk as you do not want to perform this action on a disk that is already in use.

Once this is done, you can reboot your computer and remove the UBCD4Win CD so it boots normally. Your computer should now load from the new hard disk that you restored your data to and boot into Windows properly with your original cloned Operating System intact!!

Conclusion

Now that you know how to backup your computer using DriveImage XML, you should make sure you perform backups regularly on your computer. Having these backup images of your computer will make a hard drive malfunction or loss of data easier to manage as you will be able to easily restore your data using these instructions. Just make sure you do your backups onto a media other than the drive where the original data is stored! Otherwise, if your hard drive fails, you will not only lose your original data, but all of your backups. If you have any trouble using this tutorial, please ask us in the forums.

How to backup and restore your data using Cobian Backup

How to backup and restore your data using Cobian Backup: -

Table of Contents

  1. Introduction
  2. Installation of the backup software
  3. Using Cobian Backup to backup and restore your data
  4. Conclusion

Introduction

As many of you know, today's digital world comes with a lot of things that make our daily life easier. However, as time goes on you rely more and more on the information stored on your PC. No one is completely safe from power outages, corrupt hard disks, an infected system through a backdoor or trojan, or even a fire. To make sure that a computer can easily be restored to a previous point, software developers created what is called backup software or imaging software.

In order to view our videos you need the Macromedia Flash Player.

Download Flash now!
Cobian Video Tutorial
There are different methods of creating a backup of your partition or hard drive, but this tutorial will only focus on one possibility, using a freeware tool called Cobian Backup.

If you wish to receive a broader overview of the different forms of backing up data, you can browse this excellent Wikipedia article on backups or another one on images.

Installation of the backup software

The first step is to download the software from the author's page. You will find a download link at the bottom of that site and the current version of the software is version 8 (Black Moon).

Once the setup file is downloaded you need to double-click it to start the setup process.

  1. On the first window you will be asked what language you want the tool to be installed in. English language is pre selected, but there is a wide range of choices to choose from.

  2. Next you will be shown a window containing the License Agreement. You need to accept the agreement by putting a check mark in the box next to I accept the conditions. The button Next will not be grayed out anymore. Click the Next button to proceed

  3. The next window will prompt you for the path where Cobian Backup should be installed. It should be preset to C:\Program Files\Cobian Backup 8. Click on the Next button.

  4. You will now see a screen asking for the Installation type. At this screen select the As an application (No autostart) radio button and press the Next button. This way the backup software is not started every time you boot Windows. If you wish to have it start every time do not change any of the defaults. When ready to proceed click on Next button.

  5. The program will now install. When it has completed installing click on the Done button to finish the installation.

At this point you have successfully installed Cobian Backup. A small black half moon should now be showing in your taskbar at the bottom right of your screen near your time. This taskbar icon will look like this: black half moon

Now that the program has been installed, lets move on to learning how to use it.

Using "Cobian Backup" to backup and restore your data

To open Cobian Backup, you go to the black half moon icon located on your taskbar and right-click the icon. Then left-click on the Open option.

Before we can backup our data, it is a good idea to check the options. To do that, please click on the Tools menu and then select Options.

The program is pretty much pre-configured, but if you don't want empty folders in your backups, you can select the Engine category on the left-hand-side menu and then from there put a check mark next to Delete empty folders. When done press the OK button to exit the Options screen.

We now need to create a new task to start the backup. To do this, you just need to click the clipboard icon which looks like this : create_task.

A window will now appear containing the general properties for your backup job. There are a couple of settings that should be configured. First you have to give your backup an easily identifiable name and enter it in the Task name field as shown in Figure 1 below. There is no right way in naming such files. Just use what best suits your needs and what is easiest to remember. In our example we will call it Backup 1 so we enter it into the Task name field.


properties
Figure 1. Backup Task Properties


The area surrounded by the red rectangle defines what kind of backup you wish to make. Now you can see there is four different possibilities:

Backup Type
Description
FULL This means that Cobian will copy or compress every single file that you specify to backup in the Source section of the Files category. By default this type of backup will create backup folders containing the time stamp of when the backup ran. This is also the setting used to create the first backup regardless of which Backup type you choose.
INCREMENTAL This is the feature you will most likely be using after creating your first backup instance. It checks if the source has changed from the last backup and only will backup those files that are new or have changed since the last backup. This saves a lot of time and space on your PC or the medium you will store your backup upon.
DIFFERENTIAL This setting works in the same way as incremental but instead compares the files from the last Full backup. If the current files are different compared to the last Full backup it will back them up.
DUMMY This setting does not actually back up any files but can be used to schedule the execution of programs, close services, reboot the computer, etc.


For now, until you become more familiar with the program, we suggest you select the Incremental setting.

While still in the properties window click on the Archive option, as shown in Figure 2 below, which is located in the left-hand-side menu. This lets us set how we would like the backups archived. We have two options to choose, SQX or Zip. SQX provides better compression, thus saving storage space on your computer, but I still suggest Zip compression so that you can extract the files from a backup more easily. This is because most compression tools support ZIP compression and the latest versions of Windows (XP, 2003, Vista) have zip manipulation tools built into the operating system.

Note: When you chose to compress or encrypt your backup, you should always watch for this setting to be activated on your next backup session!


compression
Figure 2: Backup Job Archive Settings


It is also possible to enter a comment, to protect your backup with a password, or to encrypt your backup. Each of these options are illustrated in Figure 2 above. To finish off our preparation, we need to select a source and a destination. The source is the files, directories, ftp site, etc that we want to backup. The destination is where the backup will be created. To start, lets choose the data we want to backup by clicking the Files option on the left-hand-side menu. This will present you with a screen similar to Figure 3 below:


get source
Figure 3. Select the data you want to backup.

To add data to be backed up you need to click on the Add button under the Source window. This will present you with 4 options. These options are described below.

Source Type
Description
Files This will allow you to select individual files that you would like to backup.
Directory This will allow you to select directories that you would like to backup. If you add a directory as your source then all files and subdirectories underneath that directory will be backed up.
FTP Site This will allow you to backup files stored on a remote FTP site. If you select this option you will need to enter your FTP site login information in order for the program to access the files.
Manually This will allow you to type out the path to the files or directories you would like to backup.

In our example, we will manually select the directory we want to backup by clicking on the Add button under Source and then selecting Manually. At the window that pops up we type C:\ and press the OK button. You should now see the C:\ folder in your Source window. This job will now backup up everything on the C: drive.

Next we need to specify where to create the backup file. In our example we want to store the backups in our G:\ folder. So I click on the Add button under the Destination window and then click on Manually. I then type in G:\ and press the OK button. Once I click on the OK button, if the directory does not exist, it will be created.

Once we have selected all our settings for our backup job, we then press the OK button at the bottom of the properties window. This will bring us back to the main Cobian Backup screen and you will now see our new backup job listed on the left hand side of the screen as shown in Figure 4 below.


start backup
Figure 4: Backup Job Created


The above image shows the newly created task and the play-like button. You are now only one click away from starting your backup. To start it, you just need to click once on the backup job and then press the Play button as shown in Figure 4 above. Once you press OK a confirmation box will pop up asking if you would like to run the selected task. You also have the option of shutting down your computer when the backup job is completed. If you want to shutdown the computer put a check in this box. When you are ready to start the backup simply press the OK button.

Your backup will now start, and when completed, the backup will appear in the G:\ folder.


Conclusion

As you have seen in this tutorial, backing up your data can be done free of charge and in with little of your time. Having these backups on hand can save you a lot of trouble and stress when having power problems, infected machines, corrupt hard drives , or just when you need to reinstall the operating system. At the top of the page you will also find a companion video that summarizes the steps taken in this tutorial.

Slipstreaming Windows XP To Create a Bootable Windows XP CD or DVD

Slipstreaming Windows XP To Create a Bootable Windows XP CD or DVD: -

Introduction

After a version of Windows is released, over time bugs are found or new enhancements are added by Microsoft. In order to fix these bugs and add these new enhancements, Microsoft will occassionally release a large update called a Windows service pack that contains all of bug fixes, enhancements, and new features created since Windows was released. Unfortunately, CDs that you have for Windows usually do not have these newer Service Packs already installed. This means that if you ever need to reinstall Windows with your CD, you will also have to deal with the timely task of reinstalling the service packs. To make matters worse, some of the fixes in these service packs are security related, and by not having them installed, your computer may be at risk from viruses or vulnerable to hackers. Therefore, not having these service packs installed after you install Windows could open yourself up to big security risks.

In order to resolve these types of issues it is possible to integrate the newer service packs over an an older copy of the Windows installation files. This allows you to install Windows with the service pack already installed so that you do not have to install them after the installation process. This process of integrating the newer service packs with older installation files is called slipstreaming. The goal of this tutorial is to walk you through creating a slipstreamed Windows installation CD or DVD that already contains Windows XP Service Pack 3. That way if you install Windows using this CD/DVD, your installation will already have these large updates installed, your computer will not be in as much danger, and you can just focus on installing the latest updates and the applications that you want on your computer.

First Steps

Before we can start the process of creating Windows install disc, we first need to gather some software. Below is a list of software that you will need to download and install, as well as CDs that you should have on hand in order to continue.

  1. An existing copy of Windows XP home, Professional, or Media Center. Unfortunately, for this step you can not use an OEM CD provided by your computer manufacturer (Dell, HP, etc).
  2. Nero Burning Rom or nLite if you do not have NERO
  3. ISOBUSTER
  4. Network installation copy of Windows XP Service pack 3
  5. A copy of your SATA drivers from your motherboard Web site if you have a SATA HDD that requires special drivers.
  6. A blank writable CD or DVD and a CD/DVD burner.

Once you have made sure you have all the software or media listed above, you should create a folder that will be used to store the files that will be written to the installation disc. For this tutorial, we suggest you create a folder on your C: drive labeled XPCD. Once the folder is created, please copy the entire contents of your XP CD to this folder.

Extracting the boot image

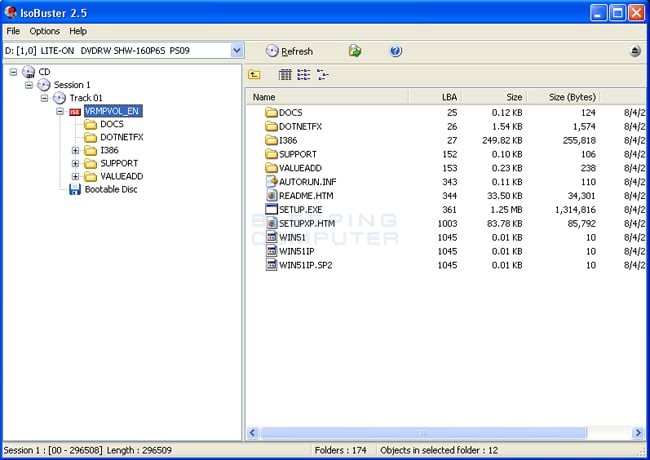
After you have completed copying your windows XP CD you will need to create a boot image by extracting it from your existing XP CD. To do this, have your XP CD inserted in your computer and start ISOBuster. When the program starts you will see a screen similar to the following. If you do not, change the selected drive so that it is pointing to the drive that contains your Windows XP CD.

IsoBuster screen shot

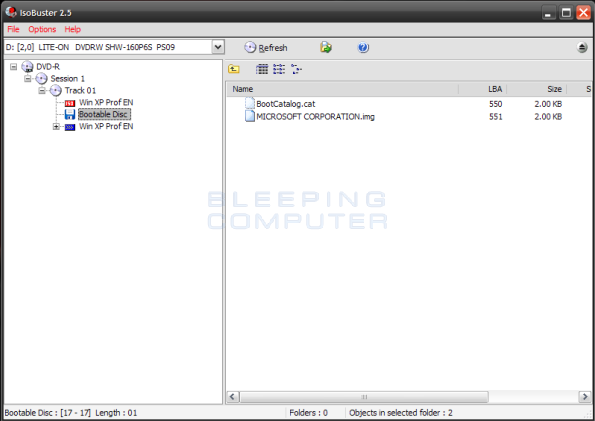
In the left hand pane you should select Bootable Disc. Click once on this Bootable Disc option, so it is selected, and you will now see a file called Microsoft Corporation.img in the right hand panel as shown in the image below.

Bootable Disc contents

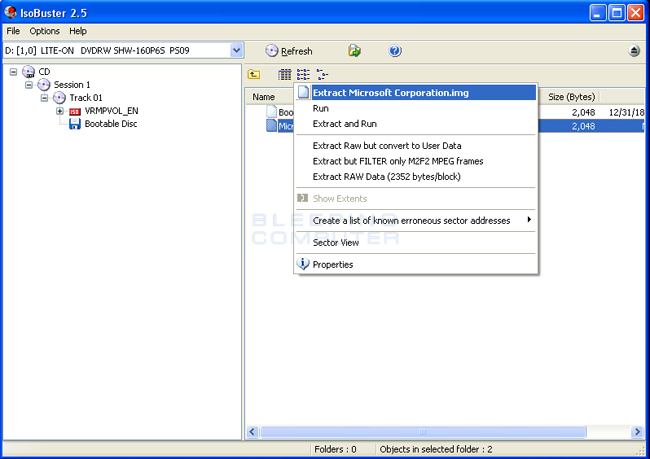
Now right-click on the MICROSOFT CORPORATION.img file and select the extract MICROSOFT CORPORATION.img option as shown in the image below.

Extract bootable image from Windows XP CD

When it prompts you for the location where you would like to extract the file, save it to the folder you copied the contents of your XP CD earlier in the guide. If you are following the guide step-by-step, this folder will be C:\XPCD.

How to slipstream Windows Service Pack 3

Now that we have extracted the boot image we need to slipstream the service pack over the Windows files you previously copied into the C:\XPCD folder. Please make sure you have downloaded the network installation version Windows XP Service Pack 3 before continuing as we will need it during this step. When downloading the service pack, please download the files to the root directory of your C: drive.

Once the service pack is downloaded, you can slipstream the service pack using two methods. The first method is to use the command line and the second is to use the nLite program. The command line method will probably be a bit easier if you are comfortable with the Windows command prompt. Otherwise, use the nLite method described below.

Using the Command Line to slipstream the service pack:

Click on the Start Menu and then select Run. Then type command into the Open: field. Finally, click on the OK button. You will now be at a command prompt where you should type the following bolded lines. After each line, press enter on your keyboard as shown in the figure below.

CD\
C:WindowsXP-KB936929-SP3-x86-ENU.exe /integrate:C:\XPCD

Slipstream Service Pack 2 command prompt

If you are using an OEM Windows XP CD you will receive the following error. This error means that you cannot use this type of CD to create a slipstreamed installation and will not be able to continue with this tutorial.

This Service Pack cannot be integrated into a destination that also has integrated Software Updates.

Now that you are done slipstreaming the service pack using the command line. You should now skip to the section detailing how to slipstream your SATA hard drive drivers. If you are not using a SATA drive you can skip ahead to learn how to burn the DVD.

Using nLite to slipstream the service pack:

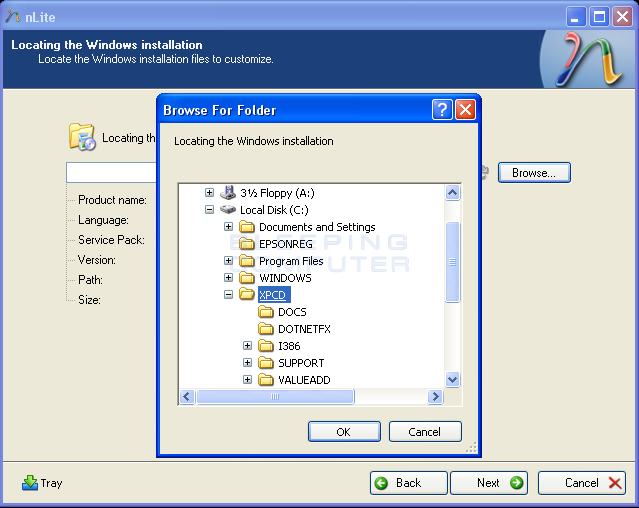
Download nLite and install the program. When the program starts, click on the Next button, and then at the next screen, select the Browse button to see a screen similar to the one below.

nLite locate windows install

Now select your Windows installation folder that we created at C:\XPCD and then click on the OK button. nLite will scan the directory and identify any previously installed Service Packs. When it has finished, click on the Next button. You will now be on a screen asking if there are any presets that you would like to use. Just click on the Next button again to continue.

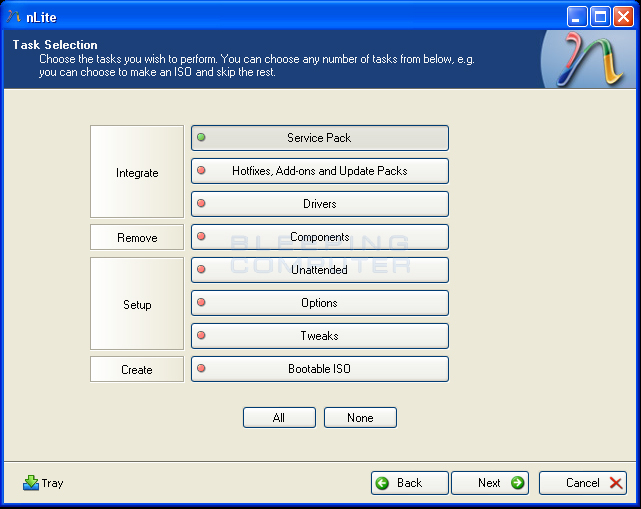
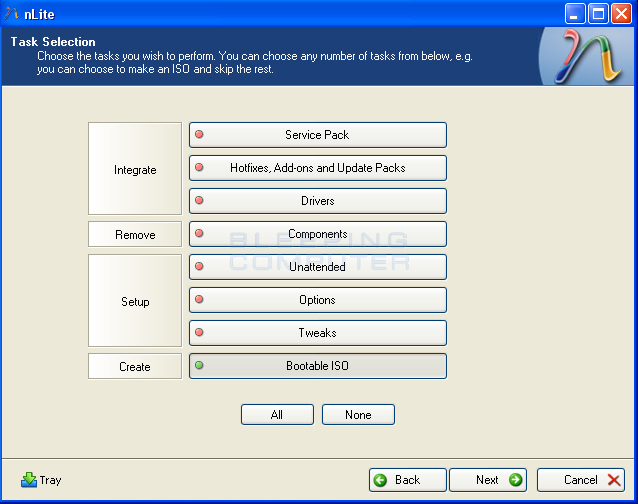
You will now be on the Task Selection screen. Simply click once on the Service Pack button so that the circle becomes green as shown in the image below.

Select service pack

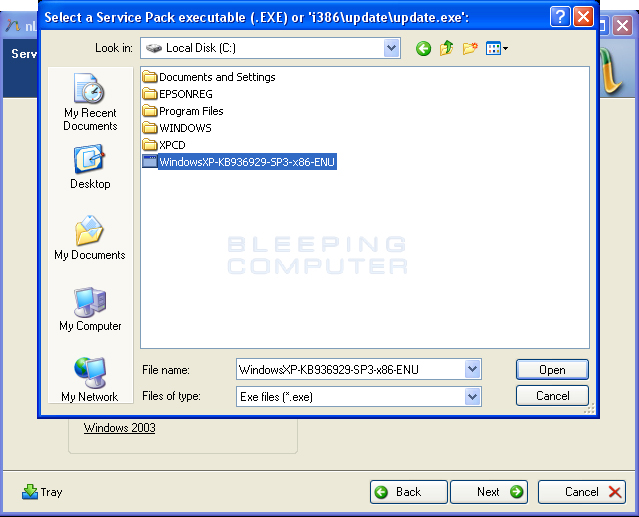
Now that it is selected, click on the Next button. You will now be prompted for the location of your service pack installation file that you downloaded earlier as shown in the image below.

Select service pack file

Browse to the service pack file and select it. Then click on the Open button. file. Once you click on the open button, nLite will automatically slipstream the service pack into your C:\XPCD folder. When it has finished, click on the Next button, and then at the next screen, click on the Finish button to close the program.

You should now continue to the section detailing how to slipstream your SATA hard drive drivers. If you are not using a SATA drive you can skip ahead to learn how to burn the DVD.

How To slipstream SATA Drivers Using nLite

If you have not already installed nLite, you will need to download and install the program first. Next, you will need to download your SATA drivers from your motherboard or computer manufacture's web site. In our example, I will be using VIA raid drivers from Biostar. Once the SATA drivers have been downloaded, you should extract them to a folder on your hard drive. In our example, we have extracted the drivers into the C:\SATA Driver folder.

Now that everything is prepared you should start the nLite program. When the program starts, click on the Next button, and then at the next screen, select the Browse button to see a screen similar to the one below.

nLite locate windows install

Now select your Windows installation folder that we created at C:\XPCD and then click on the OK button. nLite will scan the directory and identify any previously installed service packs. When it has finished, click on the Next button. You will now be on a screen asking if there are any presets that you would like to use. Just click on the Next button again to continue.

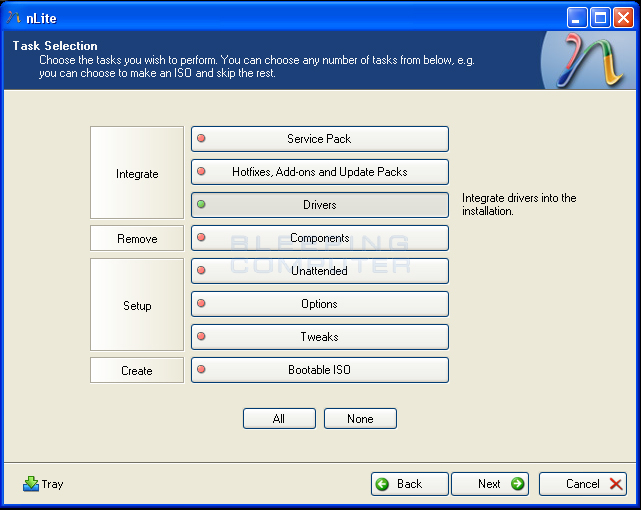
You will now be on the Task Selection screen. Simply click once on the Drivers button so that the circle becomes green as shown in the image below.

Select Drivers in the Task Selection screen

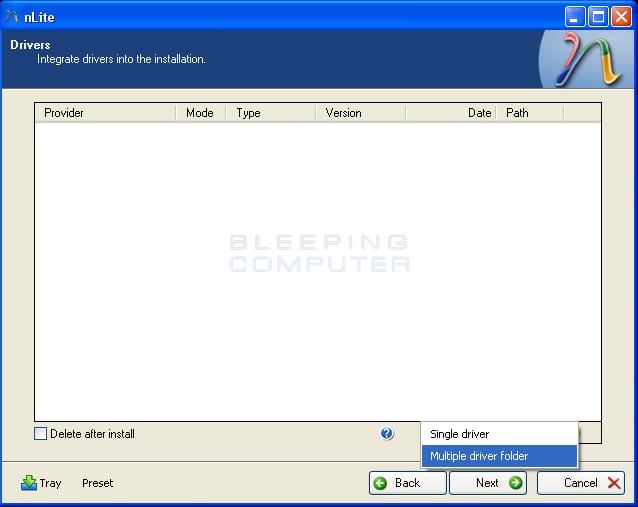
After selecting Drivers, you should click on the Next button. You will now be at the Drivers screen. You should now click on the Insert button and then select the Multiple driver folder option so you can include all of the drivers for your specific operating system.

Select multiple driver folder

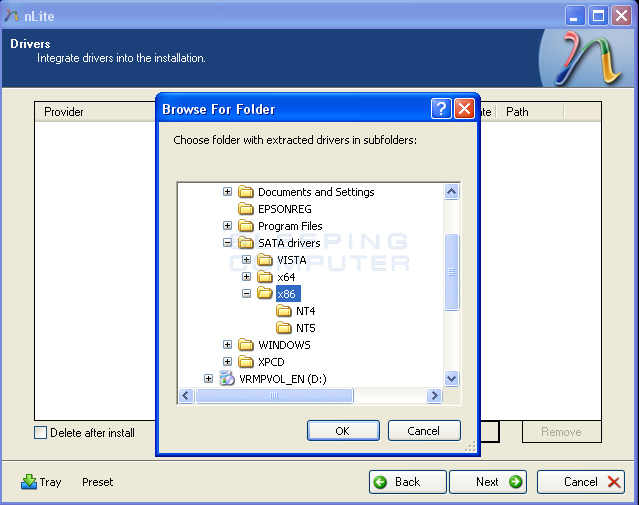
You will now be prompted for the folder where your extracted drivers are. You now want to browse to this folder, and when there, locate the correct folder for your Operating system. In our case it is the x86 directory since I am using 32bit Windows XP Pro.

You should now select the folder, and then press the OK button. nLite will now automatically install the drivers contained in both subdirectories. You will now see a screen showing the available drivers found in these folders. You should click the All button to select all drivers for your system and then press the OK button.

NOTE: If there are drivers for other versions of windows, for example Vista or 64 bit drivers, do not install them as it will cause file load errors. If you do select them, nLite will notify you of the problem.

When done selecting the correct drivers, click on the OK button.

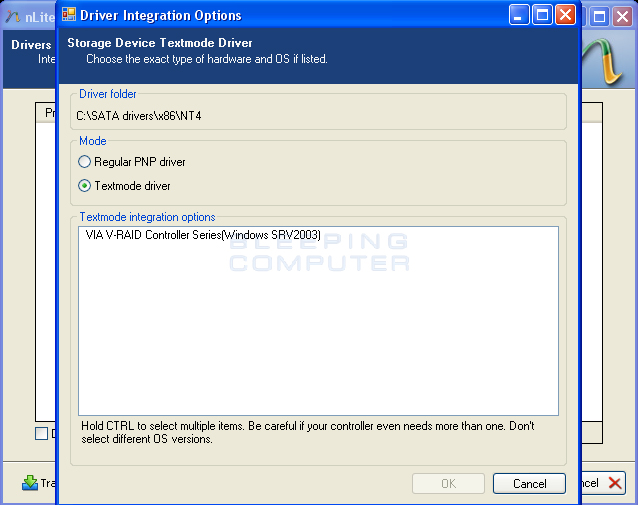
A new screen will appear asking what driver mode you would like to select. At this screen, you should select the Textmode Driver as shown in the image below.

Textmode driver

If multiple are listed in the Textmode integration options box, select the appropriate driver for your operating system. The OK button will now become available and you should click on it. Do this same routine for for each and every driver that you are installing.

After selecting Textmode Driver you will be at a page listing all the drivers that will be installed. You should click on the Next button and then click on the OK button when it asks if you want to start the process. Your SATA drivers will now be integrated into your Windows files folder. When the process has finished, click on the Next button and then the Finish button.

You are now ready to burn the Windows files to your a bootable DVD. If you will be using Nero to create this DVD, then you can continue to the next section. Otherwise, you can skip ahead to instructions on how to use the free nLite utility to create your DVD.

Burn a bootable CD or DVD Using Nero

Please note that older versions of NERO may not use the same steps as what are outlined in this guide. These steps were created for use with Nero 7 and above.

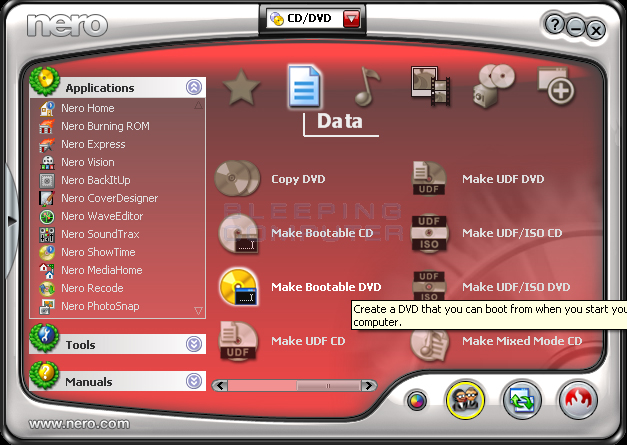
If you own Nero, then start the Nero Burning ROM program. Once started, if you do not see an option labeled Make Bootable DVD, as shown in the image below, you will need to enable the advanced user settings.

Nero Burning ROM

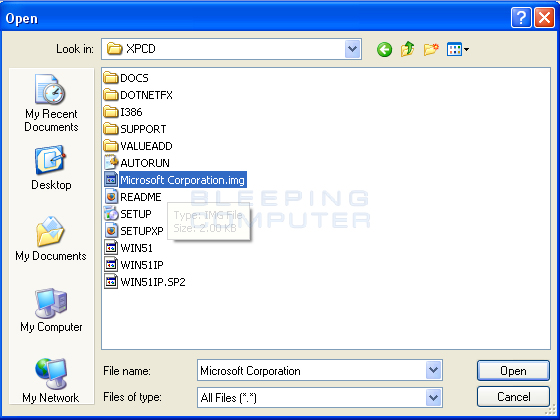
To start, select the Make Bootable DVD option. On the next screen you will be asked to select a Boot image. You should browse to the folder where you saved the Microsoft Boot image that you extracted using Isobuster in previous steps and select it. Please note, that by default Nero will be looking for a file with a .IMA extension, so you will need to change the file type to All Files (*.*) in order to select the MICROSOFT CORPORATION.img boot image. This is shown in the figure below.

Select Boot image in Nero

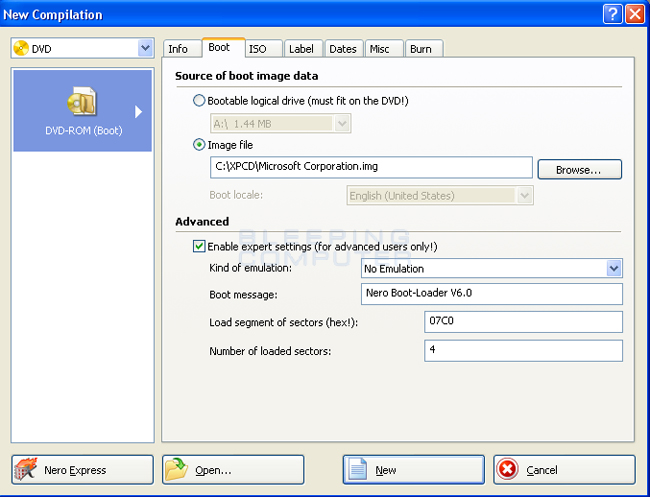
You should now click on the Boot tab and put a checkmark in Enable expert settings. Then change Kind of Emulation to No Emulation. Then change the Number of loaded sectors to 4. When done your screen should look similar to the image below.

Change Boot options in Nero

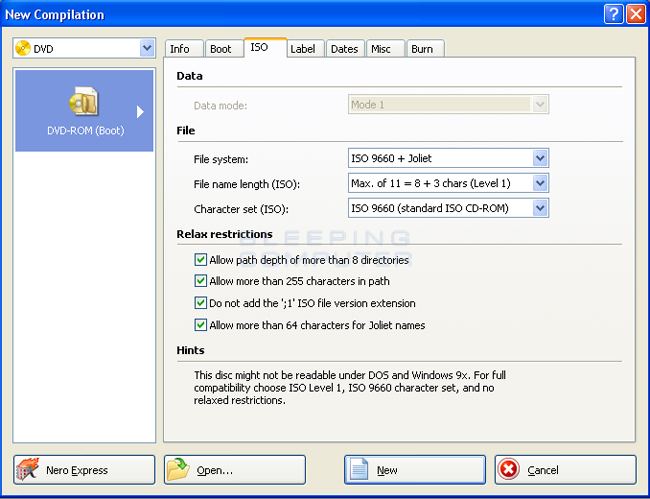
Under the ISO tab, you should not have to change any settings. Just click on the tab to make sure it is configured as shown in the image above. If you have an older version of Nero you will not have the option Do not add the ';1' ISO file version extension under the Relax restrictions category.

ISO Option tab in Nero

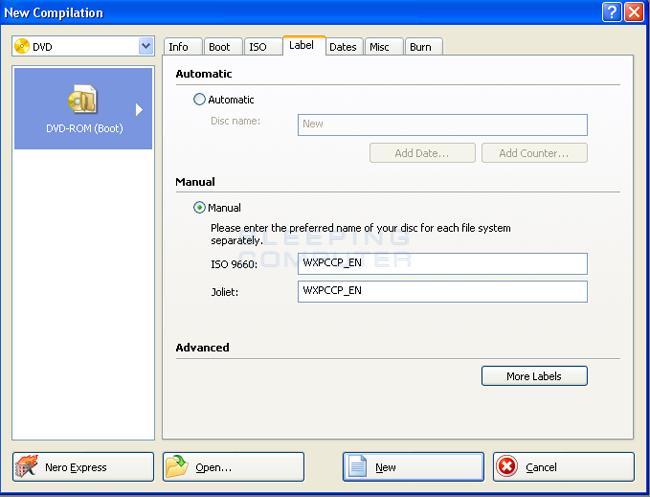
Now click on the Label tab. We recommend changing the labels on your completed CD or DVD so that they match your Windows CD. To do that Select Manual and then enter the labels into the ISO 9660 and Joilet fields. For Windows XP Pro you should enter WXPCCP_EN. For Windows XP Home you should enter WXHCCP_EN. An example of this is shown in the image below.

Label options in Nero

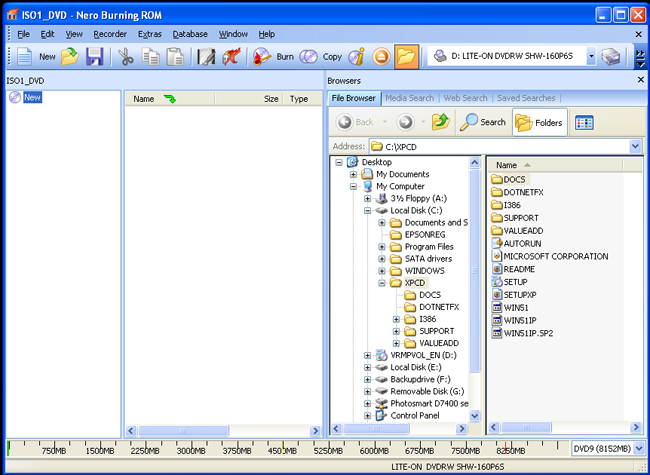
Now click on the New button to open the file browser as shown in the image below.

File browser window in Nero

In the right hand pane you will navigate to your slipstreamed location, C:\XPCD, and left-click once on it to select it. Then select all of the files in the right-hand pane and drag them into the left-hand pane. When this is completed, click on the Burn button in the top menu bar. Nero will create the bootable CD for you and you will now have a Slipstreamed Windows XP SP3 CD or DVD!

Burn a bootable CD or DVD using nLite

If you have not already installed nLite, you will need to download and install the program first and then start it.When the program starts, click on the Next button, and then at the next screen, select the Browse button to see a screen similar to the one below.

nLite locate windows install

Now select your Windows installation folder that we created at C:\XPCD and then click on the OK button. nLite will scan the directory and identify any previously installed Service Packs. When it has finished, click on the Next button. You will now be on a screen asking if there are any presets that you would like to use. Just click on the Next button again to continue.

You will now be on the Task Selection screen.

Select Bootable ISO

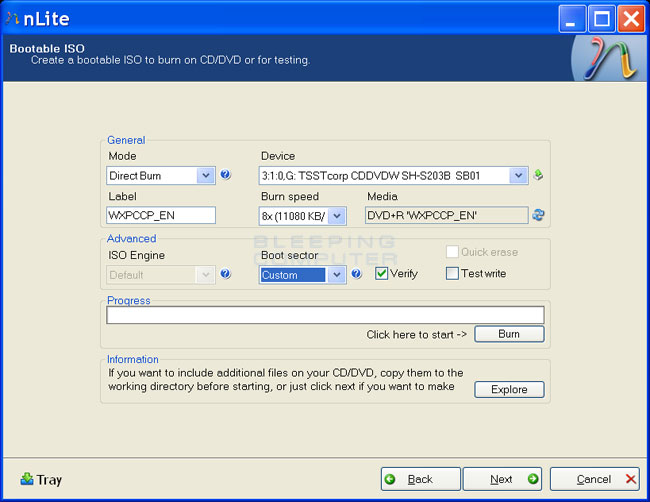
On this screen select the Bootable ISO option as shown in the image above and then click on the Next button.You will now be at the Bootable ISO screen that will look similar to the image below.

nLite Bootable ISO screen

If the screen above does not look exactly like what you see on your computer, do not be concerned as we need to make some changes first. First change the Mode option to Direct Burn. Then, for the Label field we recommend using the same label that was on your original Windows CD. For Windows XP Pro you should enter WXPCCP_EN into the Label field. For Windows XP Home you should enter WXHCCP_EN into the label field. Next, make sure your CD/DVD burner is selected in the Device menu. Last, but not least, change the Burn Speed to 8X in order to get a reliable burn.

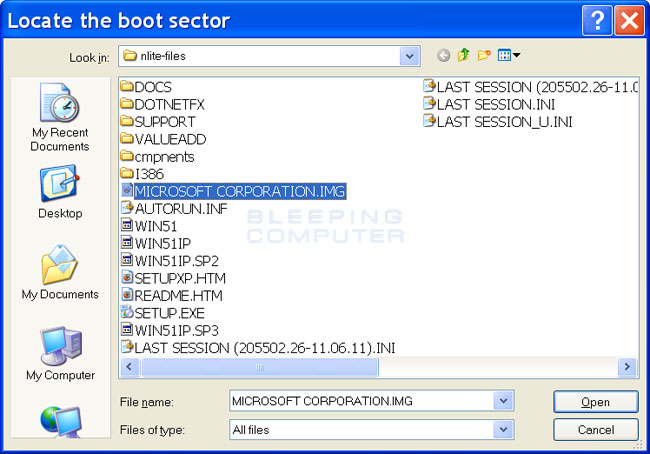
When you have finished configuring these settings, we need to specify our boot image. To do that, change Boot Sector to custom and a window will open asking you to locate your boot sector. You should browse to the folder where you saved the Microsoft Boot image that you extracted using Isobuster in previous steps and select it. Please note, that by default nLite will be looking for .bin or .dat files, so you will need to change Files of type to All Files. Once you do that you will be able to select the MICROSOFT CORPORATION.img boot image as shown in the image below.

Select boot image in nLite

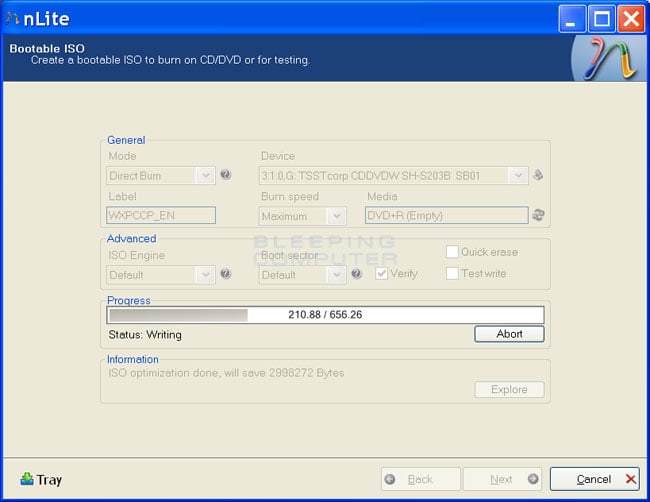
Once you have changed all of your settings and selected your boot image, we are ready to create the Windows installation media. To start this process, click on the Burn button. A confirmation prompt will appear asking if you are sure you want to burn the content to the media. You should click on the Yes button to start the process. nLite will now start preparing the content that will be copied to your media. This may take some time, so please be patient. When it has finished preparing the files, nLite will start writing them to your media as shown in the image below.

Burning your Windows CD with nLite

Please be patient while the files are written to your media. When it has finished, you will see a message stating the written files were verified successfully. You can then click on the Next button and then click on the Finish button to close nLite.

You now have a Slipstreamed SP3 CD or DVD!

Conclusion

Now that you have learned how to make a bootable Windows installation disc you can make an install or reinstall process much quicker and secure. Using a disk like this you can now install Windows XP and be at a high patch level so that your freshly installed operating system is less vulnerable to malware and hackers. This also enables you to go to locations where there is not a lot of bandwidth and install Windows with all of the latest service packs installed so you do not have to wait for a long time while the service pack downloads. If you have any questions regarding this process, or tutorial, please feel free to ask us in the Windows XP forum.

How to install and use the Windows XP Recovery Console

Table of Contents

  1. What is the Recovery Console?
  2. How to install the Recovery Console to your hard drive
  3. How to start the Recovery Console
  4. Remove the prompting of a password
  5. How to use the Recovery Console
  6. Deleting the Recovery Console

What is the Recovery Console?

The Recovery Console is a special boot up method that can be used to help fix problems that are preventing your Windows installation from properly booting up into Windows. This method allows you to access the files, format drives, disable and enable services, and other tasks from a console prompt while the operating system is not loaded. It is suggested that the Recovery Console is to only be used only after Safe mode and the other standard startup options do not work. I feel that the Recovery Console is also useful in other situations such as removing malware files that start in both Safe mode and Standard Mode and thus not allowing you to delete the infection.

This tutorial will guide you through the installation of the Recovery Console and how to use it. For those who are familiar with DOS or the command prompt, you will find the Recovery Console to be very familiar. For those who are not comfortable with this type of environment, I suggest you read through this primer in order to get familiar with this type of interface:

Introduction to the Windows Command Prompt

How to install the Recovery Console to your hard drive

I recommend that you install the Recovery Console directly onto your computer so that if you need it in the future, it is readily available. The Recovery Console only takes up approximately 7 megabytes so there is no reason why you should not have it installed in case you need it.

To install the Recovery Console on your hard drive, follow these steps:

  1. Insert the Windows XP CD into your CD-ROM drive.

  2. Click the Start button.

  3. Click the Run menu option.

  4. In the Open: field type X:\i386\winnt32.exe /cmdcons , where X is the drive letter for your CD reader, and press the OK button. An image of this step can be found below:


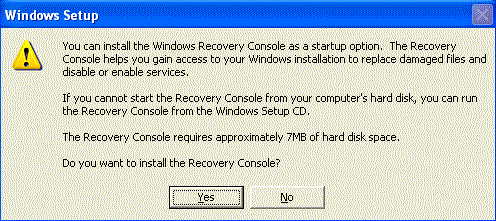
  5. After pressing the OK button a setup window will appear similar to the one below.


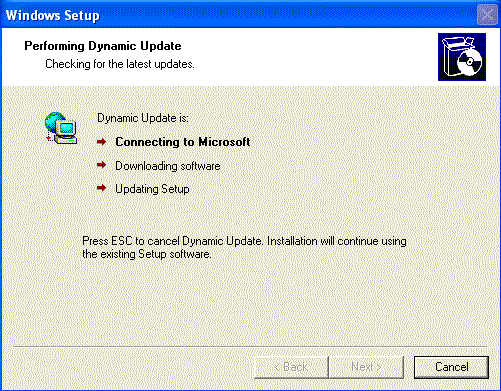
    Simply press the Yes button to continue with the installation of the Recovery Console. The setup program will then attempt to do a Dynamic Update to make sure you have the latest files as shown below.


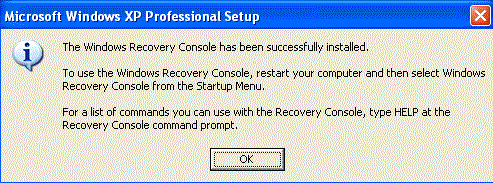
    Simply allow it to continue and then when it is finished, you will be presented with a screen similar to the one below telling you so.


  6. Press the OK button and remove the CD from your computer.

Now when you start your computer you will have an option to start the Recovery Console.

How to start the Recovery Console

To start the Recovery Console when it is installed on your hard drive you would do the following:

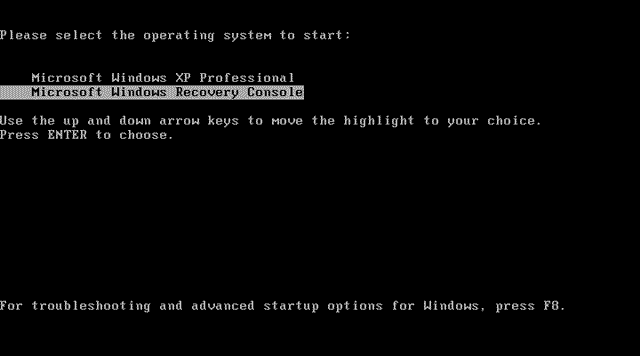
  1. Reboot your computer and as Windows starts it will present you with your startup options as shown in the figure below.


  2. With the arrows keys on your keyboard select the option listed as Microsoft Windows Recovery Console and press the enter key on your keyboard.

  3. The Recovery Console will start and ask you which Windows installation you would like to log on to. If you have multiple Windows installations, it will list each one, and you would enter the number associated with the installation you would like to work on and press enter. If you have just one Windows installation, type 1 and press enter.

  4. It will then prompt you for the Administrator's password. If there is no password, simply press enter. Otherwise type in the password and then press enter. If you do not know your password then see this.

  5. If you entered the correct password you will now be presented with a C:\Windows> prompt and you can start using the Recovery Console.

  6. Proceed to How to use the Recovery Console.

To start the Recovery Console directly from the Windows XP CD you would do the following:

  1. Insert the Windows XP cd in your computer.

  2. Restart your computer so you are booting off of the CD.

  3. When the Welcome to Setup screen appears, press the R button on your keyboard to start the Recovery Console.

  4. The Recovery Console will start and ask you which Windows installation you would like to log on to. If you have multiple Windows installations, it will list each one, and you would enter the number associated with the installation you would like to work on and press enter. If you have just one Windows installation, type 1 and press enter.

  5. It will then prompt you for the Administrator's password. If there is no password, simply press enter. Otherwise type in the password and then press enter. If you do not know your password then see this.

  6. If you entered the correct password you will now be presented with a C:\Windows> prompt and you can start using the Recovery Console.

  7. Proceed to How to use the Recovery Console.


Remove the prompting of a password

When the Recovery Console starts it will ask for your Administrator password before continuing. In many cases when you have XP pre installed on your computer the Recovery Console will not recognize your Administrator's password. In these situations it is possible to edit a registry setting so that the Recovery Console does not ask for a password. This setting works on both Windows XP Home and Pro editions.

To change this setting do the following:

  1. Click on the Start button.

  2. Click on the Run option

  3. Type regedit.exe in the open field and press the OK button.

  4. Navigate to the HKEY_LOCAL_MACHINE\SOFTWARE\Microsoft\WindowsNT\CurrentVersion\Setup\RecoveryConsole

  5. Change the value of SecurityLevel value to 1

  6. Close regedit

  7. Reboot your computer.

Now the Recovery Console will no longer ask for a password.


How to use the Recovery Console

Though the Recovery Console looks similar to a standard command prompt it is not the same. Certain commands work, while others do not, and there are new commands available to you. There is no graphical interface, and all commands must be entered by typing them into the console prompt with your keyboard and pressing enter. This may be confusing for those who are not familiar with this type of interface, but after doing a few commands it does becomes easier.

The following is a list of the available commands that you can use in the Recovery Console. When using the recovery console you can type help followed by the command to see a more detailed explanation. For example: help attrib.

Command
Description


Attrib Changes attributes on a file or directory.
Batch
Executes commands that you specify in the text file, Inputfile. Outputfile holds the output of the commands. If you omit the Outputfile parameter, output appears on the screen.
Bootcfg Allows you to modify the Boot.ini file for boot configuration and recovery.
CD (Chdir) Change directory. Operates only in the system directories of the current Windows installation, removable media, the root directory of any hard disk partition, or the local installation sources.
Chkdsk Checks a disk for drive problems or errors. The /p switch runs Chkdsk even if the drive is not flagged as dirty. The /r switch locates bad sectors and recovers readable information. This switch implies /p. Chkdsk requires Autochk. Chkdsk automatically looks for Autochk.exe in the startup folder. If Chkdsk cannot find the file in the startup folder, it looks for the Windows 2000 Setup CD-ROM. If Chkdsk cannot find the installation CD-ROM, Chkdsk prompts the user for the location of Autochk.exe.
Cls Clears the screen
Copy Copies one file to a target location. By default, the target cannot be removable media, and you cannot use wildcard characters. Copying a compressed file from the Windows 2000 Setup CD-ROM automatically decompresses the file.
Del (Delete) Deletes one file. Operates within the system directories of the current Windows installation, removable media, the root directory of any hard disk partition, or the local installation sources. By default, you cannot use wildcard characters.
Dir Displays a list of all files, including hidden and system files.
Disable Disables a Windows system service or driver. The variable service_or_driver is the name of the service or driver that you want to disable. When you use this command to disable a service, the command displays the service's original startup type before it changes the type to SERVICE_DISABLED. Note the original startup type so that you can use the enable command to restart the service.
Diskpart Manages partitions on hard disk volumes. The /add option creates a new partition. The /delete option deletes an existing partition. The variable device is the device name for a new partition (such as \device\harddisk0). The variable drive is the drive letter for a partition that you are deleting (for example, D). Partition is the partition-based name for a partition that you are deleting, (for example: \device\harddisk0\partition1) and can be used instead of the drive variable. The variable size is the size, in megabytes, of a new partition.
Enable Enables a Windows system service or driver. The variable service_or_driver is the name of the service or driver that you want to enable, and start_type is the startup type for an enabled service. The startup type uses one of the following formats:
SERVICE_BOOT_START
SERVICE_SYSTEM_START
SERVICE_AUTO_START
SERVICE_DEMAND_START
Exit Quits the Recovery Console, and then restarts the computer.
Expand Expands a compressed file. The variable source is the file that you want to expand. By default, you cannot use wildcard characters. The variable destination is the directory for the new file. By default, the destination cannot be removable media and cannot be read-only. You can use the attrib command to remove the read-only attribute from the destination directory. The option /f:filespec is required if the source contains more than one file. This option permits wildcard characters. The /y switch disables the overwrite confirmation prompt. The /d switch specifies that the files will not be expanded and displays a directory of the files in the source.
Fixboot Writes a new startup sector on the system partition
Fixmbr Repairs the startup partition's master boot code. The variable device is an optional name that specifies the device that requires a new Master Boot Record. Omit this variable when the target is the startup device.
Format Formats a disk. The /q switch performs a quick format. The /fs switch specifies the file system.
Help If you do not use the command variable to specify a command, help lists all the commands that the Recovery Console supports.
Listsvc Displays all available services and drivers on the computer.
Logon Displays detected installations of Windows and requests the local Administrator password for those installations. Use this command to move to another installation or subdirectory.
Map Displays currently active device mappings. Include the arc option to specify the use of Advanced RISC Computing (ARC) paths (the format for Boot.ini) instead of Windows device paths.
MD (Mkdir) Creates a directory. Operates only within the system directories of the current Windows installation, removable media, the root directory of any hard disk partition, or the local installation sources.
More/Type Displays the specified text file on screen. More will display a text file one page at a time, while Type displays the entire text file at once.
Rd (Rmdir) Removes a directory. Operates only within the system directories of the current Windows installation, removable media, the root directory of any hard disk partition, or the local installation sources.
Ren (Rename) Rename a file or directory. Operates only within the system directories of the current Windows installation, removable media, the root directory of any hard disk partition, or the local installation sources. You cannot specify a new drive or path as the target.
Set Displays and sets the Recovery Console environment variables.
Systemroot Sets the current directory to %SystemRoot%.


Deleting the Recovery Console

Warning: To remove the Recovery Console you need to modify the Boot.ini file. Modifying this file incorrectly can prevent your computer from starting properly. Please only attempt this step if you feel comfortable doing this.

To remove the Recovery Console from your hard drive follow these steps:

  1. Double-click on My Computer and then double-click on the drive you installed the Recovery Console (usually the C: drive).

  2. Click on the Tools menu and select Folder Options.

  3. Click on the View tab.

  4. Select Show hidden files and folders and uncheck Hide protected operating system files.

  5. Press the OK button.

  6. Now at the root folder delete the Cmdcons folder and the Cmldr file.

  7. At the root folder, right-click the Boot.ini file, and then click Properties.

  8. Click to clear the Read-only check box, and then click the OK button.

  9. Click on Start, then Run and type Notepad.exe c:\boot.ini in the Open: field and press the OK button.

  10. Remove the entry for the Recovery Console. It will look similar to this:
    C:\cmdcons\bootsect.dat="Microsoft Windows Recovery Console" /cmdcons

    Make sure you only delete that one entry.

  11. When you are done, close the notepad and save when it asks.

  12. Right click again on the boot.ini file and select Properties.

  13. Put a checkmark back in the Read-only checkbox and then press the OK button.

The recovery console should now be removed from your system.