Monday, October 24, 2011

How to Reinstall Windows Without Having to Reactivate


Every time you format and reinstall your PC, you have to activate Windows again, which can sometimes be a pain once you’ve done it too many times. Here’s how to backup and then restore the activation status.
Note: we aren’t going to cover how to reinstall Windows, since you should know how to do that already. This article just covers backing up and restoring your activation.

Introduction

Advanced Token Manager easily allows you to back up all the information that Windows uses to check the validity of you copy of Windows. Collectively called a Token, this information can be backed up to an external storage medium. Once you have formatted you can import the Token and your Windows will be genuine again.

Backing Up

Once you have grabbed your copy of Advanced Token Manager from here, you can extract the zip file and then run the executable file.

When the advanced token manager launches, you will see the BIG Backup Activation button. Click it to begin backing up your token. All the “BBB” characters are just masking the real product key, don’t worry that is not your real product key.

Once you click the Backup Activation button, we expect that 99% of you will be prompted with this message. Unless some of you are ultra geeky and using KMS at home, you will get this message. You can just click yes to continue.

Once activation is finished being backed up, you will see a folder called “Windows Activation Backup” in the same folder that you launched the token manager from, this contains the backup.

Now we have reloaded Windows on the same PC, as you can see it is not activated.

Now I can run the advanced token manager, this time it will say Restore instead of Backup.

Once you click Restore you will be prompted to make sure you want to do this, click the next button to start the restoration.

Once it has completed a success message will appear.

If you go check your validity in the System Settings, you should have the genuine badge back.

The advanced token manager can also support Office Activation and works on all versions of Windows 7.

    Tuesday, October 18, 2011

    Easily Backup & Import Your Wireless Network Settings in Windows 7


    One of the biggest annoyances when setting up wireless networks is remembering the security key and typing it correctly so that you can connect all laptops and netbooks to it. Windows 7 makes it easy to export your wireless settings from one machine to another.
    The backup of the wireless networks settings can be easily done from Windows 7, and the settings can be saved to a USB stick, and then the settings can be imported on laptops & netbooks running Windows XP, Windows Vista and Windows 7.
    How to Save Your Wireless Network Settings
    First, open the Network and Sharing Center. You can do this by clicking on the wireless network symbol from the taskbar and clicking on ‘Open Network and Sharing Center’. An alternative would be to go to Control Panel -> Network and Internet -> Network and Sharing Center.

    On the left side of the Network and Sharing Center window, click on the ‘Manage wireless networks’ link.

    In the Manage Wireless Networks window you will see a list with all wireless networks to which you have connected in the past. Double click on the one which interests you.

    Now you will see a window with all its properties. In order to save them on a flash drive, click on the bottom link which says ‘Copy this network profile to a USD flash drive’.

    The Copy Network Settings wizard will now start. Insert the USB flash drive, wait until it is detected and the Next button is no longer gray.

    The copying process will take only a few seconds. When done, click on Close.

    If you will look on your USB flash drive you will see a setupSNK.exe file and a SMRTNTKY folder. Make sure you don’t delete them from the memory stick.


    How to Import Your Wireless Network Settings
    First, plug in the USB flash drive in the laptop where you want to import the settings and run the setupSNK.exe file. When the Wireless Network Setup Wizard launches, click on Yes.

    The settings will be imported in seconds and when receiving the notification below, click on OK and start using the wireless network.


    This procedure is very helpful for both public and hidden wireless networks. Instead of typing long authentication keys, it is easier to plug in an USB memory stick and run a setup file. If you have other useful tricks like this one, don’t hesitate to share them using the comments form below.

    Enable Mapping to \\Hostname\C$ Share on Windows 7 or Vista


    Just about everybody knows about the hidden administrator C$ share that is always built into Windows file sharing, but you might have wondered why you can’t use that in Windows 7 or Vista.
    The reason this doesn’t work is because of UAC (User Account Control) that Vista is (in)famous for. By default Vista doesn’t allow UAC elevation over the network with a local user account.
    There’s a registry key that we can use to change this behavior to work the same as Windows XP. This will make your computer less secure, and I can’t recommend that you do this… but it’s also good to understand how Windows works.
    Manual Registry Hack
    Open regedit.exe through the start menu search or run box, and then navigate down to the following key, creating a new key if it doesn’t exist.
    HKEY_LOCAL_MACHINE\SOFTWARE\Microsoft\Windows\CurrentVersion\Policies\System

    On the right-hand side, add a new 32-bit DWORD value named LocalAccountTokenFilterPolicy and set the value to 1.
    To remove this tweak you can set the value to 0 or just delete the key.
    At this point you can map to the C$ share and also perform some other administrative tasks remotely. Note that you will need to enable file sharing in the network and sharing center, and make sure that your firewall settings will allow sharing.

      How to Remotely Use A PC’s DVD Drive Across Your Network


      If you own a netbook you will know what we mean when we say sacrificing a DVD drive can sometimes be a pain. Net burner sets out to solve this problem by letting you use the drive on another pc remotely.
      Note: Keep in mind that you will have to install Net Burner on both the PC that hosts the drive, as well as the PC that you are connecting from.
      Head over to the paragon website, and fill out a some quick information so that you can receive your download link via email.
      Soon after you hit the submit button, you will receive an email with your details to log into the paragon download section. Follow the instructions in the email to quickly download your free copy of Net Burner.


      The installation process is a next, next, finish matter and should take no longer than 30 Seconds to complete. When you get to the installation type the machine that has the optical drive only needs the Server components.

      The PC that you are connecting from only requires the client components.

      Once it is open the program on the PC with no drive, it should search your network for available drives.

      Click next and that’s all there is to it. As you can see it will add the drive as if it is locally attached.

      This will work on Windows XP, 7 and 8 as well as Server 2008

      Monday, October 17, 2011

      How to Make a Windows 7 or Vista Repair Disk If You Don’t Have One


      How to Make a Windows 7 or Vista Repair Disk If You Don’t Have One

      If you bought your computer with Windows 7 or Vista pre-installed, you most likely don’t 
      have a regular Windows repair disc. What you do have is some crappy disc from the 
      manufacturer that totally wipes your computer back to factory settings. What if you just 
      want to run Startup repair off the install cd without losing all your settings?
      It turns out that Microsoft is going to let you create your own Windows 7 or Vista repair 
      disc when Service Pack 1 comes out in a month or so. If you can’t wait that long, the nice 
      people over at Neosmart have created their own Windows 7 or Vista Repair Disc 
      available for downloadUpdate: it looks like the discs are no longer free.
      The file is an ISO image file… if you are familiar then skip to the link, otherwise we’ve also got instructions on how to create a CD from the ISO file.
      Burn Windows 7 or Vista Recovery Disc ISO to CD
      You may already have a tool to do this such as Nero, but the best tool available for burning 
      ISOs is ImgBurn, a freeware utility that does nothing else but burn ISO images, and it does it well.
      Open up ImgBurn, and then click on the “Browse for a file” button, selecting the file you 
      downloaded from Neosmart.

      Put a blank CD into the drive, and then click the big Write button.


      That’s about all there is to it… you now have your very own Vista Recovery CD.

        How to Create a System Image in Windows 7


        The new backup utilities in Windows 7 are actually pretty impressive and creating an image will be possible in all versions. Today we take a look at creating a backup image of your machine without the need for a third party utility like Ghost or True Image.
        You just just finished installing a fresh copy of Windows 7 on your computer and have it set up to your liking. One of the first things you should do now is create an image of the disc so in the event of a crash you will be able to restore it to its current state. An image is an exact copy of everything on the drive and will restore it back to its current state. It’s probably best to create an image when everything is clean and organized on your system. This will make the image file smaller and allows you to restore the system with a smooth running set up.
        Creating an Image in Windows 7
        Click on Start go to Getting Started and then select Back up your files.

        Next click on the Create a system image hyperlink.

        Decide where you want to save the image. You can choose an external drive, burn to multiple DVD’s, or store it on a network location.

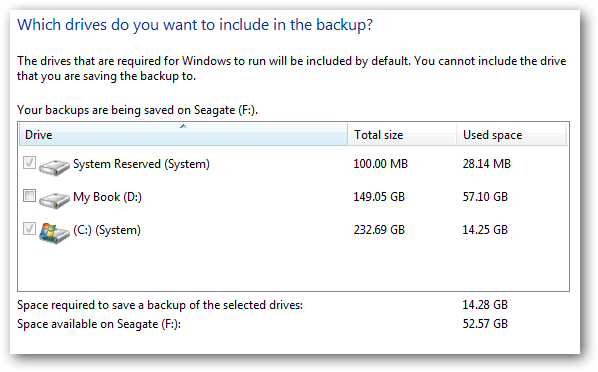
        You can include other drives if you want as well but remember that will add to the size of the final image.

        At the confirmation screen notice the amount of space the image may take. If something doesn’t look right you can still go back from this point and make adjustments.

        A progress meter is displayed while the images is created and backed up. In this example a disk of about 15GB in size took under 20 minutes backed up to an external drive. Times will vary depending on your system and where you’re backing it up to.

        After the process is complete you get the option to create a system repair disc which you should do and make sure to save it in a secure location.

        When it comes time to restore the image, you will be able to use the System Recovery Options to get the system back.


        Image in Windows Vista
        Vista Ultimate, Business, and Enterprise allow you to create an image, but Vista Home and Home Premium users do not have the option. The process is similar in Vista, type backup into the search bar and click on Backup and Restore Center.

        Then click on Back up computer and the wizard will guide you through the process.

        Conclusion
        This is a extremely handy feature and it actually works well. It is also nice that the feature will be available in each edition of Windows 7 instead of just the higher end versions. This will save you some money in not having to spend $50-80 on a third party utility. You should create an image when everything is fresh on your system so the image is not too large and the essentials of you machine can quickly be restored. For instance I created an image after a fresh install and putting Office 2007 and a few of my most commonly used programs. The entire image came in around 10 GB which is easily stored on an external drive or a few DVD’s.

          Create a System Repair Disc in Windows 7


          The new version of Windows seems to be a lot for stable than previous releases, however 
          you never know when a malfunction might occur. Today we take a look at an option in 
          Windows 7 that lets you create a System Repair disc in case you need to boot from it to
           recover your OS.
          Create System Repair Disc
          Type system repair disc into the search box in the Start menu.

          The dialog box opens where you select the right drive and click Create disc. A CD will be 
          fine as it only takes up 142MB of space.

          Using the Disc
          If you are having problems with your machine just pop in the recovery disc and boot from 
          it and enter into Windows Setup [EMS Enabled].

          After it boots up you can access recovery tools or restore the computer back to a system 

          Now you can choose from different recovery options to help you get your machine back up 
          and running.

          You never know when an Operating System disaster might occur, but having a System 
          Recovery Disc to boot from should be part of your backup and recovery toolbox in case it 
          does.

            How to Regain Access to Your Administrator Account in Windows Vista using System Restore


            Probably one of the most frustrating things that can happen to you in Windows is not being able to logon to your user account because you changed the password and then forgot it or because you accidentally deleted the account. If you don’t know the password for any other Administrator account, you have a big problem!
            Most people immediately begin searching for a way to crack the Administrator account password using some free tools or hacks off forums. However, it’s nearly impossible to crack a password on Windows Vista with the high level of encryption.
            Yet there is a way to get back into an account without having to crack the password. It’s by using the System Restore feature built into Windows.
            IMPORTANT NOTE: This only works in cases where you changed your password to something new and then forgot it or deleted a user account by accident. In order for this to work, there must be a System Restore point at which a logon was successful for the problem account. Also, this is not a problem if you are in a domain environment because the Domain Administrator can always reset your password.
            First Step – Boot to the Windows Vista DVD
            The first thing you’ll need to do is make sure you have your Windows Vista DVD or a repair disc. Insert the disc and then restart the computer. When asked to “Press any key to boot from CD or DVD”, go ahead and press any key.

            Click Next until you get to the screen that has the option “Repair your computer”, select the operating system you want to repair and then click Next.

            Note: Before reaching this screen, you may have to set preferences for the language to install, time and currency format, and the keyboard or input method.
            In the System Recovery Options dialog, choose System Restore from the list and then click Next.

            Now you need to choose the system restore from the list. You want to choose a restore point that will return the computer to a state where the logon was successful and that was using the old password.

            Then click Next to confirm the disks, then Finish to confirm the restore point and finally Yes in the warning window to begin the restore.

            Important Note: After you use the System Restore feature, you have to reinstall any programs or updates that were done on the system after that restore point. You will not lose any personal documents; however, you may have to reinstall programs. You might also have to reset some personal settings.
            When the restore is complete, click on Restart to restart the computer. Click Close to confirm that the restore was successful.
            You can now try to logon using the older password (in the case where you had reset a password on an user account and then forgot it) or using the normal password (in the case where the account was deleted by accident).
            If you have simply forgotten your password, then this method will not work and there are some possible methods you could try to reset your Administrator password, but it’s tough and costly. All the best!